GC Initial PC Technical Manual/Technische Arbeitsanleitung Manuel Technique/Manuale tecnico
←
→
Transkription von Seiteninhalten
Wenn Ihr Browser die Seite nicht korrekt rendert, bitte, lesen Sie den Inhalt der Seite unten
PC
                                  STARTER PACKAGE   IN VIVO / IN SITU SET

                   Technical Manual/Technische Arbeitsanleitung
                             Manuel Technique/Manuale tecnico

                                        GC Initial PC

REVISED MAY 2008
True-to-nature …
  Naturidentisch …

Proche du naturel …
  Estetica naturale …

By means of a simple standardized build up technique, lifelike aesthetics can be reproduced …
  Mit einer einfachen, standardisierten Schichttechnik können naturidentische Anforderungen erfüllt werden …

Quelle que soit la technique de montage, une remarquable esthétique peut être reproduite …
  Grazie ad una semplice tecnica di stratificazione standardizzata, è possibile riprodurre un'estetica naturale …
1   2

3   4

        3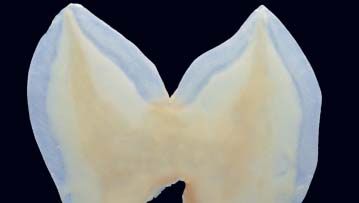
4
GB
PC

                                   D
               Technical Manual
     Technische Arbeitsanleitung
                   GC Initial PC
Table of Contents
Inhaltsverzeichnis
Page
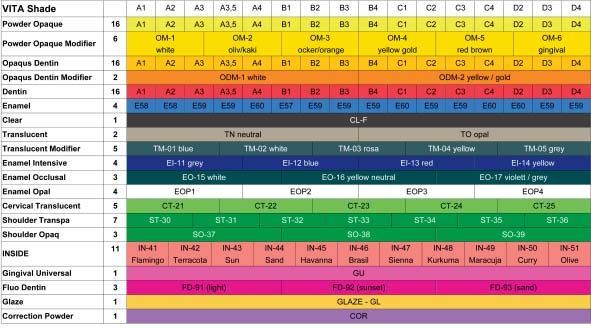
Colour Charts / Farbtabellen 7–8
Indication Charts for GC Initial PC Press Pellets / Verwendungstabelle der GC Initial PC Press Pellets 9 - 10
Opacities GC Initial PC / Opazitätsstufen GC Initial PC 11
Toothpreparation / Zahnpräparation 12
Waxing up and Investing / Wachsmodellation und Einbettung 13 - 18
Preheating and Injecting / Vorwärmen und Pressen 19 – 20
Pressing Programs for Various Calibrated Press Furnaces / Pressangaben für verschiedene kalibrierte Pressöfen 21
Devesting and Finishing / Ausbetten und Ausarbeiten 22 - 23
I. Staining Technique / Maltechnik 24 - 27
GC Initial PC Physical Properties / GC Initial PC Physikalische Eigenschaften 28
II. Layering Technique / Schichttechnik 29 - 32
GC Initial Colour Combination Chart / GC Initial Farbzuordnungstabelle 33 - 34
Photoshooting: Michael Brüsch - M.B. Dentaltechnik GmbH, Düsseldorf / GermanyColour Charts
Farbtabellen
LF
Vita® is a registered trademark of VITA Zahnfabrik H. Rauter GmbH & Co. KG, Bad Säckingen, Germany.
Vita® ist ein eingetragenes Warenzeichen der VITA Zahnfabrik H. Rauter GmbH & Co. KG, Bad Säckingen, Deutschland.
7Colour Charts
Farbtabellen
PC Press Pellets
Stains for MC/LF/PC
Indication for GC Initial INover stains
For staining of GC Initial PC restorations, 4 special stains are available: IOA (for A-shades), IOB (for B-shades), IOC (for C-shades), IOD (for D-shades).
Staining of GC Initial PC restorations, when Enamel press pellets are used. Characterization of Dentin press pellets before the Enamel layering.
Verwendung der GC Initial INover Malfarben
Für die Maltechnik bei GC Initial PC Restaurationen, stehen 4 spezielle Malfarben zur Verfügung : IOA (für A-Farben), IOB (für B-Farben), IOC (für C-Farben), IOD (für D-Farben).
Bemalung von GC Initial PC Restaurationen, wenn Schneide Pressrohlinge benützt werden. Individualisierung von Dentinrohlingen vor der Schneideschichtung.
8Indication Charts for GC Initial PC Press Pellets - Staining Technique
Verwendungstabelle für GC Initial PC Press Pellets - Maltechnik
GC Initial PC is suitable for all ceramic Inlays, Onlays (one faced, multi faced), Veneers and single Crowns
(front- and posterior).
Contra-Indication: Bridges, Parafunctions, Bruxismus, inadequate preparation.
GC Initial PC ist für vollkeramische Inlays, Onlays (ein- und mehrflächig) und Veneers sowie für Einzelkronen
(Front- und Seitenzahnbereich) geeignet.
Kontraindikation: Brücken, Parafunktionen, Bruxismus, unzureichende Präparation.
Characteristic / Inlay one faced / Inlay multi faced / Onlay / Crown / Veneer / Veneer
Charakteristik Inlay 1-flächig Inlay mehrflächig Onlay Krone - Schalentechnik
Veneer Enamel
VE-1 Translucent / Transluzent X X X X X
VE-2 Neutral / Neutral X X X X X
VE-3 Whitish / Weisslichtekst E X X X X X
Occlusal Enamel Light
OL-1 Translucent teeth / tekst D X X X X X
OL-2 Transluzenz im X X X X X
OL-3 Restzahnbestand X X X X X
OL-4 X X X X X
Occlusal Enamel Milky
OM-1 High opacity teeth / X X X X X
OM-2 Hohe Opazität im X X X X X
OM-3 Restzahnbestand X X X X X
OM-4 X X X X X
tekst E
Translucent
TD-1 Translucent Dentine 1tekst D X X X X X
TD-2 Translucent Dentine 2 X X X X X
TN Neutral X X X X X
TY Yellow X X X X X
9Indication Charts for GC Initial PC
Press Pellets – Layering Technique
Verwendungstabelle für
GC Initial PC Press Pellets -
Schichttechnik
Characteristic / Inlay one faced / Inlay multi faced / Onlay / Crown / Veneer / Veneer
Charakteristik Inlay 1-flächig Inlay mehrflächig Onlay Krone - Schalentechnik
Dentin Pellets acc. Vita® Shades / Dentinrohlinge in Vita® Farben
A1/A2/A3/A3.5/A4 Shades acc. natural teeth X X X X X
B1/B2/B3/B4 / Zuordnung nach dem X X X X X
C1/C2/C3/C4 Restzahnbestand X X X X X
D2/D3/D4 X X X X X
Bleached Shades
AO Dentine Pellets for bright - very bright X X X X X
AOO teeth - and bleached shades X X X X X
BO Dentinrohlinge für hellen - sehr hellen X X X X X
BOO Restzahnbestand - und "bleaching" Farben X X X X X
Opaque Pellets
Op-1 Pellets - with high X
Op-2 opacity (discolored dies) X
Op-3 Rohlinge mit sehr hoher X
Op-4 Opazität (Stark verfärbte Stümpfe) X
Op-5 X
10Opacities GC Initial PC
Opazitätsstufen GC Initial PC
Staining Technique Layering Technique
Maltechnik Schichttechnik
Shade / Farbe Opacity / Opazität -% Shade / Farbe Opacity / Opazität -%
Veneer Enamel Dentin Pellets
VE-1 Ca. 30% Translucent / Transluzent A1-A4 Ca. 75%
VE-2 Ca. 40% Semi Translucent / B1-B4
Halb Transluzent C1-C4
VE-3 Ca. 50% Whitish / Weisslich D2-D4
Occlusal Light Enamel Bleached Shades
OL-1 Ca. 40% Whitish / Weisslich
OL-2
tekst E Grayish / Gräulich AO Ca. 75%
AOO
OL-3 tekst D / Gelblich
Yellowish BO
OL-4 Reddish / Rötlich BOO
Occlusal Milky Enamel Opaque Pellets
OM-1 Ca. 50% Whitish / Weisslich Op-1 Ca. 85% Light Yellow
OM-2 Grayish / Gräulich Op-2 Pale Yellow
OM-3 Yellowish / Gelblich Op-3 Red Yellow
OM-4 Reddish / Rötlich Op-4 Olive / Kaki
Translucent Op-5 White
TD-1 Ca. 50% Translucent Dentin Light
TD-2 Ca. 50% tekst E
Translucent Dentin Yellow
TN Ca. 45% Translucent Neutral
TY Ca. 45%
tekstTranslucent
D Yellow
The indications are referring to in house testings, the mean value will help to differentiate the various pellets.
Dies sind interne Messungen, die Mittelwerte dienen zur Unterscheidung der verschiedenen Press Pellets und zur Orientierung im System. 11Toothpreparation
Zahnpräparation
Inlays: The inner walls should be prepared in a 15° angle towards the
occlusal area, a box preparation with rounded corners and edges
(Occlusal depth: app. 2 mm, Istmus: min. 1.5 mm, no feather edges,
(no bevel) no contact to the opposing bite).
Inlays: Die Innenwände der Kavität ca. 15° zur Kaufläche hin öffnen, und
eine Kastenpräparation (abgerundete Innenkanten) vornehmen
(Tiefe okklusal ca. 2 mm, Istmus: min. 1.5 mm, keine Federrandpräparation,
keine Antagonistenkontakte an den Präparationsgrenzen).
Crowns: Reduce the incisal edge by app. 2 mm, labial/buccal walls by
1-1.5 mm. Prepare a well-formed deep champfer or 90° shoulder
(rounded inner edges, no sharp edges, palatinal min. space: 1 mm).
Kronen: Den inzisalen / okklusalen Bereich um ca. 2 mm, labial/
bukkal um ca. 1-1.5 mm reduzieren, eine ausgeprägte Hohlkehle oder
Stufe präparieren (abgerundete Innenkanten, keine scharfen Ränder,
mindest Platzbedarf palatinal ca. 1 mm).
Veneers - Laminates: Prepare labially and at the gingival a deep chamfer
min. 0.5 mm and up to 1-1.5 mm at the Incisal edge (all margins should be
deep chamfers).
Veneers: Labial und im Bereich der gingivalen Hohlkehle min. 0.5 mm,
im Bereich der Inzisalkante min. 1-1.5 mm präparieren
(Die Präparationsgrenzen hohlkehlartig gestalten).
12Waxing up and Investing
Wachsmodellation und Einbettung
Preparation: Coat the dies with die spacer to within app. 0,5mm before the
preparation margin. Use only recommended organic wax for press ceramic
technique, which burns out without residue.
Modellvorbereitung: Den Distanzlack bis ca. 0,5mm zur
Präparationsgrenze auftragen. Zur Modellation ausschließlich empfohlene,
rückstandslos verbrennbare, organische Wachse verwenden.
Staining Technique: The restoration is fully waxed up (anatomical/functional),
invested and pressed.
Maltechnik: Die Restauration wird vollanatomisch modelliert (anatomisches
und funktionelles Aufwachsen), eingebettet und anschließend gepresst.
13Waxing up and Investing
Wachsmodellation und Einbettung
Layering Technique:
A. The restoration is fully waxed up (A silicone key for checking of the
anatomical dimensions can be used). The wax form is reduced acc. the needs.
B. The restoration is waxed-up in the reduced form and pressed
(Min. thickness: 0.8 mm).
Minimum 70% of the total crown restoration should be made out of Press
Ceramic.
Schichttechnik:
A. Zuerst erfolgt die Herstellung eines vollanatomischen Wax-Up
(ggf. mit Anfertigung eines Silikonvorwalles zur späteren Überprüfung der
anatomischen Form). Das Wax-Up wird entsprechend reduziert.
B. Es wird bereits reduziert in verkleinerter, anatomischer Form modelliert
und anschließend gepresst (Mindeststärke: 0.8 mm).
Mindestens 70% des gesamten späteren Volumens der Krone sollte aus
der Presskeramik bestehen.
14Waxing up and Investing
Wachsmodellation und Einbettung
Sprueing of the modellation:
The wax sprues (3.0-3.5 mmØ) should be app. 5-6 mm in length and
should not taper towards the pattern (Rounded out – no sharp edges,
consider the direction of flow of the ceramic material: same flow direction).
The patterns are waxed carefully onto the ring base former in an angle of
45° (Distance between the individual objects: min. 3 mm).
Anstiften der Modellation:
Der Wachsdraht (3.0-3.5 mmØ) sollte ca. 5-6 mm lang sein und darf sich
zum Objekt nicht verjüngen (Runde Übergänge schaffen, scharfe Kanten
vermeiden, die Fliess / Pressrichtung der Keramik beachten: Objekt und
Presskanal haben die gleiche Fliessrichtung). Die Objekte auf den Rand
in einem Winkel von 45° aufwachsen (Abstand zwischen den
einzelnen Objekten: min. 3 mm).
Wax weight
Wachsgewicht
Please weight the objects before investing.
Bitte vor dem einbetten die Pressobjekte abwiegen.
Wax Pellet Investment Ring System
max. 0.6g 1 100g small
max. 1.4g 2 200g large
15Waxing up and Investing
Wachsmodellation und Einbettung
The investing is carried out with GC MultiPressVest, specially developed, fine
grained phosphate bonded investment (For details please refer to the
special instruction for use).
Zum Einbetten wird die speziell für die Presstechnik entwickelte
phosphatgebundene Einbettmasse GC MultiPressVest empfohlen (Bitte die
spezielle Verarbeitungsanleitung beachten).
Place the cylinder onto the ring base and put the stabilizing ring in place.
Den Zylinder bündig auf den Sockelformer setzen und den
Stabilisierungsring aufsetzen.
16Waxing up and Investing
Wachsmodellation und Einbettung
Mix GC MultiPressVest acc. the instructions for use:
premix powder/liquid by hand with a spatula until a uniform mixture.
Mixing ratio:
Small ring size: 100g powder – 22ml liquid
Large ring size: 200g powder – 44ml liquid
Place the mixing bowl under the vacuum mixer to evacuate for 15 sec. without mixing. Mix for
60 sec. under vacuum.
Fill the cylinder up to slightly below the stabilization ring. Remove this ring carefully and put on
the mould base former turning it gently (Note: the investment needs to extrude easily through
the opening). After setting remove the mould base by turning carefully. Push the investment
cylinder out of the silicone ring. Smooth the underside by using a plaster knife (90° angle,
stable position).
Die Spezialeinbettmasse für die Presstechnik GC MultiPressVest entsprechend der Anleitung
verarbeiten: Pulver/Flüssigkeit von Hand mit einem Spatel anmischen, bis eine cremige
Konsistenz entsteht.
Mischungsverhältnis:
Kleines Ringsystem: 100g Pulver – 22ml Flüssigkeit
Grosses Ringsystem: 200g Pulver – 44ml Flüssigkeit
Die Einbettmasse für 15 Sek. ohne rühren im Mischbecher evakuieren. Anschließend für
60 Sek. unter Vakuum durchmischen.
Die Form mit GC MultiPressVest bis knapp unter den Stabilisierungsring auffüllen.
Diesen Ring vorsichtig entfernen, durch leichtes Drehen anschließend den Muffelbodenformer
aufsetzen (Die noch leicht fließende Einbettmasse tritt durch die Öffnung aus). Nach dem
Abbinden den Ring durch vorsichtiges Drehen entfernen und die Muffel aus der
Silikonmanschette entformen. Die Unterseite des Zylinders vorsichtig mit einem Messer
glätten (90° Winkel, sicherer Stand). 17Waxing up and Investing
Wachsmodellation und Einbettung
Notes:
● Check the correct fit of the silicone cylinder before investing.
● The base of the cylinder must be absolutely flat (90° angle), thus the mould stands perfectly in an upright, stable position
in the injection furnace.
● Investment residues may not enter the sprues. Clean them carefully before preheating.
● Investment materials contain quartz powder. Avoid the inhalation of dust.
● Please observe the corresponding Instruction for Use for GC MultiPressVest.
Hinweise:
● Überprüfen Sie den exakten Sitz des Silikon Zylinders auf dem Sockelformer.
● Der Muffelboden muss absolut plan sein (90° Winkel), sodass die Muffel senkrecht und stabil im Pressofen steht.
● Einbettmassereste dürfen nicht in den Presskanal gelangen, vor dem Aufsetzen die Kanäle sorgfältig kontrollieren und
ggf. reinigen.
● Einbettmassen enthalten Quarzstaub. Den Staub nicht einatmen.
● Bitte unbedingt die Verarbeitungsanleitung GC MultiPressVest beachten.
90°
18Preheating and Injecting
Vorwärmen und Pressen
Standard Alox-plungers can be used as well as one-way investment plungers.
The one-way plungers can be home made with GC MultiPressVest, investment for
pressceramic.
1. Duplicate with a silicone duplicating material a standard Alox plunger.
Alox-Kolben oder Einweg-Einbettmassestempel können zum Pressen verwendet
werden. Die Einweg Pressstempel können aus GC MultiPressVest hergestellt werden.
1. Einen Standard Alox-Kolben mit einem geeigneten Silikon dublieren.
2. Mix GC MultiPressVest in accordance with the instruction.
Dilution of liquid with aqua dest. is not necessary.
2. GC MultiPressVest entsprechend der Anleitung anmischen. Ein Verdünnen der
Flüssigkeit mit Aqua dest. ist nicht notwendig.
3. Setting time: at least 2 hours.
3. Aushärtezeit: min. 2 Stunden.
Then carefully remove the plunger from the impression.
Den Presskolben vorsichtig entformen.
4. Reduce by grinding to the exact length of the standard plunger.
Important for correct pressing: exact angle of 90°
length 37mm
4. Den Einweg Stempel auf die genaue Länge des Alox-Kolbens reduzieren.
Wichtig für korrekte Pressungen: genauer Winkel von 90°
Länge 37 mm
19Preheating and Injecting
Vorwärmen und Pressen
Preheating:
A.: Quick heating method: After 25 min. put the investment (the funnel pointing
downwards) centrally in the furnace, pre-heated to 850°C (Pre-heating: 60min).
Vorwärmen:
A.: Schnelles Aufheizen: Nach 25 Min. die Muffel mit dem Trichter nach unten,
zentral in die Mitte des auf 850°C vorgewärmten Ofens setzen
(Vorwärmzeit: 60 Min.).
If there is more than 1 ring in the furnace, each holding time should be extended by
10 min. per add. cylinder.
Werden mehrere Muffeln vorgewärmt, die Haltezeiten pro Muffel um 10 min.
verlängern.
● GC Initial PC Press pellets should not be preheated.
● Alox-press plungers can be put straight at 850°C in the oven.
● One way press plungers - GC MultiPressVest - do not need to be pre-heated.
● All Alox-press plungers need to be clean before pressing (Use glassbeads for sand-
blasting).
● Attention: short timing and distance between preheating furnace and pressing is
needed!
● GC Initial PC Press Pellets dürfen nicht vorgewärmt werden.
● Alox-Presskolben in den auf 850°C vorgewärmten Ofen stellen.
● Die Einweg Pressstempel müssen nicht vorgeheizt werden.
● Reinigen Sie die Alox-Presskolben vor jedem Pressvorgang durch abstrahlen
mit Glanzstrahlmittel.
● Achten Sie auf kurze Wege und Zeiten zwischen der Entnahme der Muffel aus
20 dem Ofen und dem Pressvorgang.Pressing Programs for Various Calibrated Press Furnaces
Pressangaben für verschiedene, kalibrierte Pressöfen
EP 500
Closing temp. / Schließtemperatur B 700°C
Heat rate / Aufheizrate T 60°C
Final temp. / Endtemperatur T 950°C
Holding time / Haltezeit 20 min
Pressing time / Presszeit 2 min
Vacuum on / Vakuum ein V1 500°C
Vacuum off / Vakuum aus V2 950°C
Pressure / Pressdruck 4,5-5,0 bar
Pro Press
Start temperature / Starttemperatur 700°C
Heat rate / Heizrate 60°C
Final temp. / Endtemperatur 950°C
Holding time / Haltezeit 20 min
Injection time / Presszeit 10 min
Vacuum / Vakuum 100%
Gemini Press
Stand by temp. / Bereitschaftstemp. 800°C
Sealing time / Verschlusszeit 00:20
Heat rate / Aufheizrate 60°C/min
Vacuum on / Vakuumstart 800°C
Vacuum hold / Vakuumverzöger. 30:00
Vacuum limit / Vakuumgrenze 730 mm
Presstemperature / Presstemperatur 940°C
Holding time / Haltezeit 20:00
Press temperature / Presstemperatur 940°C
Pressing time / Presszeit 10:00
Press-i-dent
Preheating programme / Vorwärmprogramm L9 C700 T600 T3
Press programme / Pressprogramm C700 L9 V9 T060.C940 T1200 L94 T420 V0 C0 L0 T5 C700
All data are general references of in house tests of calibrated press furnaces. Please calibrate your press furnaces regularly and test the final temperature.
Alle Werte sind allgemeine Referenzangaben kalibrierter Pressöfen. Bitte kalibrieren sie Ihren Pressofen regelmäßig und testen Sie die Endtemperatur. 21Devesting and Finishing
Ausbetten und Ausarbeiten
After cooling, please mark the length of the plunger on the investment ring
and cut separate along the length of the mark using a suitable cut-off disc
(sintered diamond disc).
Nach dem Abkühlen der Muffel wird die Länge des Presskolbens
rundherum markiert und die Muffel mit einer geeigneten Trennscheibe
vorsichtig vorsepariert (Durchgesinterte Diamantscheibe).
Afterwards carefully break apart the 2 sections.
Anschließend beide Muffelteile an dieser Sollbruchstelle vorsichtig von
einander trennen (z.B. mit Gipsmesser).
Roughly sandblast the injected patterns with glass beads (4 bar, 50µm),
after this clean the objects carefully and completely (2 bar, 50µm).
Attention: Do not use Aluminium oxide!
Die Pressobjekte sehr großzügig mit Glasstrahlmittel freilegen (4 bar, 50µm),
die vollständige Feinausbettung erfolgt vorsichtig bei einem reduzierten
Druck von 2 bar. Achtung: kein Aluminiumoxid verwenden!
22Devesting and Finishing
Ausbetten und Ausarbeiten
Cut of the sprues carefully using a suitable cut-off disc (fine diamond disc,
no pressure and low rotation).
Die Gusskanäle werden mit einer geeigneten Trennscheibe vorsichtig
abgetrennt (feine, neuwertige Diamantscheibe verwenden, drucklos
arbeiten!).
The ceramic objects are fitted carefully onto the die and then prepared
according to the technique used (fine diamonds, low RPM, avoid heating
up to prevent cracking).
Die gepressten Objekte sorgfältig mit geeigneten, feinen Diamant
-Schleifkörpern ausarbeiten und mittels einer fein zeichnenden
Kontrollpaste auf den Stumpf aufpassen (feine neuwertige Diamanten,
niedrige Drehzahl, Überhitzung unbedingt vermeiden = Verhinderung
von Mikrorisbildung).
The pressed crowns in situ on the master model.
Die gepresste Objekten in situ auf dem Meistermodel.
23I. Staining Technique
I. Maltechnik
Before staining, the ceramic restoration is shaped and contoured using adjusted
diamond burs (surface structure, contact points, occlusion; sandblasting: Alu-oxid
1bar, 50 microns).
For staining technique, GC Initial INvivo/INsitu for MC/LF/PC and INover stains are
used.
Vor dem Malfarbenbrand wird die Restauration mit Diamandschleifkörpern
vollständig ausgearbeitet (Oberflächentextur, Kontaktpunkte, Okklusion; ggf.
abstrahlen mit Alu-oxid: 1bar, 50 microns).
Für die Maltechnik werden die Farben des GC Initial INvivo/INsitu MC/LF/PC
Sortiments und die INover Malfarben verwendet.
24I. Staining Technique
I. Maltechnik
Mix the GC Initial INvivo/INsitu stains (MC/LF) and/or the INover stains with the cor-
responding INvivo/INsitu glaze liquid (MC/LF).
The restoration should be clean before characterising. For a possible correction powder
firing, the deep sintering Initial LF “correction powder” can be used (see firing chart).
Die GC Initial INvivo/INsitu Malfarben (MC/LF) und/oder die INover Malfarben mit
der entsprechenden INvivo/INsitu "glaze liquid" (MC/LF) mischen.
Die Restauration muss vor dem Bemalen schmutz- und fettfrei sein.
Für einen eventuellen Korrekturmassenbrand steht das tiefsinternde Initial LF
„correction powder“ zur Verfügung (Siehe Brenntabelle).
The restoration is given a single or several stain firings as necessary
(see firing chart).
Je nach Situation können ein - oder mehrere Malfarbenbrände durchgeführt
werden (Siehe Brenntabelle).
Start temp. Drying time Raise of temp. Vacuum 1st Firing 2nd Firing Holding time
tekst E
Starttemperatur Trocknungszeit Temperaturanstieg Vakuum 1. Brand 2. Brand Haltezeit
Stains tekst D
Malfarbe 450°C 4 min 45°C/min No/Nein 750°C 750°C 1 min
Glaze
Glasur 450°C 4 min 45°C/min No/Nein 750°C 740°C 1 min
25I. Staining Technique
I. Maltechnik
Inlay / Onlay
Preparation: Coat the dies with die spacer to within app. 1mm before the
preparation margin. Use only recommended organic wax for press ceramic
technique, which burns out without residue.
Modellvorbereitung: Den Distanzlack bis ca. 1mm zur Präparationsgrenze auftragen.
Zur Modellation ausschließlich empfohlene, rückstandslos verbrennbare, organische
Wachse verwenden.
Staining Technique: The restoration is fully waxed up (anatomical/functional), invested
and pressed.
Maltechnik: Die Restauration wird vollanatomisch modelliert (anatomisches und
funktionelles Aufwachsen), eingebettet und anschließend gepresst.
Carefully place the pressed inlay in the preparation die. In case of interfering areas,
remove them with a fine diamond point and check fit by means of a suitable marking
liquid.
Das Inlay vorsichtig auf den Stumpf aufpassen. Bei Störstellen, den Stumpf sehr
dünn mit einem Kontakliquid bestreichen und die Störstellen mit einem feinen
Diamanten vorsichtig entfernen.
26I. Staining Technique
I. Maltechnik
Inlay / Onlay
Mix the GC Initial INvivo/INsitu stains (MC/LF) and/or the INover stains with the cor-
responding INvivo/INsitu glaze liquid (MC/LF). The restoration should be clean
before characterising. For a possible correction powder firing, the deep sintering
Initial LF “correction powder” can be used. Only use quartz pillow trays to fire Inlays,
Onlays and Crowns (Molars). Anterior crowns on thin metal pins.
Die GC Initial INvivo/INsitu Malfarben (MC/LF) und/oder die INover Malfarben vermi-
schen mit der entsprechenden INvivo/INsitu "glaze liquid" (MC/LF). Die Restauration
muss vor dem Bemalen schmutz- und fettfrei sein. Für einen eventuellen
Korrekturmassenbrand steht das tiefsinternde Initial LF „correction powder“ zur
Verfügung. Inlays, Onlays und Kronen (Molaren) nur auf Brennwatte brennen,
Frontkronen auf dünnen Metalpins.
The completed "GC Initial PC" restoration by means of the staining technique.
Die fertige "GC Initial PC" Restauration nach dem Glanzbrand mit der Maltechnik.
Start temp. Drying time Raise of temp. Vacuum 1st Firing 2nd Firing Holding time
Starttemperatur Trocknungszeit Temperaturanstieg Vakuum 1. Brand 2. Brand Haltezeit
Stains
Malfarbe 450°C 4 min 45°C/min No/Nein 750°C 750°C 1 min
Glaze
Glasur 450°C 4 min 45°C/min No/Nein 750°C 740°C 1 min
27GC Initial PC Physical Properties
GC Initial PC Physikalische Eigenschaften
Properties / Eigenschaften Measure / Maßeinheit Norm / Norm
Press temperature / Presstemperatur °C 950
CTE / WAK (25-500°C) Firings / Brände 2 4
10-6xK-1 13,0 13,0
Glass Transforming Temperature / Glasstransformationspunkt °C 580
Solubility / Löslichkeit µg/cm2 25
Density / Dichte g/cm2 -
Flexural Strength / Biegefestigkeit MPa 115
Average Particle Size mµ / Mittlere Korngröße mµ D 50% 25,0
Bonding Strength / Haftverbund MPa -
Ceramic Type / Keramiksorte N=Nature N/S
S=Synthetic Glass
All technical / physical values provided here, refer to in-house testing.
Following EN ISO 9693:2000
Die angegebenen technischen / physikalischen Werte beziehen sich auf hausinterne hergestellte Proben und
im Haus befindlichen Messinstrumente.
Angaben entsprechend EN ISO 9693:2000
28II. Layering Technique
II. Schichttechnik
The restoration is fully waxed up (anatomical & functional). A silicone key for a later
check-up of the morphological dimensions can be used. Alternatively a reduced
wax-up can be modeled and pressed in its reduced form.
Die Herstellung eines vollanatomischen Wax-up (anatomisches und funktionelles
Aufwachsen) und gegebenenfalls mit Anfertigung eines Silikonvorwalls zu späte-
ren Überprüfung der Anatomischen Form. Alternativ kann das Objekt in der redu-
zierten, anatomische Form bereits modeliert und anschliessend gepressed wer-
den.
The pressed ceramic restorations are fitted carefully on to the dies and shaping and
contouring is done with diamond burs.
Die gepressten Keramikobjekten sorgfältig mit geeigneten, feinen Diamant-
Schleifkörpern ausarbeiten und mittels eines feinzeichnenden Kontrollliquids auf
den Stumpf aufpassen.
„Cut back” of the incisal border as well as a thin layer of the total labial surface,
respecting the minimum thickness (= min. 70% of total restoration).
“Cut back” der Inzisalkante sowie der Labialfläche unter der Beachtung
der Mindeststärke (= min. 70% der gesamten späteren Volumens der Krone).
Control of the reduction by use of the prepared silicone key.
Kontrolle der reduzierten Anteile durch den vorbereiteten Silikonschlüssel.
29II. Layering Technique
II. Schichttechnik
Labial view of the reduced restoration. After reduction the ceramic surface is cleaned
by carefully sandblasting with 50 microns, Al2O3 using slight pressure (1bar).
Labiale Ansicht. Nach der Reduzierung wird die Keramikoberfläche sorgfälltig mit
Aluminiumoxid abgestrahlt und so gereinigt (50 microns, 1bar Druck).
Optional: The reduced metal copings/crowns can be individualized before Enamel
firing. This internal staining can be done with GC Initial INover and/or GC Initial
INvivo/INsitu stains. A special glaze firing needs to be carried out for fixation of the
stains before moving to next step (see firing schedule GC Initial LF – Glaze firing with
glaze powder).
Optional: Das reduzierte Gerüst kann charakterisiert werden, vor dem
Schneidebrand. Diese interne Charakterisierung kann mit GC Initial INover
und/oder GC Initial INvivo/INsitu Malfarben vorgenommen werden. Ein spezieller
Fixierbrand der Malfarben vor der weiteren Schichtung ist notwendig (Siehe
Brenntabelle GC Initial LF – Glanzbrand mit Glasur).
Application of a thin layer of Clear Fluorescence (CL-F) over the entire Dentin layering
(max. 0,2mm).
Eine dünne Schicht Clear Fluorescence (CL-F) wird über den ganzen Dentinkörper
geschichtet (max. 0,2mm).
30II. Layering Technique
II. Schichttechnik
If required some additional incisal modifications are possible. GC Initial LF Enamel
(E) and/or Enamel Opal (EOP) can be applied in a very thin layer on top of the Clear
Fluorescence up to the final shape.
Falls gewünscht, können zusätzliche Charakterisierungen im Inzisalbereich vorgenom-
men werden. GC Initial LF Enamel (E) und/oder Enamel Opal (EOP) Massen werden
in einer sehr dünnen Schichtstärke bis zur endgültigen anatomischen Form auf die
Clear Fluorescence (CL-F) Schichtung aufgetragen.
Final labial build up. To create the milky white incisal contour, Enamel Opal (EOP-15)
should be used.
Die komplette labiale Schichtung. Für die Nachbildung des weißlichen inzisalen
Saumes wird die Masse Enamel Opal (EOP-15) verwendet.
The restoration is fired following the firing parameters of the 2nd Dentin Firing
(see firing schedule). The fired ceramic surface shows a slight gloss.
Die Restauration wird mit den Brennparametern für den Korrekturbrand gebrannt
(Siehe Brennanleitung). Die gebrannte Oberfläche weist nach dem Brand einen
leichten Glanz auf.
Finally the restoration is completed by creating the correct lifelike surface texture and
glazed (see firing schedule). Manual glazing/polishing is also possible.
Anschließend erfolgt die Ausarbeitung der Oberflächenstruktur analog dem natür-
lichen Vorbild und ein Glanzbrand (Siehe Brenntabelle). Eine manuelle
Oberflächenpolitur ist ebenfalls möglich.
31II. Layering Technique
II. Schichttechnik
Start temp. Drying time Raise of temp. Vacuum Final temperature Holding time
Starttemperatur Trocknungszeit Temperaturanstieg Vakuum Endtemperatur Haltezeit
1st Dentin Firing 450°C 6 min 45°C/min Yes/Ja 770°C 1 min
1. Dentinbrand
2nd Dentin Firing 450°C 6 min 45°C/min Yes/Ja 760°C 1 min
Korrekturbrand
Glaze firing without Glaze Powder 480°C 2 min 45°C/min No/Nein 770°C ---
Glanzbrand für Politur
Glaze firing with Glaze Powder 450°C 4 min 45°C/min No/Nein 750°C 1 min
Glanzbrand mit Glasur
Correction Powder Firing 400°C 4 min 45°C/min Yes/Ja 690°C 1 min
Korrekturmasse-Brand
32GC Initial - Colour Combination Chart
GC Initial – Farbzuordnungstabelle
GC Initial INside – Field of application and reference chart
GC Initial INside – Einsatzgebiete und Empfehlungstabelle
■ Primary Dentin / High Chromatic Dentin Colours ■ Mamelon / Incisal colours
Primärdentin / Chromadentin Farben Mamelon / Inzisal Farben
Shade Group Shades “INside” reference Shade Group Shades “INside” reference
Farbgruppe Farben “INside” Referenz Farbgruppe Farben “INside” Referenz
A-shades A1, A2 IN-44 Sand Light tooth shades A1, A2, A3 – B1, B2 IN-44 Sand
A-Farben A3 IN-44 Sand Helle Zahnfarben C1, C2 – D2 IN-41 Flamingo
IN-42 Terracotta IN-43 Sun
A3.5, A4 IN-45 Havanna IN-44 Sand
IN-46 Brasil IN-51 Olive
B-shades B1, B2 IN-43 Sun Warm tooth shadesA3.5, A4 – B3, B4 IN-42 Terracotta
B-Farben B3 IN-43 Sun Warme Zahnfarben C3, C4 – D3, D4 IN-45 Havanna
IN-47 Sienna IN-47 Sienna
B4 IN-48 Kurkuma IN-50 Curry
IN-50 Curry IN-51 Olive
C-shades C1, C2 IN-51 Olive
C-Farben C3, C4 IN-51 Olive
IN-45 Havanna
D-shades D2, D3, D4 IN-44 Sand
D-Farben IN-51 Olive
33GC Initial - Colour Combination Chart
GC Initial – Farbzuordnungstabelle
GC Initial INside – High Fluorescence Dentin –
Field of application and reference chart Field of application and reference chart
GC Initial INside – Hochfluoreszenzdentine –
Einsatzgebiete und Empfehlungstabelle Einsatzgebiete und Empfehlungstabelle
■ Approximal / Cervical / Oral colours ■ FD-91
Approximal / Cervical / Oral Farben
■ As a base for very bright shades
■ Als Basis für sehr helle Zahnfarben
Shade Group Shades “INside” reference
■ As a base for “bleached colours”
Farbgruppe Farben “INside” Referenz
■ Als Basis für “bleached Farben”
A-shades A1, A2, A3 IN-42 Terracotta
A-Farben IN-44 Sand
■ Vitapan Classical A1 / B1 / C1 / D2
A3.5, A4 IN-42 Terracotta ■ Vitapan Classical A1 / B1 / C1 / D2
IN-45 Havanna
IN-46 Brasil ■ FD-92
IN-49 Maracuja
B-shades B1, B2 IN-43 Sun ■ As a base for standard B-shades
B-Farben IN-47 Sienna ■ Als Basis für Standard B-Zahnfarben
B3, B4 IN-47 Sienna
IN-48 Kurkuma ■ FD-93
IN-50 Curry
C-shades C1, C2 IN-51 Olive ■ As a base for standard A-shades
C-Farben C3, C4 IN-51 Olive ■ Als Basis für Standard A-Zahnfarben
IN-45 Havanna
D-shades D2, D3, D4 IN-44 Sand ■ For standard C and D colours - FD-93 mixed with IN-51
D-Farben IN-51 Olive ■ Für Standard C- und D-Farben - FD-93 gemischt mit IN-51
34PC
Manuel Technique
F
Manuale tecnico
I
GC Initial PCTable des matières
Indice
Page
Tableau de combinaison des teintes / Tabella di combinazione delle masse 7-8
Indication des lingotins GC Initial PC Press Pellets / Tabelle di riferimento per GC Initial PC Press Pellets 9 - 10
Opacités GC Initial PC / Opacità di GC Initial PC 11
Préparation de la dent / Preparazione del dente 12
Cire et mise en revêtement / Ceratura diagnostica e rivestimento 13 - 18
Préchauffage et Injection / Pre-riscaldamento e iniezione 19 - 20
Programme de pressée selon calibrage des fours / 21
Programmi di pressatura per i vari forni a pressione calibrati
Démoulage et finition / Eliminazione del rivestimento e rifinitura 22 - 23
I. Technique de coloration / I. Tecnica del colore 24 - 27
GC Initial PC Propriétés physiques / Proprietà fisiche di GC Initial PC 28
II. Technique par couche / II. Tecnica di stratificazione 29 - 32
GC Initial - Tableau de combinaison des teintes / GC Initial - Tabella delle combinazione cromatiche 33 - 34
Photoshooting: Michael Brüsch - M.B. Dentaltechnik GmbH, Düsseldorf / Allemagne / GermaniaTableau de combinaison des teintes
Tabella di combinazione delle masse
LF
Vita® est une marque déposée de VITA Zahnfabrik H. Rauter GmbH & Co. KG, Bad Säckingen, Allemagne.
Vita® è un marchio registrato di Vita Zahnfabrik H. Rauter GmbH & Co. KG, Bad Säckingen, Germania.
7Tableau de combinaison des teintes
Tabella di combinazione delle masse
PC Lingotins
Stains for MC/LF/PC
GC Initial INover
Pour masquer les restaurations GC Initial PC, 4 maquillants spéciaux sont disponibles : IOA (pour teintes-A), IOB (pour teintes-B), IOC (pour teintes- C), IOD (pour teintes-D).
Maquillants pour restauration en GC Initial PC lorsque des lingotins Email sont utilisés. Caractérisation des lingotins Dentine avant le montage de l’émail.
GC Initial INover
Sono disponibili quattro colori speciali per la tecnica del colore su restauri realizzati con GC Initial PC: IOA (per colori A), IOB (per colori B), IOC (per colori C), IOD (per colori D).
Colorazione di restauri realizzati con GC Initial PC quando si usano pellet pressati di Smalto. Caratterizzazione di pellet pressati di Dentina prima della stratificazione dello Smalto.
8Indications pour lingotins GC Initial PC – Technique de coloration
Tabella di riferimento per GC Initial PC Press Pellets – Tecnica del colore
GC Initial PC s’utilise pour tous les inlays céramiques, onlays (une face, multi face), facettes et couronnes unitaires
(antérieures et postérieures).
Contre-Indications : Bridges, problèmes d’occlusion, bruxisme, préparation inadéquate
GC Initial PC è adatto per tutti gli inlay, onlay (a una o più facce), veneer e corone singole (anteriori e posteriori
in ceramica.
Controindicazioni: ponti, parafunzioni, bruxismo, preparazioni inadatte.
Caractéristiques / Inlay Une face / Inlay multi face / Onlay / Couronne / Facette /
Caratteristiche Inlay Una faccia Inlay Più facce Onlay Corona Veneer
Facette Email / Veneer Enamel
VE-1 Translucide / Traslucido X X X X X
VE-2 Neutre / Neutrale X X X X X
VE-3 Blanchâtre / Biancastro Tekst E X X X X X
Email occlusal clair / Occlusal Light Enamel
OL-1 Dents translucides / Tekst DX X X X X
OL-2 Denti traslucidi X X X X X
OL-3 X X X X X
OL-4 X X X X X
Email occlusal “laiteux” / Occlusal Milky Enamel
OM-1 Dents à opacité élevée / X X X X X
OM-2 Denti con elevata opacità X X X X X
OM-3 X X X X X
OM-4 X X X X X
Tekst E
Translucide / Translucent
TD-1 Translucide Dentine 1 / Dentina traslucida 1 Tekst DX X X X X
TD-2 Translucide Dentine 2 / Dentina traslucida 2 X X X X X
TN Neutre / Neutrale X X X X X
TY Jaune / Giallo X X X X X
9Indications pour lingotins
GC Initial PC – Technique par
couche/stratification
Tabella di riferimento per
GC Initial PC Press Pellets –
Tecnica di stratificazione
Caractéristiques / Inlay Une face / Inlay multi face / Onlay / Couronne / Facette /
Caratteristiche Inlay Una faccia Inlay Più facce Onlay Corona Veneer
Lingotins Dentine selon les teintes Vita® /
Pellet di dentina secondo i colori Vita®
A1/A2/A3/A3.5/A4 Teintes selon dents naturelles X X X X X
B1/B2/B3/B4 / Colori secondo i denti naturali X X X X X
tekst E
C1/C2/C3/C4 X X X X X
D2/D3/D4 tekst D X X X X X
Teintes "blanchiment" / Colori "sbiancati"
AO Lingotins Dentine pour dent claire - très claire X X X X X
AOO - très claires - et teintes blanchies X X X X X
BO Pellet di dentina per denti chiari e molto chiari X X X X X
BOO e colori “sbiancati” X X X X X
Lingotins Opaque / Pellet di opaco
Op-1 Lingotins - opacité X
Op-2 élevée (dents décolorées) X
Op-3 Pellet a elevata X
Op-4 opacità (elementi scoloriti) X
Op-5 X
10Opacités GC Initial PC
Opacità di GC Initial PC
Technique de coloration Technique par couche
Tecnica del colore Tecnica di stratificazione
Teintes / Colore Opacité / Opacità -% Teintes / Colore Opacité / Opacità -%
Facette émail / Veneer Enamel Lingotin Dentine / Pellet di dentina
VE-1 Ca. 30% Translucide / Traslucido A1-A4 Ca. 75%
VE-2 Ca. 40% Semi Translucide / B1-B4
Semi-traslucido
C1-C4
VE-3 Ca. 50% Blanchâtre / Biancastro
D2-D4
Email occlusal clair / Occlusal Light Enamel
OL-1 Ca. 40% Blanchâtre / Biancastro Teintes blanchiment / Colori “sbiancati”
OL-2 Grisâtre / Grigiastro AO Ca. 75%
OL-3 Jaunâtre / Giallastro AOO
OL-4 Rougeâtre / Rossiccio BO
Email occlusal “laiteux” / Occlusal Milky Enamel BOO
OM-1 Ca. 50% Blanchâtre / Biancastro Lingotins opaque / Pellet di opaco
OM-2 Grisâtre / Grigiastro Op-1 Ca. 85% Jaune clair /
OM-3 Jaunâtre / Giallastro Giallino
OM-4 Rougeâtre / Rossiccio Op-2 Jaune pâle /
Translucide / Translucent
Giallo pallido
TD-1 Ca. 50% Dentine translucide claire /
Op-3 Jaune rouge /
Traslucido dentina chiaro
TD-2 Ca. 50% Dentine translucide jaune / Giallo rossiccio
Traslucido dentina giallo Op-4 Olive / kaki /
TN Ca. 45% Translucide Neutre / Oliva / kaki
Traslucido neutrale Op-5 Blanc /
TY Ca. 45% Translucide jaune / Bianco
Traslucido giallo
Ces indications se réfèrent à des tests internes, la valeur moyenne permettra de différencier les différents lingotins.
Le indicazioni si riferiscono ai test condotti internamente. Il valore medio permette di distinguere meglio i diversi pellet. 11Préparation de la dent
Preparazione del dente
Inlays: Les parois internes doivent être préparées avec un angle de 15° vers
la zone occlusale, préparation de la boite avec des bords et des coins
arrondis (profondeur occlusale : environ 2mm, Isthme: min. 1.5mm, sans
biseau (non oblique) et sans contact avec l’occlusion opposée).
Inlay: Le pareti interne devono essere preparate con un’angolatura di 15°
rispetto all’area occlusale e deve essere eseguita una preparazione del
box con angoli e bordi arrotondati (profondità occlusale circa 2mm,
istmo minimo 1.5mm, assenza di bordi frastagliati (no bisellatura), assen-
za di contatto con gli antagonisti).
Couronnes: Réduire le bord incisal/occlusal d’environ 2mm, les parois
vestibulaire/buccale de 1-1.5 mm. Préparer un chanfrein profond bien
formé ou un épaulement de 90° (bords internes arrondis, pas de bords
pointus, espace palatin minimum de 1mm).
Corone: Ridurre il bordo incisale/occlusale di circa 2mm e le pareti labia-
li/buccali di 1-1,5 mm. Preparare una bisellatura profonda e ben definita
oppure una spalla a 90° (bordi interni arrotondati, nessun bordo aguzzo,
spazio palatale minimo 1mm).
Facettes – fines épaisseur : Préparer sur les faces vestibulaire et gingivale un
profond chanfrein d’un min de 0.5mm et jusqu’à 1-1.5mm sur le bord
incisal (tous les bords doivent être chanfreiner)
Veneer : Preparare a livello labiale e gengivale una bisellatura profonda
di minimo 0,5mm e fino a 1-1,5mm sul bordo incisale (tutti i margini
devono presentare una bisellatura profonda).
12Cire et mise en revêtement
Ceratura diagnostica e rivestimento
Préparation: Enduire les dies avec un espaceur et s'arrêter 0.5mm avant la
préparation des margins. Utiliser seulement de la cire organique (pas
d‘oxyde de titane) pour la technique de céramique pressée, laquelle brûle
sans laisser de résidus.
Preparazione: Rivestire lo stampo con l’apposito separatore fino a circa
0,5mm dal margine della preparazione. Utilizzare solamente la cera orga-
nica raccomandata per la tecnica con ceramica pressabile la quale può
essere eliminata a caldo senza lasciare residui.
Technique de coloration: la restauration est entièrement recouverte de cire
(anatomiquement/fonctionnellement), mise en revêtement et pressée.
Tecnica del colore: Viene eseguita la ceratura diagnostica completa del restau-
ro (anatomica/funzionale), il quale viene poi rivestito e pressato.
13Cire et mise en revêtement
Ceratura diagnostica e rivestimento
Technique par couche:
A. La restauration est totalement recouverte de cire (une clé en silicone-A
peut être utilisée pour vérifier les dimensions anatomiques). La cire est
réduite selon les besoins.
B. La restauration est modelée dans sa forme réduite et pressée
(Min. épaisseur : 0.8mm).
Un minimum de 70% de la couronne totale doit être fait en Céramique
Pressée.
Tecnica di stratificazione:
A. Viene fatta una ceratura diagnostica completa del restauro (si può uti-
lizzare una chiave in silicone A per controllare le dimensioni anatomi-
che). Il modello in cera viene quindi ridotto secondo le esigenze.
B. Viene eseguita la ceratura diagnostica del restauro nella sua forma ade-
guatamente ridotta e quindi viene pressato (spessore minimo 0,8mm).
Almeno il 70% della corona dovrebbe essere realizzata in ceramica pres-
sabile.
14Cire et mise en revêtement
Ceratura diagnostica e rivestimento
Mise en revêtement:
Les tiges de coulées (3.0-3.5mm Ø) doivent être d’environ 5-6 mm de
longueur et doivent rester dans l’axe d’injection du piston (Sur le pourtour
du piston d’injection – pas de bords pointus, prendre en compte la direc-
tion de la coulée du matériau céramique : même direction de coulée)
La base d’injection et les pièces à pressées doivent former un angle de 45°
(Distance entre les objets individuels: min. 3mm).
Canali di colata nella modellazione:
I canali di colata in cera (3,0-3,5mmØ) dovrebbero essere lunghi circa 5-
6 mm e non assumere una forma conica verso la struttura (arrotondati
senza bordi aguzzi, considerare la direzione del flusso del materiale cera-
mico: stessa direzione del flusso). La ceratura delle strutture deve essere
eseguita lungo il bordo del cilindro ad un angolo di 45° (distanza mini-
ma tra i singoli oggetti 3mm).
Cire et pesée
Peso della cera
Peser les maquettes avant la mise en revêtement.
Pesare gli oggetti prima di procedere con il rivestimento.
Cire / Cera Pellet / Pellet Revêtement / Rivestimento Cylindre / Sistema ad anello
max. 0.6g 1 100g petit / Piccolo
max. 1.4g 2 200g large / Grosso
15Cire et mise en revêtement
Ceratura diagnostica e rivestimento
La mise en revêtement se fait avec le GC MultiPressVest, revêtement à liant
phosphate à granulométrie fine développé pour le système de céramique
pressée GC INITIAL PC (Pour plus de détails se référer à son mode d’emploi).
Il rivestimento viene eseguito con GC MultiPressVest, un materiale per rive-
stimento a legante fosfatico a grana fine appositamente sviluppato (per i
dettagli consultare le apposite istruzioni per l’uso).
Placer le cylindre sur le cône d’injection et positionner sur son sommet la
rondelle de maintien.
Porre il cilindro sulla base ad anello e posizionare l’anello stabilizzante.
16Cire et mise en revêtement
Ceratura diagnostica e rivestimento
Mélanger GC MultiPressVest comme indiqué sur son mode d’emploi. Pré-mélanger manuellement
le liquide et la poudre avec une spatule en plastique jusqu’à obtention d’un mélange homogène.
Ratio de mélange:
Cylindre de petite taille: 100g poudre – 22ml liquide
Cylindre de grande taille: 200g poudre – 44ml liquide
Placer le bol de mélange sous vide pendant 15 secondes sans mélanger. Mélanger 60 sec. sous vide.
Remplir doucement le cylindre par dessus la rondelle de maintien.
Après la prise retirer la base du moule en tournant doucement (Note : le revêtement doit pou-
voir s’extraire aisément par l’ouverture) Pousser le cylindre hors du cylindre en silicone.
Lisser la surface avec un couteau à plâtre (angle 90°, position stable).
Miscelare GC MultiPressVest seguendo le istruzioni per l’uso:
premiscelare polvere e liquido a mano con una spatola fino ad ottenere una miscela uniforme.
Rapporto di miscelazione:
Cilindro piccolo: 100g polvere – 22ml liquido
Cilindro grande: 200g polvere – 44ml liquido
Porre la vaschetta di miscelazione nel miscelatore sotto vuoto per 15 secondi senza
miscelare. Miscelare per 60 secondi sotto vuoto.
Riempire il cilindro fino a poco sotto l’anello di stabilizzazione. Togliere questo anello deli-
catamente e applicare il forma-base dello stampo ruotandolo delicatamente (Nota: il rivesti-
mento deve fuoriuscire facilmente dall’apertura). Una volta indurito il materiale, togliere la
base dello stampo ruotando delicatamente. Facendo pressione, estrarre il cilindro di rivesti-
mento dall’anello di silicone.
Levigare la superficie inferiore utilizzando un coltello (angolatura a 90°, posizione stabile).
17Cire et mise en revêtement
Ceratura diagnostica e rivestimento
Notes:
● Vérifier l’ajustage du cylindre en silicone avant la mise en revêtement.
● La base du cylindre doit être absolument plate (angle 90°) ainsi le moule reste parfaitement droit et stable dans le four à injec-
tion.
● Les résidus de revêtement ne doivent pas entrer dans les tiges de coulée. Nettoyez les soigneusement avant le préchauffage.
● Les revêtements contiennent du quartz en poudre. Eviter toute inhalation de la poussière.
● Respecter les instructions du mode d’emploi du GC MultiPressVest.
Note:
● Prima di rivestire, controllare che l’adattamento del cilindro di silicone sia corretto.
● La base del cilindro deve essere assolutamente piatta (angoli a 90°) in modo tale che lo stampo rimanga perfettamente in
posizione verticale e stabile nel forno a pressione.
● I residui del rivestimento non devono entrare nei canali di colata. Pulirli accuratamente prima di pre-riscaldare.
● I materiali per rivestimento contengono polvere di quarzo. Evitare di inalare la polvere.
● Seguire le istruzioni per l’uso di GC MultiPressVest.
90°
18Préchauffage et Injection
Pre-riscaldamento e iniezione
Des pistons standard en alumine peuvent être utilisés tout comme les pistons en
revêtement. Les pistons peuvent être réalisés “maison” avec le revêtement
GC MultiPressVest pour céramique pressée.
Si possono utilizzare pistoni Alox o pistoni per rivestimento a una via.
I pistoni a una via possono essere realizzati personalmente con GC MultiPressVest,
rivestimento per ceramica pressabile.
1. Dupliquer un piston standard avec un silicone de duplication.
1. Duplicare un pistone Alox standard con materiale per duplicazione a base di silicone.
2. Mélanger GC MultiPressVest en suivant les instructions.
La dilution du liquide avec de l’eau distillée n’est pas nécessaire.
2. Miscelare GC MultiPressVest secondo le istruzioni. Non è necessario diluire il
liquido con Acqua distillata.
3. Temps de prise: au moins 2 heures.
3. Tempo di indurimento: almeno 2 ore.
Puis retirer soigneusement le piston de l’empreinte.
Estrarre con cura il pistone dall’impronta.
4. Réduire en grattant pour obtenir la même longueur que celle du piston standard.
Il est très important pour une pressée optimale de gratter le haut du piston selon
un angle très précis de 90°
Longueur 37mm
4. Ridurre molando fino ad ottenere l’esatta lunghezza del pistone standard.
Importante per una pressatura corretta: angolatura esatta di 90°
Lunghezza 37mm 19Préchauffage et Injection
Pre-riscaldamento e iniezione
Préchauffage:
A. Méthode d’enfournement rapide: Après 25 min. mettre le revêtement préchauffé à
850° avec l’entonnoir centré de haut en bas dans un four de chauffe (Préchauffage :
60min).
Pre-riscaldamento:
A.: Metodo con riscaldamento rapido: Dopo 25 minuti porre il rivestimento (con
l’imbuto rivolto verso il basso) nell’area centrale del forno pre-riscaldato a 850°C
(pre-riscaldamento: 60 minuti).
Dans l’éventualité où il y aurait plus d’un cylindre dans le four, le temps doit être pro-
longé de 10 min par cylindre supplémentaire.
Se nel forno è presente più di un cilindro, i singoli tempi di permanenza devono
essere incrementati di 10 minuti per ciascun cilindro aggiuntivo.
● Les lingotins GC Initial PC ne doivent pas être préchauffés.
● Les pistons – GC MultiPressVest – ne nécessitent pas de préchauffage.
● Les pistons peuvent être mis droit à 850° dans le four.
● Les pistons standard doivent être nettoyés avant la pressée (utiliser des billes de
verre pour le sablage).
● Attention: un temps bref entre le préchauffage du four et la pressée est nécessaire!
● GC Initial PC Press Pellets non vanno pre-riscaldati.
● I pistoni a pressione Alox possono essere messi direttamente nel forno a 850°C.
● I pistoni a una via – GC MultiPressVest – non richiedono pre-riscaldamento.
● I pistoni a pressione Alox non devono necessariamente essere puliti prima di
essere sottoposti a pressione (usare sferette di vetro per la sabbiatura).
● E’ importante che intercorra poco tempo e vi sia breve distanza tra il
20 pre-riscaldamento del forno e il processo di pressione.Programme de pressée selon calibrage des fours
Programmi di pressatura per i vari forni a pressione calibrati
EP 500
T° d’enfournement / Temperatura di chiusura B 700°C
Vitesse de montée en t° / Velocità di riscaldamento T 60°C
Temp. Finale / Temperatura finale T 950°C
Tekst E
Temps de maintien / Tempo di permanenza 20 min
Temps de pressée / Durata pressione Tekst D 2 min
Sous vide / Attivazione vuoto V1 500°C
Sans vide / Disattivazione vuoto V2 950°C
Pression / Pressione 4,5-5,0 bar
Pro Press
T° d’enfournement / Temperatura avvio 700°C
Vitesse de montée en t° / Velocità riscaldamento 60°C
Temp. Finale / Temperatura finale 950°C
Temps de maintien / Tempo di permanenza 20 min
Temps de pressée / Tempo di iniezione Tekst E 10 min
Vide / Vuoto 100%
Tekst D
Gemini Press
T° prête / Temperatura in stand by 800°C
Temps de fermeture / Tempo di sigillatura 00:20
Vitesse de montée en t° / Velocità di riscaldamento 60°C/min
Sous vide / Attivazione vuoto 800°C
Maintien sous vide / Permanenza vuoto 30:00
Vide max. / Limite vuoto 730 mm
T° de pressée / Temperatura di pressione 940°C
Temps de maintien / Tempo di permanenza Tekst E 20:00
T° de pressée / Temperatura di pressione 940°C
Temps de pressée / Durata pressione Tekst D 10:00
Press-i-dent
Programme de préchauffage / Programma di pre-riscaldamento L9 C700 T600 T3
Programme de pressée / Programma di pressione C700 L9 V9 T060.C940 T1200 L94 T420 V0 C0 L0 T5 C700
Toutes les données sont des références générales de tests internes de fours calibrés. Calibrer votre four et vérifier régulièrement la température finale.
Tutti i dati si riferiscono a valori determinati con test dei forni a pressione calibrati eseguiti internamente. Calibrare i propri forni a pressione regolarmente e controllare la temperatura finale. 21Démoulage et finition
Eliminazione del rivestimento e rifinitura
Après refroidissement, marquer la longueur du piston sur le cylindre de
revêtement pour déterminer l’axe de la coupe.
Una volta raffreddato il cilindro, segnare la lunghezza del pistone sull’anello
di rivestimento e separare tagliando lungo il segno effettuato con un
disco appropriato (disco di diamante sinterizzato).
Par la suite, séparer doucement les 2 sections.
Quindi staccare delicatamente le due sezioni.
Sabler grossièrement les modèles injectés avec des billes de verre (4 bar,
50µm), puis nettoyer soigneusement et entièrement les pièces (2 bar, 50µm).
Attention : ne pas utiliser d’oxyde d’alumine!
Sabbiare in modo approssimativo le strutture iniettate utilizzando sferette di
vetro (4 bar, 50µm) e infine pulire attentamente e completamente gli oggetti
(2 bar, 50µm).
Attenzione: Non utilizzare ossido di alluminio!
22Démoulage et finition
Eliminazione del rivestimento e rifinitura
Couper les tiges de coulées soigneusement avec un disque à découper
(disque diamanté, sans pression et à faible vitesse).
Tagliare con cura i canali di colata utilizzando un disco adatto (disco dia-
mantato fine, senza pressione e a bassa rotazione).
Les pièces céramique sont ajustées soigneusement sur le die et préparées
selon la technique choisie (pointe diamantée, vitesse lente, éviter de chauf-
fer pour éviter les craquelures).
Gli oggetti in ceramica vengono quindi posti con cura sullo stampo e
preparati in base alla tecnica utilizzata (dischi diamantati fini, basso
numero di giri al minuto, evitare di riscaldare per prevenire eventuali
fratture).
Les couronnes pressées sur le maître modèle.
Le corone pressate in situ sul modello di riferimento.
23I. Technique de coloration
I. Tecnica del colore
Avant la coloration, la restauration céramique est formée et contourée avec une fraise
diamantée adaptée (structure de surface, points de contact, occlusion, sablage : oxyde
d'alumine 1 bar, 50 microns).
Pour cette technique, utiliser les maquillants GC Initial INvivo/INsitu pour MC/LF/PC
et INover.
Prima della colorazione, il restauro in ceramica viene modellato e definito nei
contorni utilizzando frese diamantate adatte (struttura della superficie, punti di
contatto, occlusione; sabbiatura con ossido di alluminio a 1 bar, 50 micron).
Per la tecnica del colore si utilizzano GC Initial INvivo/INsitu per MC/LF/PC e colori
INover.
24Sie können auch lesen