ELEKTRO-RASENMÄHER HR3302E ORIGINAL BETRIEBSANLEITUNG EN: ELECTRIC LAWN MOWER, ORIGINAL OPERATION INSTRUCTIONS FR: TONDEUSE ELECTRIQUE, MODE ...
←
→
Transkription von Seiteninhalten
Wenn Ihr Browser die Seite nicht korrekt rendert, bitte, lesen Sie den Inhalt der Seite unten
1

ELEKTRO-RASENMÄHER

HR3302E

ORIGINAL BETRIEBSANLEITUNG

EN:   ELECTRIC LAWN MOWER, ORIGINAL OPERATION INSTRUCTIONS
FR:   TONDEUSE ELECTRIQUE, MODE D’EMLOI D’ORIGINE
IT:   RASAERBA ELETTRICO, ISTRUZIONI PER L’ USO ORIGINALI

 Licensed by
 HYUNDAI Corporation
2

DE        HINWEIS Die Abbildungen und Illustrationen in dieser Anleitung dienen nur zur
          Orientierung und können vom jeweiligen Modell abweichen. Technische Änderungen
          vorbehalten.
EN        NOTE The figures and illustrations in this manual are provided for reference only and
          may differ from your specific model. Subject to technical changes.
FR        REMARQUE Les données et illustrations de ce manuel sont fournies pour votre
          référence uniquement et peuvent différer en fonction du modèle. Sous réserve de
          modifications techniques.
IT        NOTA Le figure e le illustrazioni di questo manuale sono solo per riferimento e possono
          differire dallo specifico modello acquistato. Con riserva di apportare modifiche tecniche.

     A1                  A2                 A3                A5                A6

     A1                  A2                 A4                A5                A7

     A8

Rev. 01
3

B1
         1

                 2

3
                      4

             5
         6                          8

                                    9
     7

                     12   11   10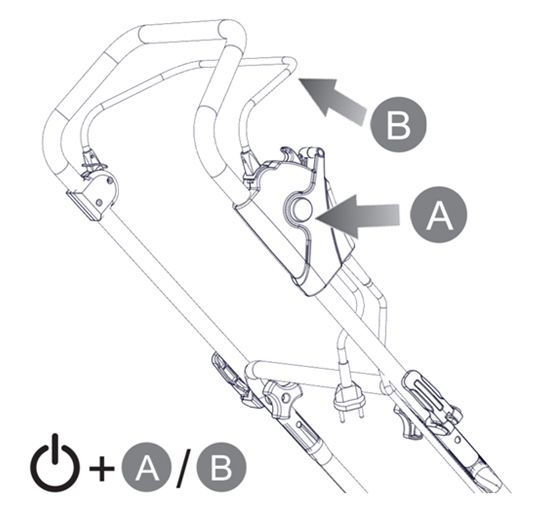
4

C1

               x2    x1

     x1

     x2   x2    x2        x1
5

D1

6

D2                   D3

         1

2
     3       3   2

D4                        D5
7 E1 E2 E3
8

E4

E5   E6

F1   F2
9

G1   G2

G3
10
H2
H1
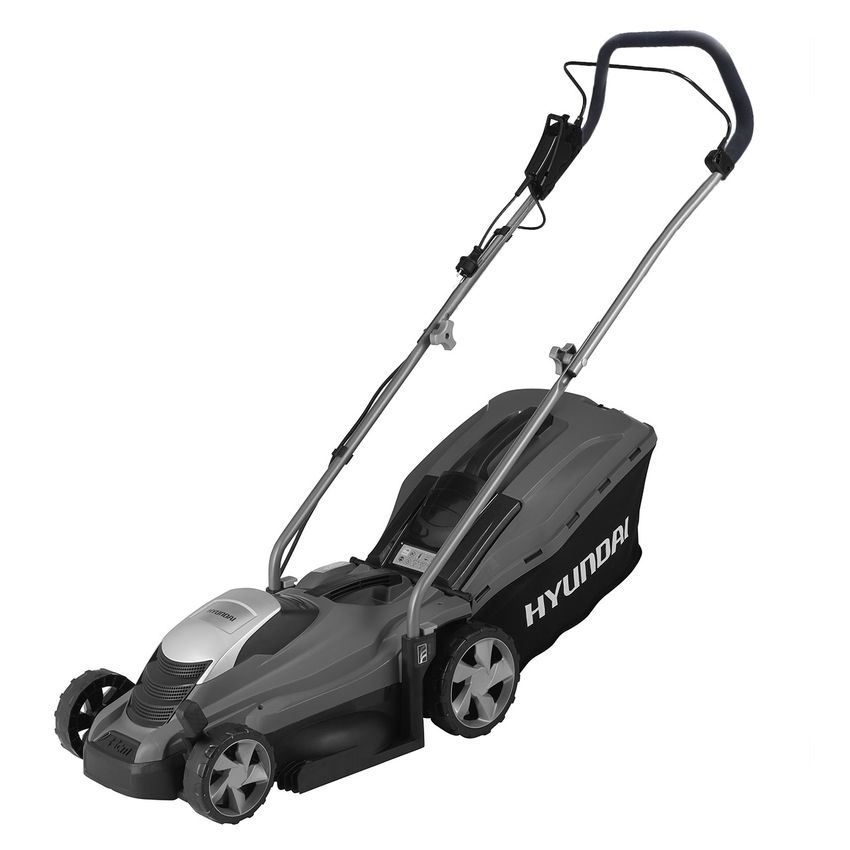
H3 H4DE 11 INHALT • TECHNISCHE DATEN • SICHERHEITSHINWEISE • FUNKTION • PFLEGE UND WARTUNG • KONFORMITÄT • PROBLEMBEHEBUNG • GARANTIE • ENTSORGUNG TECHNISCHE DATEN Model HR3302E Eingangsleistung 1300 W Spannung/Frequenz 230-240 V / 50 Hz Schutzklasse / II Leerlaufdrehzahl 3600 U/min Schnittweite 330 mm Min - Max Schnitthöhe 25-65 mm Schnitthöhepositionen 5 Grasfangkorb Volumen 35 l Raddurchmesser (vorne/hinten) 140/180 mm Schalldruckpegel LpA 76.8 dB(A), K=3dB(A) Schallleistungspegel LwA 87.7 dB(A), K=0.81dB(A) Garantierter Schallleistungspegel LwA 96 dB(A) Vibration
DE 12

SICHERHEITSHINWEISE                           A5:    Gefahr      durch      elektrischen
                                              Stromschlag. Achten Sie auf das
                                              Stromkabel und halten Sie es fern von dem
                                              Schneidemesser.
ACHTUNG! Vor Verwendung dieses
Gerätes lesen Sie bitte die Gebrauchs-        A6: Das Gerät darf beim Regen nicht
anleitung sorgfältig durch und machen Sie     benutzt werden, bzw. dem Regen
sich mit sämtlichen Bedienelementen und       ausgesetzt werden.
Funktionen vertraut. Missachten von
                                              A7: Tragen Sie beim Mähen den Hörschutz
Sicherheitsvorkehrungen                und
                                              und die Schutzbrille
Hinweisen kann zu Unfällen mit
schweren Verletzungen, z.B. durch
Stromschlag, Verbrennung und herum-
fliegende       Gegenstände,        führen    Allgemeine Hinweise
und/oder Beschädigung des Gerätes
                                              • Das Gerät ist ausschliesslich für den
sowie der Gegenstände und Personen in
                                                Privatgebrauch und zur Pflege von
der       unmitelbaren         Umgebung
                                                hauseigenen Gras- und Rasenflächen
verursachen. Für solche Fälle übernimmt
                                                bestimmt, jedoch nicht für Mähen in
der Hersteller keine Verantwortung.
                                                öffentlichen Anlagen, Parks, Land- und
Bewahren Sie diese Gebrauchsanleitung           Forstwirtschaft. Eine jährliche Nutzung
für eine spätere Verwendung sorgfältig auf.     soll 50 Stunden nicht übersteigen. Für
Falls Sie das Gerät an andere Personen          gewerblich        eingesetzte      Geräte
weitergeben,      geben      Sie     diese      übernimmt der Hersteller keine Garantie.
Gebrauchsanleitung bitte mit.                 • Das Gerät darf nicht von Kindern unter
                                                16        Jahren,      Personen        mit
                                                eigenschränkten               physischen,
Bildsymbole                                     sensorischen oder geistigen Fähigkeiten
                                                oder Personen, die mit dem Gerät nicht
A1: Allgemeiner Gefahrenhinweis. Vor            vertraut sind, genutzt werden.
Verwendung dieses Gerätes lesen Sie bitte     • Das Gerät darf nicht von Personen
die Gebrauchsanleitung sorgfältig durch         verwendet werden, die unter Einfluss von
und machen Sie sich mit sämtlichen              Alkohol, Drogen und/oder Medikamenten
Bedienelementen und Funktionen vertraut.        stehen.
                                              • Das         Gerät       erzeugt        ein
A2: Verletzungsgefahr durch heraus
geschleuderte Gegenstände. Achten Sie           elektromagnetisches Feld, welches unter
                                                Umständen mit aktiven oder passiven
auf die in der Nähe stehenden Personen.
                                                medizinischen                 Implantaten
Halten Sie genügend Abstand.
                                                wechselwirken kann. Personen mit
A3: Halten Sie sich fern von rotierenden        solchen Implantaten wird empfohlen vor
Teilen. Es besteht Verletzungsgefahr durch      dem Nutzen des Gerätes Ihren Arzt oder
das scharfe Messer. Nicht unterhalb von         Hersteller      des     Implantats      zu
Gerätegehäuse greifen und auf die Füsse         kontaktieren, um die Verträglichkeit
achten.                                         abzuklären.
                                              • Es ist nicht gestattet, das Gerät zum
A4: Vor jeglichen Arbeiten am Gerät
                                                Trimmen von Büschen, Hecken und
unbedingt den Motor abstellen und den
                                                Sträuchern,     zum Schneiden         und
Netzstecker ziehen. Auch wenn Sie das
                                                Zerkleinern von Rankgewächsen oder
Gerät unbeaufsichtigt stehen lassen muss
                                                Mähen von Rasen auf Dachpflanzungen
der Netzstecker gezogen werden.
                                                oder in Balkonkästen zu verwenden.
DE 13
Weiterhin ist auch nicht gestattet, das • Beim Verwenden einer Kabelrolle muss
Gerät zum Zerkleinern von Baum- und das Kabel vor der Anwendung komplett
Heckenabschnitten, Absaugen von ausgerollt werden. Zusammengerolltes
Gehwegen sowie zum Einebnen von Kabel kann überhitzen.
Bodenunebenheiten zu verwenden. • Verwenden Sie keine Adapter, die
keinen Spritzwasserschutz haben und
für den Aussenbereich nicht vorgesehen
Vorbereitung sind.
• Beim Ausrollen soll das Kabel auf
• Tragen Sie angemessene, geschlossene Beschädigungen geprüft werden.
Kleidung, lange Hosen und festes Beschädigtes Kabel soll sofort und
Schuhwerk. Niemals barfuss oder mit komplett ausgetauscht werden.
offenen Sandalen arbeiten. • Der Netzstecker darf niemals mit nassen
• Tragen Sie Schutzbrille und Hörschutz. Händen oder beim Regen angefasst und
• Vor der Verwendung überprüfen Sie, ob gesteckt werden.
das Messer ausreichend scharf und • Um einen unbeabsichtigten Start des
ordnungsgemäss befestigt ist. Gerätes zu vermeiden, stellen Sie sicher,
Beschädigtes oder abgenutztes Messer dass der Motor-Schalthebel und
muss getauscht werden. Verwenden Sie Sicherheitsknopf am Gerät nicht betätigt
nur Originalzubehör. sind, bevor Sie den Netzstecker
• Beseitigen Sie Fremdkörper wie Steine, einstecken.
Stöcke, Äste, Knochen und Drähte von • Zerren Sie nie direkt am Kabel, um den
der zu bearbeitenden Fläche. Stecker aus der Steckdose
herauszuziehen.
• Achten Sie darauf, dass das Kabel beim
Netzstecker Mähen nicht überfahren wird. Falls es
jedoch passiert, entfernen Sie sich sofort
• Die Spannung der Stromquelle muss mit
von dem Gerät und ziehen Sie den
der Spannung, die auf dem Typenschild
Netzstecker aus der Steckdose, bevor
des Gerätes angegebenen ist, Sie das Kabel oder das Gerät erneut
übereinstimmen. berühren.
• Die Stromquelle muss ausreichend
• Das Gerät ist sofort abzustellen und der
abgesichert sein. Empfohlene Sicherung Netzstecker zu ziehen, wenn Sie es
ist maximal 30 mA. unbeaufsichtigt lassen, bei Wartungs-,
• Zur Verlängerung darf ausschliesslich Reparatur- und Reinigungsarbeiten, vor
ein für den Aussenbereich bestimmtes der Beseitigung von Blockierungen, beim
Kabel mit einem ausreichenden Anheben und Transportieren, nach
Querschnitt und spritzwasser- Kollision mit Fremdkörpern oder beim
geschützten Steckern verwendet Auftreten von ungewöhnlich hohen
werden. Empfohlener Querschnitt bei Vibrationen.
Kabellänge bis 20m - 1.5mm2, bis 50m –
2.5mm2. Achtung: Nach dem Ausschalten des
• Das Verlängerungskabel muss einen Gerätes, rotiert das Messer noch einige
Schutzleiter besitzen, der über den Sekunden weiter. Vergewissern Sie
Netzstecker mit dem Schutzleiter Ihrer sich, dass das Messer komplett zum
elektrischen Anlage verbunden ist. Stillstand gekommen ist, bevor sie am
• Achten Sie darauf, dass das Kabel nicht Gerät arbeiten. Fassen Sie niemals ein
mit Hitze, Öl und scharfen rotierendes Messer an.
Gegenständen in Berührung kommt.DE 14
Verwendung beginnen. Warten Sie bis das Gerät sich
abgekühlt hat.
• Arbeiten Sie nur bei Tageslicht oder bei • Überprüfen Sie regelmässig den Zustand
einer ausreichenden künstlichen des Gerätes. Ersetzen Sie die
Beleuchtung. beschädigten oder abgenutzten Teile nur
• Verwenden Sie das Gerät nicht bei durch Originalzubehör. Bei Verwendung
Regen oder bei nassem Gras. von nicht Originalzubehör übernimmt der
• Kippen Sie das Gerät nicht, wenn Sie Hersteller keine Haftung für die
den Motor starten. möglichen Verletzungen der Personen
• Defekte Schutzvorrichtungen, oder Beschädigungen des Gerätes.
Abdeckungen oder Geräteteile müssen • Beim Arbeiten am Messer muss auf den
vor dem Gebrauch repariert oder ersetzt Schutz von Händen geachtet werden.
werden. Tragen Sie die angemessenen
• Bewegen Sie das Gerät ruhig, laufen Sie Handschuhe.
nicht. • Vergewissern Sie sich, dass alle Muttern,
• Achten Sie auf nebenstehende Bolzen und Schrauben sicher
Personen, Kinder und Tiere. Der angezogen sind.
Bediener ist für die Verletzungen an
anderen Menschen oder
Beschädigungen an deren Eigentum
verantwortlich. FUNKTION
• Wenn Sie eine geneigte Fläche
bearbeiten müssen, achten Sie darauf,
dass Sie festen Tritt haben, quer zur Gerätekomponenten (Bild B)
Neigung und niemals auf- und abwärts
arbeiten. Bearbeiten von Flächen mit B1: Oberer Griffbügel
einer Neigung über 15° ist nicht erlaubt. B2: Motor-Schalthebel
• Seien Sie besonders vorsichtig beim
Richtungswechsel. Rückwärtsgehen soll B3: Sicherheitsknopf
vermieden werden. Achten Sie B4: Netzstecker
insbesondere darauf, dass Sie nicht über
das Kabel stolpern oder das Kabel B5: Unterer Griffbügel
überfahren.
B6: Prallschutz
• Schalten Sie das Gerät ab, wenn Sie
über eine nicht bepflanzte Fläche fahren B7: Schnitthöheneinstellung
müssen.
• Heben oder kippen Sie das Gerät B8: Befestigungsschrauben des oberen
niemals beim laufenden Motor. Griffbügels
• Achten Sie darauf, dass Ihre Hände und B9: Grasfangkorb mit Füllstandsanzeige
Füsse mit rotierenden Teilen nicht in
Berührung kommen. B10: Hinterrad
Wartung B11: Befestigung des unteren Griffbügels
• Schalten Sie das Gerät aus, warten Sie B12: Vorderrad
bis die rotierenden Teile komplett zum
Stehen kommen und ziehen Sie den
Netzstecker, bevor Sie mit Wartungs-,
Reparatur- oder ReinigungsarbeitenDE 15
Lieferumfang (Bild C) Klick eingeschoben werden. Nur dann sind
sie richtig fixiert.
• Packen Sie das Gerät und sämtliche
Teile seitlich aus dem Karton vorsichtig D2: Befestigen Sie den oberen Griffbügel
aus. Das Gewicht des Gerätes ist mehr auf den Stangen des unteren Griffbügels
als 8kg. Heben Sie das Gerät nicht wie abgebildet.
alleine! Bei Bedarf holen Sie sich
D3: Befestigen die das Stromkabel mit den
entsprechende Hilfe.
Kabelclips am Griffbügel. Achten Sie
• Überprüfen Sie, ob alle Teile vollständig darauf, dass das Kabel fern von
und frei von Beschädigungen sind: beweglichen Komponenten bleibt und
genügend Spiel hat.
- 1 x Rasenmäher mit dem oberen
Griffbügel D4: Heben Sie den Prallschutz und hängen
- 2 x Stangen des u. Griffbügels Sie den Grasfangkorb ein. Achten Sie
- 1 x Grasfangkorb darauf, dass kein Mulchkeil installiert ist.
- 2 x Schrauben Achtung! Wenn kein Mulchkeil installiert
- 2 x Kabelklemme ist, darf das Gerät nicht ohne
- 2 x Flügelmutter Grasfangkorb betrieben werden.
- 1 x Gebrauchsanleitung
D5: Wenn Sie die Mulchfunktion
verwenden möchten, nehmen Sie den
• Sollten Sie feststellen, dass der
Fangkorb ab und installieren Sie den
Lieferumfang von Ihrem Gerät nicht
Mulchkeil wie abgebildet.
vollständig oder beschädigt ist, wenden
Sie sich bitte an Ihren Händler.
• Bewahren Sie die Verpackung nach
Möglichkeit bis zum Ablauf der Garantie Betrieb (Bild E)
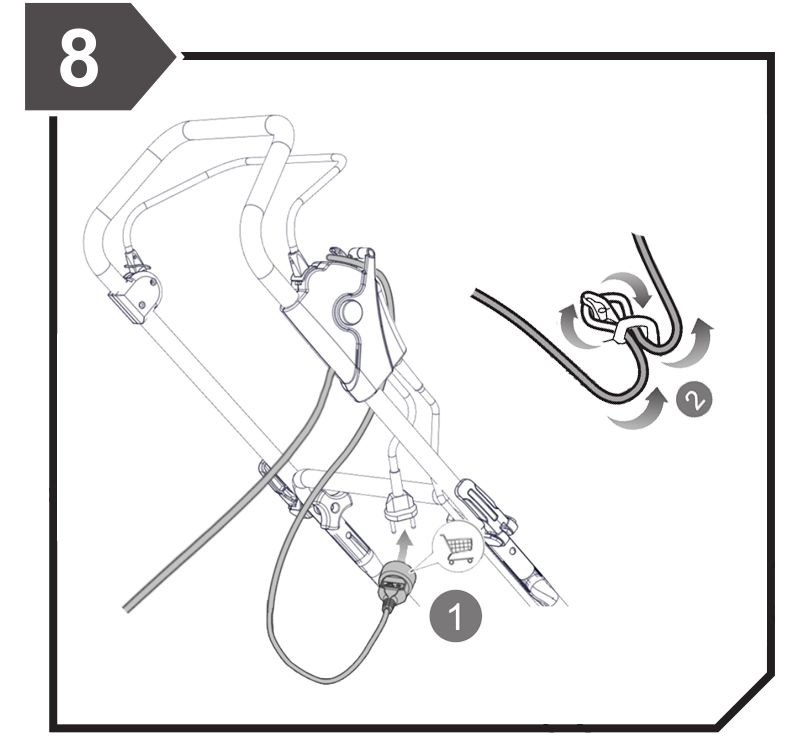
auf. E1: Schliessen Sie den Netzstecker an die
• Achtung! Das Verpackungsmaterial Steckdose an. Beachten Sie unbedingt
enthält Kunststoffbeutel, Folien und die Sicherheitshinweise aus dieser
Kleinteile, die von Kindern Anleitung. Um eine Zugentlastung des
verschluckt werden können. Es Kabels zu erreichen, fixieren Sie das
besteht Erstickungsgefahr. Stromkabel so wie im Bild dargestellt.
Achtung! Seien Sie vorsichtig beim
Auspacken und berühren Sie nicht das E2: Zum Starten des Gerätes halten Sie
scharfe Messer auf der Unterseite des den Sicherheitsknopf gedrückt und ziehen
Gerätes. Sie den Motor-Schalthebel an. Nach dem
Starten des Gerätes können Sie den
Sicherheitsknopf wieder loslassen.
Montage (Bild D) E3: Lassen Sie den Motor-Schalthebel los.
Der Motor schaltet sich ab. Achtung! Nach
D1: Stecken Sie die beiden Stangen des
Loslassen des Motor-Schalthebels
unteren Griffbügels bis zum Klick in die
bleibt das Messer noch für einige
entsprechenden Löcher im Gehäuse des
Sekunden in Bewegung. Warten Sie
Gerätes. Sie können die Höhe des
unbedingt, bis der Motor und das
Griffbügels jederzeit verstellen, in dem Sie
Messer zum kompletten Stillstand
auf den Knopf drücken und die Stangen
gekommen sind, bevor Sie das Gerät
tiefer oder weniger tief einstecken. Es sind
transportieren oder irgendwelche
3 Positionen möglich. Achten Sie darauf,
Arbeiten am Gerät durchführen.
dass die Stangen jedes Mal bis zu einemDE 16
E4: Das Gerät ist mit einer zentralen 5- • Ihr Gerät ist mit einem Überlastschutz
stufigen Höhenverstellung ausgestattet, die ausgestattet. Es kann auslösen, wenn
Ihnen erlaubt, die Rasenhöhe zwischen 25 das Gerät überlastet wird, z.B. beim
und 65 mm einzustellen. Zum Verstellen Mähen von zu hohem und zu nassem
der Höhe ziehen Sie den Griff der Gras, bei der Motorblockierung und/oder
Schnitthöhenverstellung etwas zur Seite Überhitzung. Beim Auslösen vom
und verschieben Sie ihn in die gewünschte Überlastschutz wird der Motor
Position. Die Höhenverstellung darf nur automatisch abgeschaltet. Falls es
bei einem komplett ausgeschalteten passiert:
Gerät durchgeführt werden!
- Ziehen Sie den Netzstecker aus der
E5: Das Gerät ist mit einer
Steckdose,
Füllstandsanzeige ausgestattet. Wenn der
- Lassen Sie das Gerät 5 bis 10 Minuten
Grasfangkorb nicht voll ist, bleibt die
abkühlen,
Klappe der Anzeige offen und es kommt
- Inspizieren Sie das Gerät auf
Luft heraus.
Beschädigungen und Blockierungen,
E6: Ist der Grasfangkorb gefüllt, wird der - Prüfen Sie, ob das Messer scharf
Luftstrom unterbrochen und die Klappe genug ist. Beim Arbeiten am Messer
geht zu. In diesem Fall muss der muss auf den Schutz von Händen
Grasfangkorb entleert werden. Schalten geachtet werden. Tragen Sie die
Sie dazu das Gerät aus und angemessenen Handschuhe.
vergewissern Sie sich, dass das Messer
Nach dem Abkühlen und Beseitigen von
komplett zum Stillstand gekommen ist.
möglichen Störungen, versuchen Sie das
Gerät erneut zu starten. Falls es nicht
startet oder erneut abschaltet, wenden
Tips zum Mähen Sie sich an eine autorisierte
• An Ihrem Gerät kann die Rasenhöhe Servicestelle.
zwischen 25 und 65 mm eingestellt
werden. Um eine optimale Rasenfläche
zu erhalten, empfehlen wir Ihnen die PFLEGE UND WARTUNG
mittlere Schnitthöhe zwischen 30 und 50
mm zu verwenden.
• Bei einem zu hohen Gras empfehlen wir Für eine lange, sichere und zuverlässige
Ihnen in Stufen zu mähen. D.h. zuerst mit Nutzung wird eine regelmässige Pflege und
maximaler Schnitthöhe mähen und Wartung dringend empfohlen. Wir
anschliessend im zweiten oder dritten empfehlen Ihnen das Gerät nach jeder
Gang das Gerät auf die gewünschte Benutzung zu reinigen.
Schnitthöhe einstellen.
• Mähen Sie möglichst in geraden Bahnen. Achtung: Das Gerät darf nur im
Dabei sollen die Bahnen um einige ausgeschalteten und abgekühlten
Zentimeter überlappen. Zustand gepflegt und gewartet werden.
• Fangen Sie mit Mähen immer an dem Ziehen Sie unbedingt den Netzstecker
Rand der Rasenfläche, der am nächsten ab bevor Sie mit der Arbeit beginnen.
zur Steckdose liegt. Bewegen Sie das Beim Arbeiten am Messer muss auf den
Gerät von der Steckdose weg, so dass Schutz von Händen geachtet werden.
das Kabel stets auf der bereits gemähten Tragen Sie die angemessenen
Rasenfläche liegt. Seien Sie vorsichtig Handschuhe.
beim Wenden des Gerätes.DE 17
Reinigung und Inspektion wird ein Holzblock benötigt, mit dem Sie
das Messer einklemmen können (nicht im
F1: Ziehen Sie den Netzstecker des Lieferumfang).
Gerätes ab. Entfernen Sie die Grasreste,
den Staub und Schmutz mit einer Bürste G1: Legen Sie das Gerät auf die Seite.
von der Geräteoberfläche. Alternativ kann klemmen Sie den Holzblock so, dass das
auch Druckluft verwendet werden. Tragen Messer nicht rotieren kann. Lösen Sie mit
Sie dabei Hör- und Augenschutz. Achten dem Schlüssel (nicht im Lieferumfang) die
Sie, dass keine Personen sich in der Schraube. Entfernen Sie die Schraube,
Umgebung aufhalten. Scheibe und das Messer.
F2: Benutzen Sie kein Wasser. Das kann G2: Tauschen Sie das Messer gegen ein
elektrische Komponente an Ihrem Gerät neues. Achten Sie darauf, dass das Messer
beschädigen. Reinigen Sie Ihr Gerät nie mit auf der Unterlage richtig positioniert ist.
einem Hochdruckreiniger. Benutzen Sie Legen Sie die Unterlegscheibe und ziehen
insbesondere zur Reinigung von Sie die Schraube leicht an.
Plastikteilen keine Chemikalien, Benzin
G3: Klemmen Sie den Holzblock erneut so,
oder Lösemittel. Dies kann unter
dass das Messer nicht rotieren kann.
Umständen zur Schädigung von diesen
Ziehen Sie die Schraube mit dem
Teilen sowie vom Schutzlack führen.
Schraubenschlüssel fest an. Benutzen Sie
Reiben Sie das Gerät mit einem feuchten
dabei unbedingt einen Drehmoment-
Tuch ab.
schlüssel (nicht im Lieferumfang).
• Überprüfen Sie regelmässig, ob alle
Schrauben, Muttern und Bolzen richtig
angezogen sind. Aufbewahrung (Bild H)
• Prüfen Sie, ob alle Schutzvorrichtungen
und Abdeckungen richtig angebracht und Das Gerät soll sauber und trocken in einem
funktionsfähig sind. Beschädigte oder geschlossenen und gut gelüfteten Raum,
abgenutzte Teile müssen durch ausserhalb der Reichweite von Kindern,
Originalzubehör ersetzt werden. aufbewahrt werden.
• Prüfen Sie regelmässig den H1: Trennen Sie das Gerät vom Strom ab
Grasfangkorb. Durch den beschädigten und lassen Sie es abkühlen. Nehmen Sie
Grasfangkorb können eingesaugte den Grasfangkorb ab.
Gegenstände ausgeworfen werden. Dies
kann unter Umständen zu Verletzungen H2: Lösen Sie die Flügelmutter und
oder Beschädigungen führen. klappen Sie den Griffbügel nach unten.
• Zur Reinigung vom Grasfangkorb soll H3: Drücken Sie auf die Knöpfe und ziehen
dieser von dem Gerät abgehängt, mit Sie die beiden Stangen des unteren
Wasser gewaschen und getrocknet Griffbügels heraus.
werden. Stellen Sie sicher, dass der
Grasfangkorb komplett trocken ist, bevor H4: Stellen Sie den Grasfangkorb auf den
Sie ihn wieder benutzen. Rasenmäher. So kann das Gerät dauerhaft
aufbewahrt werden.
Messerwartung (Bild G)
Vor der Messerwartung soll das Gerät vom
KONFORMITÄT
Netz getrennt und gereinigt werden.
Wir erklären auf eigene und alleinige
Nehmen Sie den Grasfangkorb ab. Tragen Verantwortung, dass die von unserem
Sie die angemessenen Handschuhe. EsDE 18
Werk in Serienfertigung hergestellten Gerät ausgeschaltet und abgekühlt ist.
Geräte: Klemmen Sie den Netzstecker ab.
HR3302E Folgende Probleme können auftreten:
• Falls der Motor nicht startet, prüfen
folgenden harmonisierten EU-Richtlinien Sie, ob der Sicherheitsknopf gedrückt ist,
und EU-Normen hinsichtlich der Sicherheit Netzstecker und das
und produktspezifischen Standards Verlängerungskabel nicht defekt sind,
entsprechen: Netzstecker eingesteckt ist.
2006/42/EC, 2014/30/EC, • Falls das Gerät ausschaltet und nicht
2000/14/EC Annex VI, 2011/65/EU wieder startet, überprüfen Sie die
Sicherung der Stromversorgung. Lassen
Angewendete Normen: Sie den Motor abkühlen und prüfen Sie,
ob es evtl. eine Verstopfung gibt. Stellen
EN 60335-1:2012 +A11:2014, EN 60335-2- Sie eine grössere Schnitthöhe ein, um
77:2010, EN 62233:2008, EN 55014-2:2015,
den Motor nicht zu überlasten. Falls das
EN 55014-1:2006/+A1:2009/+A2:2011,
EN 61000-3-2:2014, EN 61000-3-11:2000,
Gras zu nass ist, warten Sie bis es
ISO11094:1991, EN ISO3744:1995, Annex III trocknet.
of 2000/14/EC as amended by 2005/88/EC, • Falls das Gerät vibriert oder unruhig
IEC 62321-1: 2013, IEC 62321-2: 2013 läuft, prüfen Sie, ob alle Schrauben,
insbesondere die Messerschraube,
Garantierter Schallleistungspegel LwA: richtig angezogen sind und ob das
96 dB (A), Messer gewuchtet und unbeschädigt ist.
Vibration: < 4.5 m/s2 Tauschen Sie ggf. das Messer aus.
• Falls der Rasen lückenhaft gemäht
Benannte Stelle: wird, stellen Sie eine grössere
Intertek Testing&Certification Ltd, Davy Schnitthöhe ein, prüfen Sie, ob das
Avenue, Knowlhill, Milton Keynes, MK5 8NL, Messer scharf ist. Tauschen Sie das
No. 0359 Messer ggf. aus.
• Falls das gemähte Gras nicht
Unterlagen werden aufbewahrt am Sitz des komplett eingesammelt wird, prüfen
Herstellers: HPP AG, Churerstrasse 135, Sie, ob der Grasfangkorb überfüllt oder
CH-8808 Pfäffikon SZ. verstopft ist.
EU-Importeur: HPP Pro GmbH, Rheinblick
7, DE-79725 Laufenburg.
GARANTIE
Pfäffikon SZ, den 21.11.2019
Ihr Gerät hat eine gesetzlich
------------------------ vorgeschriebene Gewährleistungsfrist von
Dr. E. Ilinich (Managing Director)
2 Jahren. Zusätzlich zu dieser
Gewährleistung versprechen wir Ihnen, bei
einer ausschliesslich privaten, nicht
PROBLEMBEHEBUNG gewerblichen oder handwerklichen
Nutzung, eine 24-monatige Garantie ab
Kaufdatum des Gerätes. Die Garantie
Wichtig! Wenn Sie am Gerät arbeiten, erstreckt sich auf die Behebung von
achten Sie unbedingt darauf, dass das Material- und/oder Herstellungsfehler.DE 19
Von der Garantie ausgeschlossen sind
Verschleissteile, wie das Messer. Weiterhin
werden durch die Garantie keine Schäden
und Mängel abgedeckt, die durch
fehlerhafte Montage, nicht Beachtung der
Hinweise der Betriebsanleitungen des
Gerätes, mangelnde Wartung und
Instandhaltung, unsachgemässe oder
übermässige Anwendung, äussere
Umwelt- und Krafteinwirkungen,
Verwendung einer Stromquelle, die nicht
mit dem Typenschild des Gerätes
übereinstimmt, entstehen.
Unsere Produkte werden unter strengsten
Qualitätsanforderungen produziert. Sollte
Ihr Gerät jedoch unerwarteter Weise
ausfallen, bedauern wir das sehr. In diesem
Fall wenden Sie sich bitte an eine von
HYUNDAI autorisierte Werkstatt in Ihrer
Nähe oder an Ihren Fachhändler. Die
aktuelle Liste der autorisierten Werkstätten
finden Sie auf unserer Webseite:
für Deutschland:
www.hyundaipower-de.com
für die Schweiz:
www.hyundaipower-ch.com
Ihre Rechnung gilt als Garantieschein, bitte
bewahren Sie diese sorgfältig auf.
ENTSORGUNG
Die Verpackung enthält wieder-
verwertbare Stoffe und muss umwelt-
gerecht entsorgt werden. Nach der EU
Richtlinie 2002/96/EG muss auch Ihr nicht
mehr gebrauchsfähiges Gerät getrennt von
dem Hausmüll gesammelt und entsorgt
werden. Der Besitzer muss sich um eine
umweltgerechte Entsorgung kümmern.
Es ist kein Hausmüll! Informieren
Sie sich über die entsprechenden
Sammelstellen bei der örtlichen
Behörde oder Ihrem Händler.EN 20 CONTENTS • TECHNICAL DATA • SAFETY INSTRUCTIONS • FUNCTION • CARE AND MAINTENANCE • CONFORMITY • TROUBLESHOOTING • WARRANTY • DISPOSAL TECHNICAL DATA Model HR3302E Input Power 1300 W Voltage/Frequency 230-240 V / 50 Hz Protection Class / II Idle Speed 3600 U/min Cutting Width 330 mm Cutting Height 25-65 mm Cutting Height Positions 5 Grass Catcher Capacity 35 l Wheel Diameter (front/rear) 140/180 mm Sound Pressure Level LpA 76.8 dB(A), K=3dB(A) Sound Power Level LwA 87.7 dB(A), K=0.81dB(A) Guaranteed Sound Power Level LwA 96 dB(A) Vibration
EN 21

SAFETY INSTRUCTIONS                            A7-A8: During mowing, wear hearing
                                               protection and safety glasses.

CAUTION! Before using this lawn mower,
please read these operation instructions       General Information
carefully and become familiar with all         • This machine is exclusively intended for
operating     elements      and   functions.     private use for lawn maintenance at the
Disobeying of safety precautions and             own house, but not for mowing the grass
instructions may result in accidents             at public places and parks, as well as the
involving serious injuries, e.g. caused          use in agriculture and forestry. Yearly
by electrical shock, burning and flying          use should not exceed 50 hours. The
objects, and / or damage to the device as        manufacturer does not accept any
well as objects and persons in the               warranty      for   commercially     used
immediate            environment.       The      machines.
manufacturer does not assume any liability     • Children under 16 years, persons with
for cases like this.                             limited physical, sensory or mental
Keep these operation instructions readily        abilities or persons unfamiliar with this
accessible for later use. If you pass this       lawn mower, are not allowed to use it.
lawn mower on to other persons, also pass      • Persons under the influence of alcohol,
on the operation instructions.                   drugs and/or medication, are not allowed
                                                 to use this lawn mower.
                                               • The        device       generates       an
Picture Icons                                    electromagnetic field that may interact
                                                 with active or passive medical implants.
A1: General safety information. Before           Persons with such implants are advised
using the lawn mower, read these operation       to consult their doctor or the
instructions carefully and become familiar       manufacturer of the implant in order to
with all operating elements and functions.       clarify the compatibility before using the
A2: Risk of injury through objects ejected       device.
from the machine. Keep an eye on persons       • It is not allowed to use this lawn mower
nearby. Keep sufficient distance.                for the trimming of bushes, hedges and
                                                 shrubs, for cutting and shredding of
A3: Keep distance from rotating parts.           climbing plants or mowing of rooftop
There is a danger of injury from the sharp       lawns or plants in flower boxes.
blade. Do not put your hands underneath          Furthermore, it is not allowed to use the
the machine housing and watch your feet.         machine for the shredding of tree and
                                                 hedge clippings, cleaning sidewalks and
A4: Be sure to stop the engine and unplug
                                                 levelling of bumps in the ground.
the power plug before performing any work
on the device. Even if you leave the device
unattended, the power plug must be
                                               Preparation
disconnected.
A5: Danger of electrical shock. Pay            • Wear appropriate, closed clothing, long
attention to the power cable and keep it         trousers and sturdy shoes. Never work
away from the cutting blade.                     bare-footed or wearing open sandals.
                                               • Wear safety glasses and hearing
A6: The device must not be used during           protection.
rain or exposed to rain.                       • Before use, check if the blade is sharp
                                                 enough and properly attached. A
EN 22
damaged or worn blade needs to be immediately and unplug the power plug
replaced. Only use original accessory. from the socket before touching the cable
• Remove foreign objects such as stones, or the device again.
sticks, branches, bones and wires from • The device must be switched off
the area you are going to mow. immediately and the power plug must be
unplugged, if you leave the device
unattended, or during maintenance,
Power Plug repair and cleaning work, before removal
of blockages, when lifting and
• The voltage of the current source must transporting the device, after a collision
be the same as the voltage indicated on with foreign objects or when abnormally
the nameplate of the device. high vibrations occur.
• The current source must be sufficiently
fused. Recommended fuse rating is 30 Caution: After switching off the device,
mA max. the blade continues to rotate for a few
seconds. Make sure the blade has
• For the extension, a cable designed for
stopped completely before working on
outdoor use with a sufficient cross-
the device. Never touch a rotating blade.
section and splash-proof plugs must be
used. Recommended cross-section for
cable lengths up to 20m - 1.5 mm2, up to
50m - 2.5 mm2. Use
• The extension cable must have a
• Only work during the day or with
protective conductor which is connected
sufficient artificial lighting.
to the protective conductor of your
• Do not use the lawn mower during rain or
electrical device via the power plug.
on wet grass.
• Be careful not to expose the cable to
• Do not tilt the lawn mower when you are
heat, oil, or sharp objects.
starting the engine.
• When using a cable reel, the cable must
• Damaged protective guards, covers or
be completely rolled out before use.
machine parts need to be repaired or
Coiled cable may overheat.
replaced before use.
• Do not use any adapters that do not have
• Use the lawn mower calmly, do not run.
splash protection and are not intended
• Keep an eye on persons, children and
for outdoor use.
animals near you. The person operating
• When unrolling, the cable should be
the lawn mower is responsible for injuries
checked for damage. Damaged cable
to other persons or damage to their
should be replaced immediately and
property.
completely.
• If you need to mow a graded surface, be
• Never plug or touch the power plug with
careful to walk and stand safely and to
wet hands or during rain.
work at right angles to the grade, never
• To prevent an accidental start-up of the
upwards or downwards. Working on
device, make sure that the motor lever
areas with a grade of more than 15° is not
and the safety button on the device are
allowed.
not actuated before inserting the power
• Be particularly careful when changing
plug.
direction. Backwarding is to be avoided.
• Never pull the cable itself to pull the plug
Pay particular attention to not stumbling
out of the socket.
over the cable or running over the cable
• Make sure that you don't run over the
• Turn the lawn mower off when you need
cable during the mowing. If this happens,
to cross an unplanted area.
however, get away from the deviceEN 23
• Never lift or tilt the lawn mower with the B2: Engine Lever
engine on.
B3: Safety Button
• Be careful not to touch the rotating parts
with your hands and feet. B4: Power Plug
B5: Lower Handlebar
Maintenance B6: Impact Protection
• Switch off the device, wait until the B7: Cutting Height Adjustment
rotating parts come to a complete
B8: Fixing screws of the upper handlebar
standstill and unplug the power plug
before starting any maintenance, B9: Grass Collecting Basket with Level
repair or cleaning work. Wait until the Indicator
device has cooled down.
• Check the condition of the lawn mower B10: Rear Wheel
regularly. Replace damaged or worn B11: Fixing of the lower handlebar
parts with original parts only. When using
non-original parts, the manufacturer B12: Front Wheel
does not assume liability for possible
injuries to persons or damage of the lawn
mower. Scope of Supply (Image C)
• When working on the blade, the hands • Carefully take the lawn mower and all
need to be protected. Wear appropriate parts out of the box sideways. The lawn
gloves. mower weighs more than 8kg. Do not
• Make sure that all nuts, bolts and screws lift the lawn mower alone! If needed,
are safely tightened. ask someone for help.
• Check, if all the parts are complete and
free of damage:
Storage
• The lawn mower may only be kept in - 1 x Lawnmower with the upper and
rooms with good ventilation. lower handlebar
• Before storing the lawn mower, it has to - 2 x Rods of the lower handlebar
cool off completely. - 1 x Grass collecting basket
• It needs to be free from dirt and grass. - 2 x Screws
Dried grass can catch fire the next time - 2 x Cable clamp
the lawn mower is used. - 2 x Wing nut
• The lawn mower may not be tilted. Oil - 1 x Instruction manual
and petrol are at risk of leaking.
• If you find that the scope of supply is not
complete or damaged, please contact
your dealer.
• Keep the packaging until after the
expiration of the warranty, if possible.
FUNCTION • Warning! The packaging material
includes plastic bags, foil and small
Machine Components (Image B) parts, which could be swallowed by
children. There is danger of
B1: Upper Handlebar suffocation.EN 24
• Warning! Be careful during unpacking transporting the device or performing
and do not touch the sharp blades at the any work on the device.
bottom of the lawn mower.
E4: The device is equipped with a central
5-step height adjustment which allows you
to adjust the lawn height between 25 and
Assembly (Image D)
65 mm.
D1: Insert the two rods of the lower
E5: To adjust the height, pull the handle of
handlebar into the corresponding holes in
the height adjustment slightly to the side
the housing of the device until you here a
and move it to the desired position. The
click sound. You can adjust the height of
height adjustment may only be carried
the handlebar at any time by pressing the
out with a completely switched off
button and inserting the rods deeper or less
device!
deep. Three positions are possible. Make
sure that the rods are inserted up to the E6: The lawn mower has a fill level
click each time. Only then are they properly indicator. If the grass catcher is not full, the
fixed. flap of the indicator stays open and air
comes out.
D2: Attach the upper handlebar to the rods
of the lower handlebar as shown in the E7: If the grass catcher is full, the air flow is
image. disrupted and the flap closes. If this
happens, the grass catcher needs to be
D3: Fix the power cable to the handlebar
emptied. To empty it, turn off the lawn
with the cable clips. Make sure that the
mower and make sure that the blade is
cable stays away from moving components
not moving any more.
and has enough space.
D4: Lift the impact protection and hang up
the grass basket. Caution! The device Tips for Mowing
must not be used without the grass
• It is possible to adjust the lawn height to
basket.
a height between 25 and 65 mm on the
lawn mower. To have the optimal lawn,
Operation (Image E) we recommend using the medium cutting
height between 30 and 50 mm.
E1: Plug the power plug into the socket. • When the grass is too high, we
Pay strict attention to the safety recommend mowing in different stages.
instructions in this manual. To obtain a This means to start with maximum
strain relief of the cable, fix the power cable cutting height and then set it to the
as shown in the image. desired cutting height in the second or
third pass.
E2: To start the device, hold down the
• Try to mow in straight lines if possible.
safety button and pull the engine lever.
The lines should overlap at several
After starting the device, you can release
centimeters.
the safety button.
• Always start with the mowing at the edge
E3: Release the engine shift lever. The of the lawn that is closest to the socket.
engine turns off. Caution! After releasing Move the device away from the socket so
the engine lever, the blade keeps that the cable always lies on the already
moving for a few seconds. Be sure to mowed lawn surface. Be careful when
wait until the engine and the blade have turning the device.
come to a complete standstill beforeEN 25
• Your device is equipped with an overload mower surface. Alternatively, you can use
protection. It can trigger when the device pressurized air. While doing that, wear
is overloaded, e.g. when mowing high hearing protection and eye protection.
and too wet grass, during engine Make sure that no other persons are
blockage and / or overheating. When the around.
overload protection is triggered, the
F2: Do not use water. It may damage the
engine is switched off automatically. If
electrical component of your device. Never
this happens:
clean your lawn mower with a pressure
washer. Do not use any chemicals, petrol
- Unplug the power plug from the
or solvents to clean it, especially not on
socket,
plastic parts. This could lead to damage of
- Allow the device to cool down for 5 to
these parts and the protective coating.
10 minutes,
Clean the lawn mower with a wet cloth.
- Inspect the device for damage and
blockages, • Regularly check if all screws, nuts and
- Check whether the blade is still sharp bolts are tightened correctly.
enough. When working on the blade, • Check if all protective devices and covers
care must be taken to protect the are attached correctly and are
hands. Please wear the appropriate functioning. Damaged or worn parts
gloves. need to be replaced with original parts.
After cooling and eliminating possible • Regularly check the grass catcher. If the
errors, try to restart the device. If it does grass catcher is damaged, sucked in
not start or shut down again, contact an objects could be ejected at speed. This
authorized service center. could possibly lead to injuries or damage.
• To clean the grass catcher, detach it from
the lawn mower, wash it with water and
let it dry. Make sure that the grass
CARE AND MAINTENANCE catcher is completely dry before using it
again.
For a long, safe and reliable use, regular
care and maintenance is highly
recommended. We recommend cleaning
the lawn mower after every use.
Caution: Care and maintenance may
only be carried out when the lawn
mower is turned off and cooled down.
Disconnect the power plug of the
device. before working on the lawn
mower in any case. When working on
the blade, the hands need to be
protected. Wear appropriate gloves.
Cleaning and Inspection
F1: Disconnect the power plug of the
device. Remove remaining grass clippings,
dust and dirt with a brush from the lawnEN 26
Blade Maintenance (Image G) CONFORMITY
Before the blade maintenance, the device
We hereby declare on our sole and
should be disconnected from the mains and
exclusive responsibility that the models
cleaned. Remove the grass basket. Wear
the appropriate gloves. A wooden block is
HR3302E
needed to pinch the blade (not included).
G1: Place the device on the side. Clamp manufactured in series by our facility,
the wooden block so that the blade can not comply with the following harmonized EU
rotate. Use the wrench (not included) to guidelines and EU standards with regard to
loosen the screw. Remove the screw, shim safety and product-specific standards.
and blade.
2006/42/EC, 2014/30/EC,
G2: Replace the blade with a new one. 2000/14/EC Annex VI, 2011/65/EU
Make sure that the blade is correctly
positioned on the support. Insert the shim Applied Standards:
and tighten the screw slightly. EN 60335-1:2012 +A11:2014, EN 60335-2-
G3: Re-clamp the block so that the blade 77:2010, EN 62233:2008, EN 55014-2:2015,
EN 55014-1:2006/+A1:2009/+A2:2011,
can not rotate. Tighten the screw securely
EN 61000-3-2:2014, EN 61000-3-11:2000,
with the wrench. Always use a torque
ISO11094:1991, EN ISO3744:1995, Annex III
wrench (not included). of 2000/14/EC as amended by 2005/88/EC,
IEC 62321-1: 2013, IEC 62321-2: 2013
Storage (Image H) Guaranteed sound power level LwA,
96 dB(A)
The lawn mower needs to be stored dry and VibrationEN 27
TROUBLESHOOTING The guarantee does not include wearing
parts such as the blade. In addition, the
guarantee does not cover any damage or
defects caused by incorrect installation,
Important! When working on the device, failure to obey the instructions given in the
make sure that the device is switched off operating manual of the device, lack of
and has cooled down. Disconnect the maintenance and care, improper or
power plug. excessive use, external environmental and
The following problems may occur: force effects, use of a power source that
does not comply with the name plate of the
• If the engine does not start, check device.
whether the safety button is pressed
down, the power plug and the extension Our products are produced under strict
cable are not defective, the power plug is quality requirements. If your lawn mower
plugged in. should fail nevertheless, we are very sorry.
• If the device switches itself off and In this case, please contact a local
does not restart, check the fuse of the workshop authorized by HYUNDAI or your
power supply. Allow the engine to cool specialist dealer. The current list of
down and check if there is any blockage. authorized workshops you can find on our
Select a larger cutting height to take care website:
not to overstrain the engine. If the grass for Germany:
is too wet, wait until it dries.
• If the device vibrates or does not www.hyundaipower-de.com
move smoothly, check whether all for Switzerland:
screws, in particular the blade screw, are
correctly tightened and whether the www.hyundaipower-ch.com
blade is balanced and undamaged. If
Your purchase receipt is your warranty
necessary, replace the blade.
certificate, keep it in a safe place.
• If the lawn is mowed with gaps, set a
larger cutting height and check whether
the blade is sharp. If necessary, replace
the blade. DISPOSAL
• If the mown grass is not collected
The packaging contains reusable materials
completely, check whether the grass
and must be disposed of in an
basket is overfilled or blocked.
environmentally compatible manner.
According to EU Directive 2002/96/EC,
your device, which is no longer usable,
WARRANTY must also be collected and disposed of
separately from household waste. The
Your lawn mower has warranty period of 2 owner has to take care of environmentally
years, as prescribed by law. In addition to friendly disposal.
this warranty, we give you a guarantee of
24 months from the date of purchase of the It is not household waste! You can
lawn mower, when it is used exclusively for get information on appropriate sites
private, non-commercial, or non-artisanal at your local authorities or from your
purposes. The warranty applies to the dealer.
repair of material defects and
manufacturing defects.IT 28 CONTENUTO • DATI TECNICI • ISTRUZIONI DI SICUREZZA • FUNZIONE • CURA E MANUTENZIONE • CONFORMITÀ • RISOLUZIONE DI PROBLEMI • GARANZIA • SMALTIMENTO DATI TECNICI Model HR3302E Potenza assorbita 1300 W Tensione di rete 230-240 V / 50 Hz Grado di proteizone / II Velocita al minimo 3600 U/min Larghezza di taglio 330 mm Altezza di taglio 25-65 mm Posizioni regolazione altezza di taglio 5 Volume del raccoglierba 35 l Diametro delle ruote (anteriore/posteriore) 140/180 mm Livello di pressione sonora LpA 76.8 dB(A), K=3dB(A) LIvello di potenza sonora LwA 87.7 dB(A), K=0.81dB(A) Livello di potenza sonora garantito LwA 96 dB(A) Vibratione
IT 29

ISTRUZIONI DI SICUREZZA                          A6: L’apparecchio non deve essere
                                                 utilizzato con la pioggia, né deve essere
                                                 esposto ad essa.

ATTENZIONE! Prima dell’utilizzo di questo        A7: Indossare cuffie e occhiali di protezione
apparecchio, leggere attentamente le             durante la falciatura.
istruzioni per l’uso e familiarizzare con i
comandi e le funzioni. Ignorare le
disposizioni e le indicazioni di sicurezza       Indicazioni generiche
può provocare incidenti con lesioni
gravi,     come      scosse       elettriche,    • L’apparecchio è designato per il solo
combustione e dispersione in aria di               utilizzo privato e per la cura di erba e
oggetti,     o     anche     causare        il     superfici interne alla propria abitazione,
danneggiamento dell’apparecchio o di               non per aree pubbliche, parchi, boschi e
oggetti e persone nelle immediate                  in attività agricole. Nell’arco di un anno
vicinanze. Per tali incidenti, il produttore       non deve essere superato un tempo di
non risponde di alcuna responsabilità.             utilizzo di 50 ore. Per gli apparecchi
                                                   destinati ad uso commerciale il
Conservare accuratamente tali disposizioni         produttore non assume nessuna
sull’uso dell’apparecchio per un futuro            garanzia.
utilizzo. Nel caso in cui il prodotto venga      • L’apparecchio non deve essere utilizzato
ceduto ad ulteriori persone, fornire               da bambini di età inferiore ai 16 anni,
unitamente ad esso queste istruzioni d’uso.        persone con limitate capacità fisiche,
                                                   sensoriali o psichiche, che non abbiano
                                                   familiarizzato con l’apparecchio stesso.
Simboli grafici                                  • L’apparecchio non deve essere utilizzato
                                                   da persone sotto effetto di alcol, droghe
A1: Indicazione generica di pericolo. Prima
                                                   e/o farmaci.
dell’utilizzo di tale apparecchio, leggere
attentamente le istruzioni per l’uso e           • L’apparecchio         genera   un    campo
familiarizzare con i comandi e le funzioni         elettromagnetico, in grado di interagire in
disponibili.                                       determinate circostanze con impianti
                                                   medici attivi o passivi. Alle persone con
A2: Pericolo di lesioni tramite oggetti            tali impianti è consigliato di contattare un
scagliati dall’apparecchio. Fare attenzione        medico o il produttore dell’impianto per
alle persone presenti nelle vicinanze.             valutare la loro compatibilità.
Mantenere un’opportuna distanza.                 • Non è previsto l’utilizzo dell’apparecchio
                                                   per la potatura di arbusti, cespugli e siepi,
A3: Tenersi lontano dalle parti rotanti
                                                   per il taglio o la frantumazione di piante a
Pericolo di lesioni a causa della lama
                                                   filari o la tosatura di prato su piante da
affilata. Non toccare sotto l’alloggiamento
                                                   tetto o in vasi da balcone. Inoltre non ne
dell’apparecchio e fare attenzione ai piedi.
                                                   è previsto l’utilizzo anche per la
A4: Prima di ogni utilizzo, rimuovere il cavo      la pulitura di marciapiedi, nonché per
di accensione della candela. Anche in caso         l’appiattimento di superfici ruvide.
di deposito incustodito, il cavo deve essere
rimosso.
A5: Rischio di scosse elettriche. Prestare       Preparazione
attenzione al cavo di alimentazione e            • Indossare abiti chiusi adeguati, quali
tenerlo lontano dalla lama di taglio.              lunghi pantaloni e calzature obbligate
                                                   Non lavorare a piedi nudi o con sandali.
IT 30
• Indossare occhiali e cuffie di protezione. • Non tirare mai il cavo per rimuovere
• Prima dell’utilizzo, assicurarsi che il direttamente la spina dalla presa di
coltello sia sufficientemente affilato e corrente.
adeguatamente fissato. In caso di coltelli • Assicurarsi che il cavo non si trovi sul
danneggiati o usurati eseguirne la percorso di falciatura. Tuttavia, se
sostituzione. Utilizzare solamente dovesse succedere, allontanarsi subito
componenti originali. dall’apparecchio e staccare la spina dalla
• Eliminare qualsiasi corpo estraneo come presa di corrente prima di toccare di
pietre, bastoni, rami, ossi e cavi, dalla nuovo il cavo o l 'apparecchio.
superficie di lavoro. • Spegnere subito l’apparecchio e
staccare la spina se lo si lascia
incustodito, se si eseguono lavori di
Spina manutenzione, riparazione e pulizia,
prima della rimozione dei blocchi durante
• La tensione di alimentazione deve il sollevamento e il trasporto, dopo la
corrispondere alla tensione specificata collisione con corpi estranei o al
sulla targhetta. verificarsi di vibrazioni insolitamente alte.
• La fonte di alimentazione deve essere • Attenzione: Dopo aver spento
sufficientemente assicurata. Si consiglia l'apparecchio, la lama continua a
una sicurezza massima di 30 mA. ruotare per alcuni secondi.
• Per il prolungamento del cavo può Assicurarsi che la lama sia
essere utilizzato esclusivamente un cavo completamente ferma prima di
per uso all’aperto con una sezione operare sul dispositivo. Non toccare
trasversale di adeguata misura, e spina mai una lama rotante.
resistente agli schizzi d’acqua. La misura
consigliata della sezione per cavi di
lunghezza fino a 20m è di 1.5mm2, per Utilizzo
cavi fino a 50m - di 2.5mm2.
• Il cavo di prolunga deve avere un filo di • Lavorare solamente alla luce del giorno o
terra, che viene collegato tramite illuminazione artificiale adeguata.
la spina, al Suo impianto elettrico. • Non utilizzare l’apparecchio in caso di
• Assicurarsi che il cavo non venga a pioggia o con erba bagnata.
contatto con calore, olio e oggetti affilati. • Non inclinare l’apparecchio
• Quando si utilizza una bobina di cavo, il all’accensione del motore.
cavo deve essere completamente • I dispositivi, di protezione, le parti e i
srotolato prima dell'uso. Il cavo arrotolato coperchi difettosi devono essere riparati
potrebbe surriscaldarsi. o sostituiti prima dell’utilizzo.
• Non utilizzare adattatori che non • Muovere l’apparecchio lentamente, non
dispongono di protezione dagli spruzzi e correre.
non sono destinati per uso esterno. • Prestare attenzione a persone, bambini e
• Quando si srotola il cavo, controllare che animali nelle vicinanze. L’utilizzatore è
non sia danneggiato. Il cavo danneggiato responsabile per lesioni a persone o per
deve essere immediatamente sostituito. danneggiamento della proprietà altrui.
• La spina non deve mai essere toccata • Se dovete lavorare una superficie
con le mani bagnate o sotto la pioggia. inclinata, prestare attenzione, ad avere
• Per evitare un avviamento involontario un passo antisdrucciolevole,
della macchina, controllare che la leva trasversalmente, all’inclinazione e mai.
del motore e il pulsante di sicurezza non verso l’alto o verso il basso. Non è
siano premuti prima di inserire la spina.IT 31
consentita la lavorazione di superfici con B1: Manico superiore
un’inclinazione maggiore di 15°.
B2: Leva frizione del motore
• Prestare particolare attenzione ai cambi
di direzione. Evitare di procedere B3: Pulsante di sicurezza
all’indietro. Prestare particolare
attenzione a non inciampare nel cavo o a B4: Spina d’alimentazione
passare sopra il cavo. B5: Manico inferiore
• Spegnere l’apparecchio nel momento in
cui si attraversa una superficie non B6: Protezione da impatto
coperta da piante.
B7: Regolazione dell’altezza di taglio
• Non sollevare mai o inclinare
l’apparecchio mentre il motore è in B8: Bullone di fissaggio del manico
funzionamento superiore
• Fare attenzione che mani e piedi non
B9: Cesto raccoglierba con indicatore di
vengano in contatto con le parti rotanti
livello
dell’apparecchio.
B10: Ruota posteriore
B11: Fissaggio del manico inferiore
Manutenzione B12: Ruota anteriore
• Spegnere l’apparecchio, attendere che
le parti rotanti si fermino
completamente e poi scollegare la Consegna (Figura C)
spina prima di iniziare lavori di • Rimuovere attentamente dalla
manutenzione, riparazione o di pulizia. confezione lateralmente l’apparecchio e
Attendere che l’apparecchio si sia tutte le parti. Il peso dell’apparecchio
raffreddato supera i 8kg. Non sollevare
• Controllare regolarmente lo stato l’apparecchio da soli!
dell’apparecchio. Sostituire le parti • Controllare che tutti i pezzi siano integri
danneggiate o consumate solo con pezzi e esenti da danni
originali. Il produttore non assume alcuna
responsabilità per possibili lesioni a
persone o danneggiamento
- 1 x Tosaerba con manico superiore e
all’apparecchio, se tali parti vengono
inferiore
sostituite da pezzi non originali.
- 2 x Barra per manico inferiore
• Per operazioni sul coltello, è necessario
- 1 x Cesto raccoglierba
proteggere accuratamente le mani.
- 2 x Vite
Indossare guanti di protezione adeguati.
- 2 x Morsetto per cavi
• Assicurarsi che dadi, bulloni e viti siano
- 2 x Madrevite ad alette
assicurati correttamente all’apparecchio.
- 1 x Manuale d‘uso
• In caso di ricezione del prodotto non
integro o con eventuali danneggiamenti,
FUNZIONE rivolgersi direttamente al venditore.
• Conservare l’imballaggio possibilmente
fino alla scadenza della garanzia.
Componenti dell‘apparecchio • Attenzione! Il materiale di imballaggio
(Figura B) contiene sacchetti di plastica, fogli eIT 32
piccoli pezzi, che possono essere dell’apparecchio è possibile rilasciare il
ingeriti da bambini. Vi è pericolo di pulsante.
asfissia.
E3: Lasciar andare la leva di cambio del
• Attenzione! Prestare attenzione
motore. Il motore si fermerà. Attenzione!
all’apertura dell’imballaggio. Non toccare
Dopo il rilascio della leva di cambio del
il coltello affilato nella parte inferiore
motore, la lama rimane in movimento
dell’apparecchio.
ancora per alcuni secondi. Attendere
che il motore e la lama siano
completamente fermi, prima di
Montaggio (Figura D) trasportare l’apparecchio o di effettuare
qualsiasi tipo di lavoro su di esso.
D1: Inserire entrambe le barre del manico
inferiore fino al click, negli appositi fori E4: L’apparecchio è dotato di un dispositivo
dell’alloggiamento dell’apparecchio. È centrale di regolazione su 5 livelli, che
possibile impostare l’altezza del manico in permette di regolare l’altezza di taglio da 25
ogni momento, semplicemente premendo a 65 mm.
sul pulsante e inserendo le barre più o
meno in profondità. Sono disponibili 3 E5: Per regolare l’altezza, tirare
posizioni. Assicurarsi che le barre generino lateralmente la leva di regolazione
un click ogni volta che le si inserisce. Solo dell’altezza di taglio e scegliere l’altezza
in quel caso sono fissate correttamente. desiderata. L’operazione di regolazione
dell’altezza di taglio può essere
D2: Fissare quest’ultimo alle barre del effettuata solo quando l’apparecchio è
manico inferiore, come mostrato completamente fermo!
nell’immagine.
E6: L’apparecchio è dotato di un indicatore
D3: Fissare il cavo della corrente al manico di livello. Quando il cesto raccoglierba non
con appositi fermacavi. Mantenere il cavo è pieno, la membrana dello schermo
lontano dalle parti in movimento, lasciando rimane aperta e esce aria.
sufficiente gioco.
E7: Se il cesto raccoglierba è pieno, la
D4: Sollevare la protezione da impatto e corrente di aria viene interrotta e lo
agganciare il cesto raccoglierba. sportello si richiude. In questo caso, è
Attenzione! L’apparecchio non può necessario svuotare il cesto. Spegnere
essere avviato senza cesto l’apparecchio e assicurarsi che la lama
raccoglierba. si sia arrestata completamente.
Consigli per la tosatura
Funzionamento (Figura E) • L‘apparecchio prevede la regolazione
E1: Collegare la spina alla presa dell’altezza di taglio da 25 a 65 mm. Per
dicorrente. Osservate assolutamente le ottenere una tosatura della superficie
indicazioni di sicurezza elencate in ottimale, raccomandiamo di utilizzare
questo manuale. Per ottenere un l’altezza di taglio media, vale a dire da 30
ancoraggio del cavo, fissare il cavo elettrico a 50 mm.
come mostrato in foto. • In caso di erba molto alta, consigliamo di
tosare per gradi. Ciò significa che in un
E2: Per avviare l’apparecchio, tenere primo momento dovrà essere utilizzata la
premuto il pulsante di sicurezza e tirare la massima altezza di taglio, mentre nella
leva di cambio del motore. Dopo l’avvioSie können auch lesen