VTX100 RELA NOW DE EN IT NL ES FR - SPORTSTECH CARE
←
→
Transkription von Seiteninhalten
Wenn Ihr Browser die Seite nicht korrekt rendert, bitte, lesen Sie den Inhalt der Seite unten
RELA NOW
VTX100 DE
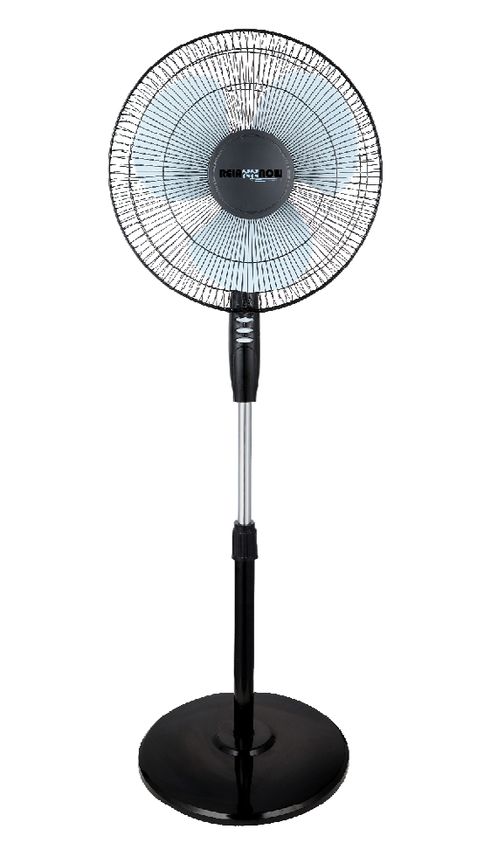
Standventilator
DE | EN | IT | NL | ES | FR
EN
IT
NL
ES
FRDE
Sehr geehrter Kunde,
wir freuen uns, dass Sie sich für ein Gerät aus der RELAXXNOW Produktpalette entschieden haben.
RELAXXNOW Geräte bieten Ihnen höchste Qualität und neueste Technologie.
Um die Leistungsfähigkeit des Gerätes voll ausnutzen zu können und viele Jahre Freude an Ihrem Gerät
zu haben, lesen Sie bitte vor der Inbetriebnahme und dem Beginn des Trainings dieses Benutzerhandbuch
sorgfältig durch und verwenden Sie das Gerät den Anweisungen entsprechend. Die Betriebssicherheit
und die Funktion des Gerätes können nur dann gewährleistet werden, wenn die Sicherheitshinweise in
diesem Benutzerhandbuch beachtet werden. Wir übernehmen keine Haftung für Schäden, die durch
unsachgemäßen Gebrauch bzw. fehlerhafte Bedienung entstehen.
i
Bitte stellen Sie sicher, dass alle Personen, die das Gerät verwenden, das Be-
nutzerhandbuch gelesen und verstanden haben.
Bewahren Sie das Benutzerhandbuch an einem sicheren Ort auf, um
im Bedarfsfall jederzeit darauf zurückgreifen zu können.
Stand: 14.01.2021Unsere Video Tutorials für Dich!
In 3 einfachen Schritten
zum schnellen und sicheren Start:
Aufbau
Benutzung
Abbau
1. QR-Code scannen
2. Videos anschauen
3. schnell und sicher starten
Link zu den Videos:
https://service.innovamaxx.de/vtx100_videoDE
INHALT
TECHNISCHE ANGABEN........................................................................6
TEILELISTE..........................................................................................6
ALLGEMEINE HINWEISE........................................................................7
WARNHINWEISE .................................................................................8
MONTAGEANLEITUNG..........................................................................8
GEBRAUCHSANWEISUNG.....................................................................9
INBETRIEBNAHME ...............................................................................10
BETRIEBSANWEISUNG.........................................................................10
REINIGUNG & AUFBEWAHRUNG............................................................11
ENTSORGUNG.....................................................................................12
RELA NOWTECHNISCHE ANGABEN
16“ Standventilator
Leistung: 45 W
Maße: 43*40*130cm
Nettogewicht: 4,7 Kg
Spannung: 220-240V~,50Hz
3 Geschwindigkeitsstufen
3 Propellerflügel
70° rechts und links Oszillation
Größenverstellbar
Sicher und zuverlässig
starkes rundes Gestell
Lieferumfang: Ventilator, Bedienungsanleitung
TEILELISTE
Unter folgendem Link
finden Sie die Explosionszeichnung
und die Ersatzteile-Liste:
https://service.innovamaxx.de/vtx100_spareparts
6 RelaxxnowDE
ALLGEMEINE HINWEISE
Bitte lesen Sie diese Bedienungsanleitung sorgfältig vor Gebrauch des Gerätes durch
und bewahren Sie sie an einem sicheren Ort auf. Benutzen Sie das Gerät nur wie
beschrieben und machen Sie sich vor dem Benutzen des Produktes mit allen Bedien- und
Sicherheitshinweisen vertraut.
Entfernen Sie die Verpackung und prüfen Sie, ob das Produkt unbeschädigt ist. Wenn an der
Unversehrtheit Zweifel besteht, verwenden Sie das Produkt nicht und treten Sie mit Ihrem
Verkäufer in Kontakt.
• Lassen Sie keine Kinder mit Teilen der Verpackung spielen (wie z.B. Plastiktüten).
• Beim Auf- oder Abbau des Ventilators darf dieser nicht an einer Steckdose
angeschlossen sein.
• Bevor Sie das Netzkabel abstecken, stellen Sie den Ventilator aus.
• Stecken Sie keine Objekte in die Schutzgitter. DAS KANN ZU VERLETZUNGEN
FÜHREN.
• Der Ventilator ist zum Temperieren von Räumen gedacht. Nutzen Sie ihn nicht in
staubigen Bereichen und Bereichen mit hoher Luftfeuchtigkeit. Halten Sie ihn fern
von Säuren und Alkali.
• Hängen Sie keine Kleidung über den Ventilator.
• Verwenden Sie den Ventilator nicht draußen.
• Lassen Sie den Ventilator nicht über einen längeren Zeitraum direkt auf ein Baby
oder Patienten gerichtet.
• Dieses Produkt ist nicht für die unbeaufsichtigte Nutzung von Kindern oder
gebrechlichen Personen geeignet.
• Kleine Kinder sollten nicht unbeaufsichtigt mit dem Produkt allein gelassen werden.
• Dieses Produkt ist nicht geeignet für die Nutzung von Personen (Kinder
eingeschlossen) mit reduzierten physischen, sensorischen und mentalen Fähigkeiten
oder Mangel an Erfahrung, außer es geschieht unter Beaufsichtigung oder vorherigen
Gebrauchsanweisungen der verantwortlichen Aufsichtsperson.
Relaxxnow 7WARNHINWEISE
• Nutzen Sie dieses Gerät nur für den privaten Zweck.
• Jede Wartung, die über die normale Pflege und den normalen Gebrauch
hinaus geht, sollte von einem autorisierten Fachmann vorgenommen werden
• Tauchen Sie das Gerät nicht in Wasser.
• Nehmen Sie keine Teile hinaus und nehmen Sie das Gehäuse nicht ab, um
das Risiko eines Feuers oder Elektroschocks zu vermeiden.
• Lassen Sie das Gerät nur von einem autorisierten Fachmann reparieren.
• Wenn die Netzschlussanleitung dieses Gerätes beschädigt wird, muss Sie von
dem Hersteller oder dem zuständigen Kundendienst oder einer ähnlich quali-
fizierten Person ersetzt werden, um Gefährdungen zu vermeiden.
MONTAGEANLEITUNG
Installation und Verwendung
1. Montieren und verbinden Sie den Sockel mit dem Auf- und Abwärtsrohr und
dem Stützrohr. Öffnen Sie das Gehäuse und nehmen Sie den Sockel heraus.
Dann montieren Sie das Rohr und die Abdeckung von Auf-Ab-Rohr und Stützrohr.
Richten Sie die vier Löcher am Boden des Stützrohrs auf die Löcher am Boden
und ziehen Sie die Schrauben fest. Schieben Sie die dekorative Abdeckung auf
die Basis neben das Stützrohr und stellen Sie das das Auf-Ab-Rohr auf die Höhe
ein. Drehen Sie dann das Außengelenk fest.
2. Propeller montieren:
1) Montieren Sie die Schutzabdeckung und den Abdeckring.
Befestigen Sie die hintere Abdeckung am Motor. (Drehrichtung beachten)
Legen Sie die Verbindung des Abdeckrings nach unten und decken Sie die
tiefe Schraube des Abdeckrings mit dem kreisförmigen Seitenring des Ge-
häuses der hinteren Abdeckung ab. Ziehen Sie dann die Schrauben an der
richtigen Position der Verbindung mit der Mutter fest.
8 RelaxxnowDE
2) Installieren Sie den Propeller.
Bei der Installation des Propellers bitte die Keilschraube auf der Rückseite des
Propellers am Abstandsbolzen der Abtriebswelle des Motors festklemmen.
Ziehen Sie dann die Befestigungsmutter des Propellers gegen den Uhrzeigersinn
an.
3) Setzen Sie die vordere Abdeckung zusammen.
Setzen Sie den Kreis der vorderen Abdeckung in die Schraube des Abdeckrings
ein, die an der hinteren Abdeckung befestigt ist. Zum Schluss die Schrauben
in die Schraube des Deckbandringgelenks einschrauben.
GEBRAUCHSANWEISUNG
1. Einstellung der Windrichtung
Dieser Ventilator kann sich sowohl nach oben als auch nach unten bewegen.
Der Winkel nach oben oder unten kann durch leichtes Anheben oder Drücken
der Abdeckung eingestellt werden.
2. Einstellen der Rotation
Drücken Sie den Drehknopf und der Kopf beginnt sich zu
drehen. Ziehen Sie es dann heraus und der Lüfter hört auf sich zu drehen
3. Einstellung von Windgeschwindigkeit und Windart
Durch Drücken der Windgeschwindigkeitstaste kann die Windgeschwindigkeit
angepasst werden
Lösung bei einfachem Versagen
Beim Starten des Ventilators funktioniert der Propeller nicht. Bitte prüfen Sie, ob der Netzstecker
wirklich in die Steckdose eingesteckt ist oder die Abdeckung verzogen ist und den Propeller
berührt hat. Wenn Sie beim Starten des Ventilators ein Geräusch hören, prüfen Sie auf folgende
Punkte:
(1) Propeller wurde leicht in die Abtriebswelle des Motors eingebaut.
(2) Die Nut auf der Rückseite der Abdeckung stimmt mit der Einstecknut auf der Abtriebswelle
überein.
(3) Es gibt einen kleinen defekten Kantenring um den Propeller.
(4) Die Abdeckung hat sich verzogen und den Propeller berührt.
Relaxxnow 9INBETRIEBNAHME
Elektrischer Anschluss
• Bevor Sie den Stecker in die Steckdose stecken, stellen Sie sicher, dass die
Spannung Ihrer Hauptversorgung mit der Spannung auf dem Etikett des Produkts
übereinstimmt.
• Schließen Sie den Ventilatur nur an eine vorschriftsmäßig installierte
Kontaktsteckdose an.
BETRIEBSANWEISUNG
1. Geschwindigkeitsregelung
• Drehen Sie den Ringschalter, um den Luftzug zu steuern
2. Kippen
• Stellen Sie aus Sicherheitsgründen sicher, dass der Ventilator ausgeschaltet ist.
• Halten Sie den Ständer mit einer Hand fest und bewegen Sie den Schutz
vorsichtig nach oben oder unten.
3. Oszillation
• Drücken Sie den Oszillationsstift nach unten, um den Lüfter zum Schwingen
zu bringen.
• Drücken Sie den Oszillationsstift nach oben, um die Oszillation zu stoppen
10 RelaxxnowDE
REINIGUNG & AUFBEWAHRUNG
Bevor Sie den Ventilator reinigen, sollte unbedingt darauf
geachtet werden, dass das Gerät ausgeschaltet und
Adapter von der Steckdose gezogen ist!
Pflege:
Darauf ist zu achten:
Lassen Sie während der Säuberung kein Wasser in den Motor kommen. Reinigen Sie den Propeller
und die Schutzgitter mit einem weichen, feuchten Tuch und trocknen Sie sie anschließend ab.
Verwenden Sie zum Reinigen des Ventilators keinen Verdünner, Alkohol oder andere chemische
Flüssigkeiten.
Aufbewahrung:
Tragen Sie ein paar Tropfen Schmiermittel auf die Motorwelle auf, um Korrosion zu vermeiden.
Entfernen Sie Öl und Flecken von dem Körper, um Schäden an dem Ventilator zu vermeiden.
Nehmen Sie den Ventilator nach der Aufbauanleitung in umgekehrter Reihenfolge auseinander,
legen Sie ihn zurück in den Karton und lagern Sie ihn an einem trockenen Ort.
Relaxxnow 11ENTSORGUNG
Recyclingkreislauf
Verpackungsmaterialien können wieder dem Rohstoffkreislauf zugeführt werden.
Entsorgen Sie die Verpackung gemäß den aktuellen Bestimmungen. Informationen erhalten Sie bei den Rückgabe- und Sammelsystemen Ihrer Gemeinde.
Hinweise zum Elektro- und Elektronikgerätegesetz (ElektroG)
Wir weisen Besitzer von Elektro- und Elektronikaltgeräten darauf hin, dass Elektroaltgeräte gemäß den geltenden gesetzlichen Vorschriften, einer vom Siedlungs-
abfall getrennten Erfassung zuzuführen sind. Das dargestellte und auf Elektro- und Elektronikaltgeräten aufgebrachte Symbol einer durchgestrichenen Abfalltonne
weist zusätzlich auf die Pflicht zur getrennten Erfassung hin:
Nach dem ElektroG sind wir als Vertreiber von Elektrogeräten nach § 17 Abs. 2 ElektroG in Verbindung mit § 17 Abs. 1 ElektroG verpflichtet, bestimmte Elektro-
und Elektronikaltgeräte unentgeltlich zurückzunehmen. Dieser gesetzlichen Verpflichtung kommen wir über die DR Deutsche Recycling Service GmbH/take-e-way
GmbH nach. Daneben können Sie Elektroaltgeräte an den Sammelstellen der öffentlich-rechtlichen Entsorgungsträger abgeben. Sie leisten einen wichtigen
Beitrag zur Wiederverwendung, zum Recycling und zur sonstigen Verwertung von Altgeräten, dadurch dass sie Ihre Altgeräte einer getrennten Erfassung in den
richtigen Sammelgruppen zuführen.
Für die Löschung personenbezogener Daten auf den zu entsorgenden Elektroaltgeräten sind Sie als Endnutzer vor der Abgabe selbst verantwortlich.
12 RelaxxnowEN
Dear customer,
We are pleased you chose a device from the RELAXXNOW product range. With equipment from
RELAXXNOW you get the highest quality and latest technology.
In order to fully use the potential of your device and be able to enjoy it for many years, please read
this manual carefully before starting up and beginning of training, and use the device according to the
instructions. The operational safety and function of the device can only be guaranteed if the safety
instructions in this user manual are observed. We shall not assume any liability for damages resulting
from improper use or incorrect operation.
i
Please ensure that all people using the device have read and understood the user
manual.
Keep the user manual in a safe place to be able to access it at any
time if needed.Our video tutorials for you!
3 simple steps
for a fast and safe start:
assembly
use
disassembly
1. scan the QR code
2. watch videos
3. start fast and safely
https://service.innovamaxx.de/vtx100_videoEN
CONTENT
TECHNICAL SPECIFICATIONS...............................................................13
PARTS LIST.......................................................................................13
GENERAL INFORMATION.....................................................................14
WARNINGS........................................................................................15
ASSEMBLY INSTRUCTIONS..................................................................15
INSTRUCTIONS..................................................................................16
START UP INSTRUCTIONS ..................................................................17
OPERATING INSTRUCTIONS.................................................................17
CLEANING AND STORAGE...................................................................18
DISPOSAL.........................................................................................19
RELA NOWTECHNICAL SPECIFICATIONS
16“ floor fan
Power: 45 W
Dimensions: 43 x 40 x 130cm
Net weight: 4.7 Kg
Voltage: 220-240V ~, 50Hz
3 speed levels
3 propeller blades
70 ° right and left oscillation
Adjustable size
Safe and reliable
Strong round rack
Covered Delivery: fan, operating instructions
PARTS LIST
At the following link
you will find the exploded drawing
and the spare parts list:
https://service.innovamaxx.de/vtx100_spareparts
16 RelaxxnowEN
GENERAL INFORMATION
Please read this operating manual carefully before using the device and keep the manual in
a safe place. Use the device only as instructed and familiarize yourself with all the operational
and user aspects of the product.
Familiarize yourself with the safety instructions.
Remove the packaging and check that the product is undamaged. If there is doubt that
the product is undamaged, do not use the product and contact your company or the seller.
• Do not let children play with parts of the packaging (e.g. plastic bags).
• When installing or removing the fan, it must not be connected to a power outlet
• Before unplugging the power cord, turn off the fan.
• Do not insert objects into the protective grille. THIS CAN LEAD TO SERIOUS INJURY
• The fan is intended for standard rooms. Do not use it in dusty areas and areas of high
humidity. Keep the fan away from any acid and alkaline.
• Do not hang clothing over the fan.
• Do not use the fan outside.
• Do not leave the fan directly blowing towards a baby for an extended period of time,
or any unwell person.
• his product is not for unsupervised use by children or suitable for frail people.
• Young children should not be left alone with the product.
• This product is not suitable for the use of persons (children included) with reduced
physical, sensory or mental abilities or lack of experience unless it is under
supervision of, or on the specific instructions of, a responsible supervisor.
Relaxxnow 17WARNINGS
• This product is for personal use only.
• Any maintenance beyond standard care of the product should be performed
by an authorized professional
• Do not immerse the device in water.
• Do not remove any parts and do not remove the wiring or tamper with the
electrical system
• to avoid the risk of fire or electric shock.
• The product should only be repaired by an authorized specialist.
• If the power system of this unit is damaged, it must be replaced by the ma-
nufacturer or the responsible customer service provider or a similarly qualified
person in order to avoid hazards.
ASSEMBLY INSTRUCTIONS
Installation and use
1. Mount and connect the socket unit with the support tube. Open the case and
remove the socket.
Then assemble the tubes, the larger tube being the bottom tube and the smaller
tube connecting to the switch unit.
Align the four holes in the tubes and tighten the screws. Slide on the decorative
cover.
Place the base next to the support tube and secure the support tube to the base
unit. Then tighten the outer joint.
2. Mount propeller:
1) Connect the protective cover and the cover ring and attach the rear cover to the
engine. (Observe the direction of rotation)
Lay the connection of the cover ring down and connect the deep screw of the
cover ring with the circular side ring of the rear side of the unit. Then tighten the
screws for the correct position of the connection with the nut.
18 RelaxxnowEN
2) Install the propeller
When installing the propeller, please use the wedge screw on the back of the
clamp of the propeller and connect to the bolt of the output shaft of the motor.
Then tighten the mounting nut of the propeller in an anticlockwise direction.
3) Put the front cover together
Insert the circle of the front cover into the screw of the cover ring which is
attached to the rear cover. Finally, tighten the screw into the ring joint.
INSTRUCTIONS
1. Adjust the wind direction
This fan can move up and down. The angle can be adjusted up or down by gently
lifting or pushing the cover.
2. Adjust the rotation
To control the rotation of the fan, press the knob on the head of the fan to start the
rotation of the fan and then pull it up to stop the rotation.
3. Adjustment of wind speed and wind type
Pressing the wind speed button will adjust the wind speed.
Simple troubleshooting
the propeller does not work when the starting the fan then please check if the mains plug is really
plugged into the socket or if the cover is warped and touching the propeller.
If you hear a noise when starting the fan, check for the following
Points:
(1) Propeller is securely installed in the output shaft of the engine.
(2) The groove on the back of the cover matches the insertion groove on the output shaft, i.e. the
grooves must line up.
(3) There is a small broken edge ring around the propeller.
(4) The cover has warped and is in contact with the propeller.
Relaxxnow 19GETTING STARTED
Electrical connection
• Before plugging the plug into the socket, make sure that the voltage of your main
supply complies with the voltage on the label of the product
• Only connect the fan to a correctly installed socket.
OPERATING INSTRUCTIONS
1. Speed control
• Turn the ring switch to control the draft
2. Tilt
• For safety reasons, make sure the fan is off.
• Hold the stand with one hand and move the guard gently up or down.
3. Oscillation
• Push down the oscillation button on top of the fan to make it rotate
• Pull the oscillation button up to stop the rotation.
20 RelaxxnowEN
CLEANING AND STORAGE
Before you clean the fan, it is important to be sure that the
device is turned off and the fan is not connected to any
electrical supply or socket.
Maintenance:
Please note:
Do not allow water to get into the engine during cleaning. Clean the propeller and the guards with
a soft, damp cloth and then dry them.
Do not use thinner, alcohol or any other chemical to clean the fan
Storage:
Apply a few drops of lubricant to the motor shaft to prevent corrosion.Remove any excess oil
and stains from the body to prevent any damage to the fan.Take the fan apart according to the
assembly instructions in reverse order, put it back in the box and store it in a dry place.
Relaxxnow 21DISPOSAL
Recycling loop
Packaging material can be conveyed back to the raw material cycle. Dispose of packaging material in accordance with legal provisions. Information can be
retrieved from the return or collections systems of your community.
Notes on the Electrical and Electronic Equipment Act (ElektroG)
We would like to point out to owners of electrical and electronic equipment that, according to the applicable legal regulations, electrical devices must be disposed
of separately from municipal waste. The symbol of a crossed-out waste bin shown on the electrical and electronic equipment shown also indicates the obligation
to dispose of the batteries separately:
According to the ElektroG, as distributors of electrical devices, we are obliged to take back certain old electrical and electronic equipment free of charge in
accordance with Section 17 (2) ElektroG and in conjunction with Section 17 (1) ElektroG. We comply with this legal obligation through DR Deutsche Recycling
Service GmbH / take-e-way GmbH. You can also hand in your electrical equipment at the designated collection points of the public waste disposal authorities. By
disposing of your old devices according to the legal requirements, you make an important contribution in the reuse and recycling of old devices.
As the end user, you are responsible for the deletion of all manner of personal data on electronic devices before handing the devices over for disposal.
22 RelaxxnowIT
MANUALE D’USO
ITALIANO
Gentile cliente,
Siamo lieti che abbiate scelto un dispositivo della gamma RELAXXNOW. Con le attrezzature di
RELAXXNOW potrete usufruire della più alta qualità e della più recente tecnologia.
Per sfruttare a pieno il potenziale del dispositivo e poterlo utilizzare per molti anni, raccomandiamo
di leggere attentamente questo manuale prima di iniziare l’allenamento e di utilizzare il dispositivo
seguendo le istruzioni. La sicurezza e la funzionalità del dispositivo possono essere garantite solo se
vengono rispettate le istruzioni di sicurezza contenute nel presente manuale d‘uso. Non ci assumia-
mo alcuna responsabilità per i danni derivanti da un uso improprio o da un uso errato del dispositivo.
i
Assicurarsi che tutte le persone che utilizzano il dispositivo abbiano letto e com-
preso il manuale dell'utente.
Tenere il manuale dell'utente in un luogo sicuro per potervi accedere
in qualsiasi momento, ove necessario.Il nostro Video Tutorial per te!
3 semplici passaggi per un inizio veloce e sicuro:
Montaggio
Utilizzo
Smontaggio
1. Scannerizza il QR-Code
2. Guarda il Video
3. Inizia ad allenarti!
Link per il Video:
https://service.innovamaxx.de/vtx100_videoIT
CONTENUTO
DATI TECNICI......................................................................................22
LISTA COMPONENTI...........................................................................22
LINEE GUIDA GENERALI.......................................................................23
AVVERTENZE......................................................................................24
INSTRUZIONI DI MONTAGGIO...............................................................24
INSTRUZIONI PER L‘USO.....................................................................25
MESSA IN SERVIZIO ...........................................................................26
INSTRUZIONI DI FUNZIONAMENTO........................................................26
PULIZIA & CUSTODIA..........................................................................27
SMALTIMENTO...................................................................................28
RELA NOWDATI TECNICI
Ventilatore da pavimento da 16“
Potenza: 45 W
Dimensioni: 43 * 40 * 130 cm Peso netto: 4,7 Kg
Tensione: 220-240 V ~, 50Hz 3
livelli di velocità 3 pale
Oscillazione 70 ° destra e sinistra
Dimensione regolabile
Robusto e affidabile telaio tondo
Contenuto di spedizione: ventilatore, istruzioni per l‘uso
LISTA COMPONENTI
Al seguente link
troverete il disegno esploso
e la lista dei pezzi di ricambio:
https://service.innovamaxx.de/vtx100_spareparts
26 RelaxxnowIT
LINEE GUIDA GENERALI
Leggere attentamente questo manuale prima di utilizzare il dispositivo e conservarlo in
un luogo sicuro. Utilizzare il dispositivo solo come descritto e seguire tutte le istruzioni
operative e di sicurezza prima di utilizzare il prodotto.
Rimuovere la confezione e verificare che il prodotto non sia danneggiato. In caso di dubbio,
non utilizzare il prodotto e contattare il venditore.
• Non lasciare che i bambini giochino con parti della confezione (come sacchetti di
plastica)
• Durante l‘installazione o la rimozione della ventola, il dispositivo non deve essere
collegato ad una presa di corrente
• Prima di scollegare il cavo di alimentazione, spegnere la ventola.
• Non inserire oggetti nella rete di protezione. QUESTO PUO’ CAUSARE LESIONI.
• Il ventilatore è progettato per garantire la ventilazione nelle stanze. Non usarlo in
aree polverose o ad alta umidità. Tenerlo lontano da acidi e alcali.
• Non appendere indumenti sopra la ventola
• Non utilizzare il ventilatore all‘esterno
• Non lasciare il ventilatore puntato su un bambino o un paziente per un lungo periodo
di tempo.
• Questo prodotto non è adatto all‘uso incustodito di bambini o persone inferme.
• I bambini non devono essere lasciati soli con il prodotto incustodito.
• Questo prodotto non è adatto all‘uso da parte di persone (inclusi i bambini) con
ridotte capacità fisiche, sensoriali e mentali o mancanza di esperienza, a meno che
non siano sotto la supervisione o le istruzioni del supervisore responsabile.
Relaxxnow 27AVVERTENZE
• Utilizzare questo dispositivo solo per uso personale.
• Qualsiasi manutenzione oltre la normale cura e l‘uso deve essere eseguita da
un professionista autorizzato
• Non immergere il dispositivo in acqua.
• Non rimuovere alcuna parte o la custodia per evitare il rischio di incendi o
scosse elettriche.
• Lasciar riparare il dispositivo solo da uno specialista autorizzato.
• Se il cablaggio di alimentazione di questa unità è danneggiato, deve essere
sostituito dal produttore, da un addetto all’assistenza o da personale qualifica-
to per evitare pericoli.
INSTRUZIONI DI MONTAGGIO
Installazione e utilizzo
1. Montare e collegare la base con la prolunga regolabile e il supporto principale.
Aprire la custodia e rimuovere la presa. Quindi assemblare il supporto principale
e il coperchio con il supporto regolabile. Allineare i quattro fori nella parte
inferiore del tubo di supporto con i fori sul fondo e avvitare. Fai scorrere il
coperchio decorativo sulla base accanto al tubo di supporto per posizionare il
supporto regolabile. Quindi fissare bene il giunto esterno
2. Montare l‘elica:
1) Montare il coperchio di protezione e l‘anello di assemblaggio.
Assemblare il coperchio posteriore al motore seguendo il senso di rotazione.
Tirare verso il basso l’allacciamento dell’anello e coprire la vite dello stesso con
l’anello laterale rotondo dell’alloggiamento, posto sulla rete di protezione
anteriore. Posizionare correttamente la vite e il dado e fissare bene.
28 RelaxxnowIT
1) Installare l’elica
Durante l‘installazione dell‘elica, serrare la vite a cuneo sul retro dell‘elica al
perno distanziale dell‘albero di uscita del motore.
Quindi serrare il dado di fissaggio dell‘elica in senso antiorario.
2) Assemblare la rete di protezione anteriore
Inserire l’anello della protezione anteriore nella vite dell‘anello di assemblaggio
fissato al coperchio posteriore. Infine fissare le viti
del giunto dell‘anello di protezione.
INSTRUZIONI PER L‘USO
1. Impostare la direzione del vento
Questo ventilatore può muoversi verso l’alto e verso il basso. L‘inclinazione può
essere regolata sollevando o spostando leggermente il coperchio.
2. Regolazione dell‘oscillazione
Premere l’apposito pulsante. Estrarlo per far smettere la ventola di ruotare
3. Regolazione della velocità del vento e del tipo di vento
Premendo il tasto della velocità è possibile regolare la velocità del vento
In caso di guasto o malfunzionamento
Quando si avvia il ventilatore, l‘elica non funziona. Si prega di verificare se la spina di alimenta-
zione è realmente inserita o se la copertura è deformata e ha toccato l‘elica. Se senti un rumore
quando avvii la ventola, controlla quanto segue:
(1) L‘elica è stata correttamente installata nell‘albero di uscita del motore.
(2) La scanalatura sul retro della rete protettiva entra perfettamente nella scanalatura di inserimen
to dell‘albero di uscita.
(3) L’elica si è scheggiata.
(4) La rete protettiva si è deformata e ha toccato l‘elica.
Relaxxnow 29MESSA IN SERVIZIO
Allacciamento elettric0
• Prima di collegare la spina, assicurarsi che la tensione dell‘alimentazione principale
corrisponda alla tensione sull‘etichetta del prodotto.
• Collegare la ventola solo a una presa di contatto installata correttamente.
INSTRUZIONI DI FUNZIONAMENTO
1. Regolazione della velocità
• Azionare l’interruttore per regolare la corrente d‘aria
2. Ribaltamento
• Per motivi di sicurezza accertatevi che il ventilatore sia spento.
• Tenere il supporto principale con una mano e spostare delicatamente la
protezione verso l‘alto o verso il basso
3. Oscillatione
• Premere lo spinotto di regolazione del movimento oscillatorio verso il basso
per far oscillare il ventilatore.
• Premere lo spinotto di regolazione del movimento oscillatorio verso l’alto per
porre fine all’oscillazione.
30 RelaxxnowIT
PULIZIA & CUSTODIA
Prima di procedere alla pulizia del ventilatore è
necessarioassicurarsi che il dispositivo sia spento e che
l’adattatore non sia collegato alla presa!
Manutenzione:
Osservare attentamente le seguenti istruzioni:
Non fare entrare acqua nel motore durante la pulizia. Pulire l‘elica e la protezione con
un panno morbido inumidito e quindi asciugare. Non usare diluente, alcol o altri liquidi
chimici per pulire la ventola.
Conservazione del prodotto:
Applicare alcune gocce di lubrificante sull‘albero motore per prevenire la corrosione.
Rimuovere l‘olio e le macchie dal corpo per evitare danni alla ventola. Smontare il
ventilatore e rimetterlo nella scatola, conservandolo in un luogo asciutto.
Relaxxnow 31SMALTIMENTO
Riciclaggio dei rifiuti
Il materiale di imballaggio può essere trasportato di nuovo al ciclo delle materie prime. Smaltire il materiale di imballaggio in conformità alle disposizioni di legge.
Le informazioni possono essere recuperate dai sistemi di ritorno o di raccolta della vostra comunità.
Avviso sulla legge degli apparecchi elettrici ed elettronici (ElektroG)
Desideriamo far notare ai proprietari di vecchie apparecchiature elettriche ed elettroniche che le apparecchiature elettriche devono essere raccolte separatamente
dai rifiuti urbani, in conformità con le norme di legge vigenti. Il simbolo di un bidone della spazzatura su ruote barrato, apposto su vecchie apparecchiature
elettriche ed elettroniche, indica anch’esso, l‘obbligo di raccolta differenziata:
Secondo la ElektroG, noi, in qualità di distributori di apparecchi elettrici, siamo obbligati a ritirare gratuitamente i rifiuti di apparecchi elettrici ed elettronici ai sensi
della legge § 17 comma 2 assieme alla legge § 17 comma 1 della ElektroG. Rispettiamo questo obbligo legale tramite la DR Deutsche Recycling Service GmbH/
take-e-way GmbH. Inoltre, è possibile consegnare i vecchi apparecchi elettrici ed elettronici presso i punti di raccolta delle autorità pubbliche di smaltimento dei
rifiuti. Darete un importante contributo al riutilizzo, al riciclaggio ed ad altri tipi di recupero di vecchie apparecchiature, inviando le vostre vecchie apparecchiature
alla raccolta differenziata, nei corretti punti di raccolta.
L‘utente finale è responsabile della cancellazione dei dati personali relativi ai rifiuti di apparecchiature elettriche ed elettroniche da smaltire prima della consegna.
32 RelaxxnowNL
GEBRUIKSAANWIJZING
NEDERLANDS
Geachte klant,
We zijn blij dat je een apparaat uit het RELAXXNOW-assortiment hebt gekozen. RELAXXNOW biedt
je de hoogste kwaliteit en de nieuwste technologie.
Lees vóór gebruik deze gebruikershandleiding aandachtig door en gebruik het apparaat zoals aan-
gegeven. Zo zul je ten volle van de prestaties van het apparaat kunnen profiteren en er vele jaren
geniet van hebben. De bedrijfsveiligheid en de werking van het apparaat kunnen alleen worden
gegarandeerd als de veiligheidsinstructies in deze gebruiksaanwijzing in acht worden genomen. We
aanvaarden geen aansprakelijkheid voor schade veroorzaakt door oneigenlijk gebruik of verkeerde
bediening.
i
Zorg ervoor dat alle personen die het apparaat gebruiken de gebruikershandleiding
hebben gelezen en begrepen.
Bewaar de gebruikershandleiding op een veilige plaats zodat deze kan worden ge-
bruikt wanneer dat nodig is.Onze Video-tutorials voor jou!
In 3 eenvoudige stappen
voor een snelle en veilige start:
Montage
Gebruik
Demontage
1. Scan de QR-code
2. Bekijk video‘s
3. Begin snel en veilig
Link naar de video‘s:
https://service.innovamaxx.de/vtx100_videoNL
INHOUD
TECHNISCHE INFORMATIE...................................................................13
LIJST MET ONDERDELEN....................................................................13
ALGEMENE INFORMATIE......................................................................14
WAARSCHUWINGEN...........................................................................15
MONTAGE-INSTRUCTIES.....................................................................15
GEBRUIKSAANWIJZING.......................................................................16
INGEBRUIKNAME................................................................................17
BEDRIJFSVOORSCHRIFT.....................................................................17
REINIGING EN OPSLAG........................................................................18
VERWIJDERING..................................................................................19
RELA NOWTECHNISCHE INFORMATIE
16” staande ventilator
Vermogen: 45 W
Afmetingen: 43*40*130 cm
Nettogewicht: 4,7 kg
Spanning: 220-240V~, 50Hz
3 snelheidsniveaus
3 propellerbladen
Oscillatie 70° rechts en links
In de hoogte verstelbaar
Veilig en betrouwbaar sterk rond frame
Leveromvang: ventilator, handleiding
LIJST MET ONDERDELEN
At the following link
you will find the exploded drawing
and the spare parts list:
https://service.innovamaxx.de/vtx100_spareparts
36 RelaxxnowNL
ALGEMENE INFORMATIE
Lees deze handleiding aandachtig voordat je het apparaat in gebruik neemt en bewaar
deze op een veilige plaats. Gebruik het apparaat alleen zoals beschreven en maak jezelf
vertrouwd met alle bedienings- en veiligheidsinstructies voordat je het product in gebruik
neemt.
Verwijder de verpakking en controleer of het product niet beschadigd is. Als er enige twijfel
bestaat over de integriteit van het product, gebruik het dan niet en neem contact op met
je verkoper.
• Laat kinderen niet spelen met onderdelen van de verpakking (zoals plastic zakken).
• De ventilator mag niet op een stopcontact worden aangesloten bij de montage en
demontage.
• Schakel de ventilator uit voordat je het netsnoer loskoppelt.
• Steek geen voorwerpen in het beschermrooster. DIT KAN LEIDEN TOT
VERWONDINGEN.
• De ventilator is bedoeld voor de regeling van de kamertemperatuur. Gebruik hem niet
in stoffige ruimten en ruimten met een hoge luchtvochtigheid. Houd het apparaat uit
de buurt van zuren en logen.
• Hang geen kleding over de ventilator.
• Gebruik de ventilator niet buitenshuis.
• Houdt de ventilator niet voor langere tijd direct gericht op een baby of patiënt.
• Dit product is niet bedoeld voor onbewaakt gebruik door kinderen of personen met
een handicap.
• Kleine kinderen mogen niet alleen worden gelaten met het product zonder toezicht.
• Dit product is niet bedoeld voor gebruik door personen (inclusief kinderen) met
verminderde fysieke, zintuiglijke of mentale capaciteiten of gebrek aan ervaring,
behalve onder toezicht of voorafgaande instructie van een verantwoordelijke
toezichtspersoon.
Relaxxnow 37WAARSCHUWINGEN
• Gebruik dit apparaat alleen voor privédoeleinden.
• Elk onderhoud dat verder gaat dan het normale onderhoud en gebruik moet
worden uitgevoerd door een erkende specialist.
• Dompel het apparaat niet onder water.
• Verwijder geen onderdelen of verwijder de behuizing niet om het risico van
brand of elektrische schokken te voorkomen.
• Laat het apparaat alleen door een geautoriseerde specialist repareren.
• Als het netsnoer van dit apparaat beschadigd is, moet het worden vervangen
door de fabrikant of de verantwoordelijke klantenservice of een vergelijkbaar
gekwalificeerd persoon om risico‘s te voorkomen.
MONTAGE-INSTRUCTIES
Installatie en gebruik
1.Monteer en verbind de basis met de op- en neergaande buis en de steunbuis.
Open de behuizing en verwijder de basis. Monteer vervolgens de buis en de
afdekking van de op- en neergaande buis en de steunbuis. Lijn de vier gaten
aan de onderkant van de steunbuis uit met de gaten aan de basis en draai de
schroeven vast. Schuif de decoratieve afdekking op de basis langs de steunbuis
en pas de hoogte van de op- en neergaande buis aan. Draai vervolgens de
buitenste verbinding vast.
2. Monteer de propeller
1) Monteer de beschermkap en de afdekring.
Bevestig de achterste afdekking aan de motor. (Let op de draairichting) Plaats
de verbinding van de afdekring naar beneden en dek de diepe afdekringschroef af
met de ronde ring van de behuizing van de achterste afdekking. Draai vervolgens
de schroeven vast in de juiste positie van de verbinding met de moer.
38 RelaxxnowNL
2) Installeer de propeller
Bij de montage van de propeller moet de klemschroef aan de achterzijde
van de propeller aan de afstandsbout van de uitgaande as van de motor worden
vastgeklemd.Draai vervolgens de bevestigingsmoer van de propeller tegen de
klok in vast.
3) Zet de voorste afdekking samen
Steek de ring van de voorste afdekking in de schroef van de afdekring die aan de
achterste afdekking is bevestigd. Schroef ten slotte de schroeven in de verbin
dingsschroef van de afdekbandsring.
GEBRUIKSAANWIJZING
1. De windrichting instellen
Deze ventilator kan zowel naar boven als naar beneden bewegen. De hoek omhoog
of omlaag kan worden aangepast door de afdekking iets op te tillen of naar onder
te duwen.
2. De zwaaibeweging regelen
Druk op de bewegingsknop en de ventilator begint te draaien. Trek hem vervolgens
naar buiten en de ventilator stopt met draaien.
3. Aanpassing van windsnelheid en windtype
Door op de windsnelheidsknop te drukken, kan de windsnelheid worden aangepast.
Oplossing voor eenvoudige storingen
Bij het starten van de ventilator werkt de propeller niet. Controleer of de netstekker goed in het
stopcontact zit of kijk na of het deksel vervormd is en de propeller raakt. Als je bij het starten van
de ventilator een geluid hoort, controleer dan de volgende punten:
(1) Propeller was te losjes in de uitgaande as van de motor gemonteerd.
(2) De moer aan de achterkant van de afdekking valt samen met de insteekmoer op de uitgaande
as.
(3) Er is een klein defect in de randring rond de propeller.
(4) De afdekking is vervormd en raakt de propeller.
Relaxxnow 39INGEBRUIKNAME
Elektrische aansluiting
• Voordat je de stekker in het stopcontact steekt, moet je er zeker van zijn dat de
spanning van je netvoeding overeenkomt met de spanning op het productetiket.
• Sluit de ventilator alleen aan op een correct geïnstalleerd stopcontact.
BEDRIJFSVOORSCHRIFT
1. Regeling van de snelheid
• Draai de ringschakelaar om de luchtstroom te controleren.
2. Kantelen
• Zorg er om veiligheidsredenen voor dat de ventilator uitstaat.
• Houd de standaard vast met één hand en beweeg de beschermkap
voorzichtig omhoog of omlaag.
3. Oscillatie
• Druk de oscillatiepen omlaag om de ventilator te laten draaien.
• Duw de oscillatiepen naar boven om de oscillatie te stoppen.
40 RelaxxnowNL
REINIGING EN OPSLAG
Voordat je de ventilator reinigt, is het belangrijk om ervoor
te zorgen dat het apparaat is uitgeschakeld en de stekker
uit het stopcontact is getrokken!
Onderhoud:
Let op:
Zorg dat er tijdens het reinigen voor dat er geen water in de motor kan komen.
Reinig de propeller en het beschermrooster met een zachte, vochtige doek en droog
vervolgens af. Gebruik geen verdunner, alcohol of andere chemische vloeistoffen om
de ventilator te reinigen.
Opslag:
Doe een paar druppels smeermiddel op de motoras om corrosie te voorkomen.
Verwijder olie en vlekken van het apparaat om schade aan de ventilator te voorkomen.
Demonteer de ventilator in omgekeerde volgorde volgens de montage-instructies,
plaats hem terug in de doos en bewaar hem op een droge plaats.
Relaxxnow 41VERWIJDERING
Recyclingcyclus
Verpakkingsmaterialen kunnen worden teruggebracht in de grondstoffenkringloop.
Voer de verpakking af volgens de geldende voorschriften. Informatie kan worden verkregen uit de retournerings- en ophaalsystemen van je gemeente.
Informatie volgens de wet op elektrische en elektronische apparatuur (ElektroG - Duitse norm)
We wijzen de eigenaren van elektrische en elektronische apparatuur erop dat oude elektrische apparatuur gescheiden van het gemeentelijk afval moet worden
ingezameld volgens de geldende wettelijke voorschriften. Het symbool van een doorgestreepte vuilnisbak op wieltjes, dat is afgebeeld en dat op AEEA is
aangebracht, geeft bovendien aan dat gescheiden inzameling verplicht is:
Volgens de ElektroG-norm zijn we als distributeurs van elektrische apparaten conform § 17, lid 2, ElektroG in combinatie met § 17, lid 1, ElektroG verplicht om
bepaalde elektrische en elektronische apparatuur kosteloos terug te nemen. Deze wettelijke verplichting komen we na via de DR Deutsche Recycling Service
GmbH/take-e-way GmbH. Daarnaast kun je afgedankte elektrische apparatuur afleveren aan de inzamelingspunten van de publieke afvalverwerkingsinstanties. Zij
leveren een belangrijke bijdrage aan het hergebruik, de recycling en de andere nuttige toepassing van afgedankte apparatuur door jouw afgedankte apparatuur
gescheiden in de juiste inzamelingsgroepen te plaatsen.
Je bent als eindgebruiker zelf verantwoordelijk voor het verwijderen van persoonsgegevens op de te verwijderen elektrische apparaten voordat je deze aflevert.
42 RelaxxnowES
Estimado cliente,
Nos complace que haya elegido un dispositivo de la línea de productos RELAXXNOW. Los disposi-
tivos RELAXXNOW le ofrecen la más alta calidad y la última tecnología.
Con el fin de usar todo el potencial de su dispositivo y para que pueda disfrutarlo durante muchos
años, por favor lea este manual cuidadosamente antes de comenzar a ejercitarse, y use el dispo-
sitivo de acuerdo a las instrucciones. La seguridad y funcionamiento operativos del dispositivo
solo puede garantizarse si se tienen presentes las instrucciones de seguridad en este manual de
usuario. Nosotros no asumimos ninguna responsabilidad por daños resultantes del uso inadecuado
o incorrecto del dispositivo.
i
Por favor asegúrese de que todas las personas que usen el dispositivo hayan leído
y entendido este manual de usuario.
Mantenga el manual de usuario en un lugar seguro para poder acce-
der a él cuando sea necesario.Nuestros tutoriales en video para usted!
En 3 sencillos pasos para
un arranque rápido y seguro:
Montaje
Utilizar
Desmontaje
1. Escanear el código QR
2. Ver vídeos
3. Comienza rápido y seguro
Enlace a los videos:
https://service.innovamaxx.de/vtx100_videoES
INDICE
DATOS TÉCNICOS...............................................................................13
LCOMPONENTES................................................................................13
INFORMACIÓN GENERAL.....................................................................14
ADVERTENCIAS DE SEGURIDAD...........................................................15
INSTRUCCIONES DE MONTAJE............................................................15
INSTRUCCIONES DE USO....................................................................16
PUESTA EN MARCHA..........................................................................17
MANUAL DE USO................................................................................17
LIMPIEZA Y ALMACENAMIENTO...........................................................18
OPCIONES DE RECICLAJE...................................................................19
RELA NOWDATOS TÉCNICOS
Ventilador de pie de 16“
Motor: 45 W
Tamaño:43x40x130 cm
Peso neto: 4,7 kg
Voltaje: 220-240V~,50Hz
3 niveles de velocidad
3 aspas
Oscilación de 70° a izquierda y derecha
Tamaño ajustable
Seguro y fiable
Estructura redondeada y resistente
Contenido: ventilador, manual de instrucciones
COMPONENTES
En el siguiente enlace
encontrarás el dibujo de explosión
y la lista de repuestos:
https://service.innovamaxx.de/vtx100_spareparts
46 RelaxxnowES
INFORMACIÓN GENERAL
Lea detenidamente estas instrucciones de funcionamiento antes de utilizar este aparato
y guárdelas en un lugar seguro. Antes de ponerlo en marcha, familiarícese con todas las
instrucciones de uso y seguridad.
Retire el embalaje y compruebe que el producto no esté dañado. Si hay alguna duda sobre la
integridad del producto, no lo utilice y póngase en contacto con su proveedor.
• No deje ninguna pieza o embalaje al alcance de los niños.
• Al montar o desmontar el ventilador, asegúrese de que no está conectado a ninguna
toma de corriente.
• Antes de desconectar el cable de alimentación, apague el ventilador.
• No introduzca ningún objeto en las rejillas de seguridad. ESTO PUEDE PROVOCAR
LESIONES Y DAÑOS
• El ventilador está diseñado para regular la temperatura de una habitación. No lo
use en áreas polvorientas ni con alta humedad. Manténgalo alejado de ácidos y
sustancias alcalinas.
• No cuelgue ropa sobre el ventilador.
• No utilice el ventilador en exteriores
• No mantenga el ventilador dirigido directamente a un bebé o a un paciente durante
un período prolongado de tiempo.
• Este producto no está pensado para su uso por niños o personas enfermas sin
supervisión.
• No deje este producto al alcance de los niños sin supervisión.
• Este producto no está destinado a ser utilizado por personas (incluidos los niños)
con capacidades físicas, sensoriales o mentales reducidas o sin experiencia, excepto
bajo la supervisión o la instrucción previa del supervisor responsable.
Relaxxnow 47ADVERTENCIAS DE SEGURIDAD
• Utilice este dispositivo sólo para fines privados.
• Cualquier mantenimiento que vaya más allá del cuidado y uso normal debe
ser realizado por un especialista autorizado.
• No sumerja el aparato en agua.
• Para evitar el riesgo de incendio o descarga eléctrica, no retire ninguna pieza
de la estructura.
• Encargue la reparación del aparato únicamente a especialistas autorizados.
• Si el las conexiones a la red eléctrica se dañan, debe ser sustituidas por el
fabricante, el servicio técnico responsable o por una persona cualificada para
evitar riesgos.
INSTRUCCIONES DE MONTAJE
IInstalación y uso
1.Monte y conecte la base a los tubos retráctiles y al tubo que soporta la estructura.
Para ello, abra la caja y saque la base. Luego ensamble los tubos y la cubierta de
los tubos retráctiles y de soporte. Alinee los cuatro orificios de la parte inferior del
tubo de soporte con los orificios de la parte inferior y apriete los tornillos. Deslice
la cubierta decorativa sobre la base junto al tubo de sujeción y ajuste los tubos re
tráctiles a la altura deseada. A continuación, apriete la tuerca para el ajuste de
altura
2. Montaje del ventilador:
1) Monte la rejilla de seguridad trasera y la banda protectora.
Coloque la rejilla de seguridad trasera en el motor. (Observe el sentido de giro)
Coloque la conexión de la banda de protección hacia abajo y encaje el tornillo largo
de la banda de protección con el anillo lateral circular de la cubierta trasera. A con
tinuación, apriete los tornillos en la posición correcta para conectarlos con la tuerca.
48 RelaxxnowES
2) Instale las aspas
Para instalar la hélice, sujete el tornillo de cuña situado en la parte posterior de
la hélice al perno espaciador del eje de salida del motor. A continuación, apriete
el tornillo de las aspas en sentido contrario a las agujas del reloj.
3) Montaje de la rejilla de seguridad frontal
Inserte el tornillo de la banda de protección en el círculo de la rejilla de seguridad
frontal, junto a la conexión con la rejilla trasera. Finalmente, atornille los tornillos
de la junta del anillo de la banda de la cubierta.
INSTRUCCIONES DE USO
1. Ajuste de la dirección del viento
Este ventilador puede moverse tanto hacia arriba como hacia abajo. El ángulo hacia
arriba o hacia abajo se puede ajustar levantando o presionando suavemente la tapa.
2. Ajuste de la rotación Presione la palanca y el cabezal comenzará a girar. Luego, tire
de ella y el ventilador dejará de girar.
3. Ajuste de la velocidad
La velocidad del ventilador se puede ajustar pulsando los botones.
Solución de fallos sencillos
Las aspas no se mueven cuando se enciende el ventilador. Compruebe si la fuente de alimenta-
ción está conectada o si la rejilla presenta alguna imperfección y toca las aspas. Si oye un ruido
al encender el ventilador, compruebe los siguientes puntos:
(1) Que las aspas se fijaron bien al motor.
(2) La ranura de la parte posterior de la rejilla trasera coincide con la ranura de inserción del eje
de salida.
(3) No hay un pequeño defecto en los bordes alrededor de las aspas.
(4) La rejilla no se ha deformado y no toca las aspas.
Relaxxnow 49PUESTA EN MARCHA
Conexión eléctrica
• Antes de enchufar el aparato, asegúrese de que el voltaje de su fuente de
alimentación principal coincida con el voltaje indicado en la etiqueta.
• Conecte el ventilador sólo a una toma de corriente correctamente instalada.
MANUAL DE USO
1. Regulación de velocidad
• Pulse los botones para controlar la corriente de aire.
2. Regulación del ángulo
• Por razones de seguridad, asegúrese de que el ventilador esté apagado.
• Sujete el soporte firmemente con una mano y mueva con cuidado la rejilla hacia
arriba o hacia abajo.
3. Oscilación
• Presione la palanca de oscilación para que el ventilador oscile.
• Tire de la palanca de oscilación para que el ventilador deje de oscilar.
50 RelaxxnowES
LIMPIEZA Y ALMACENAMIENTO
Antes de limpiar el ventilador, asegúrese de que la unidad
esté apagada y desconectada de la toma de corriente.
Precaución:
Evite que el agua entre en el motor durante la limpieza. Limpie las aspas y las rejillas de seguridad
con un paño suave y húmedo y séquelas después. No utilice disolventes, alcohol u otros líquidos
químicos para limpiar el ventilador.
Almacenamiento:
Aplique unas cuantas gotas de lubricante al eje del motor para evitar la corrosión.
Retire la grasa y las manchas de la estructura para evitar daños al ventilador. Desmonte
el ventilador en orden inverso a las instrucciones de montaje, vuelva a colocarlo en la
caja y guardelo en un lugar seco.
Relaxxnow 51OPCIONES DE RECICLAJE
Reciclaje loop
El material de empaque puede trasladarse de nuevo al ciclo de materias primas. Deshágase del material de empaque de acuerdo a las normativas legales. Puede
encontrar información en los sistemas de recolección de su comunidad.
Notas sobre la Ley sobre aparatos eléctricos y electrónicos (ElektroG)
Quisiéramos señalar a los propietarios de aparatos eléctricos y electrónicos viejos que éstos deben desecarse por separado de los residuos municipales de
conformidad con las normas legales aplicables. El símbolo de un cubo de basura con ruedas tachado que se muestra en los RAEE también indica la obligación
de separar la recogida:
Según la normativa vigente, nosotros, como distribuidores de aparatos eléctricos, estamos obligados a retirar gratuitamente determinados residuos de aparatos
eléctricos y electrónicos de acuerdo con el artículo 17, apartado 2, de la ley alemana sobre aparatos eléctricos y electrónicos en relación con el artículo 17,
apartado 1, de la ley alemana sobre aparatos eléctricos y electrónicos. Cumplimos con esta obligación legal a través de la empresa DR Deutsche Recycling
Service GmbH/take-e-way GmbH. También se puede entregar el aparato eléctrico viejo en los puntos de recogida designados por las autoridades locales de
eliminación de residuos. Contribuye de manera importante a la reutilización, el reciclado y otras formas de recuperación de los aparatos usados, enviándolos a
una recogida selectiva en los grupos de recogida correctos.
Como usuario final, usted es responsable de eliminar los datos personales de los residuos de aparatos eléctricos y electrónicos antes de su entrega.
52 RelaxxnowFR
MANUEL
FRANÇAIS
Cher client,
Nous sommes ravis que vous ayez choisi un appareil de la gamme de produits RELAXXNOW. Avec
les équipements de RELAXXNOW, vous obtenez la plus haute qualité et la meilleure technologie.
Afin d'utiliser pleinement le potentiel de votre appareil et de pouvoir l'apprécier pendant de nom-
breuses années, lisez attentivement ce manuel avant l'utilisation et le début de votre entraînement
et utilisez l'appareil conformément aux instructions. La sécurité et le fonctionnement opérationnelles
de l‘appareil ne peuvent être garanties que si les consignes de sécurité contenues dans ce manuel
d‘utilisation sont respectées. Nous n'assumons aucune responsabilité pour les dommages résultant
d'une mauvaise utilisation ou d'un fonctionnement incorrect.
i
Veuillez vous assurer que toutes les personnes qui utilisent l'appareil ont lu et
compris le manuel d'utilisateur.
Gardez le manuel d'utilisateur dans un endroit sûr pour y avoir accès
à tout moment si nécessaire.Sie können auch lesen