DIMAX NAVIGATOR - TREIN PLEZIER
←
→
Transkription von Seiteninhalten
Wenn Ihr Browser die Seite nicht korrekt rendert, bitte, lesen Sie den Inhalt der Seite unten

DiMAX Navigator
Inhaltsverzeichnis                                                       Content
1      Information und Hinweise...........................               1.    Information.................................................         4
1.1    Beschreibung (Funktionsumfang)...............                     1.1. General Information....................................               4
1.2    Lieferumfang..............................................        1.2. Scope of supply..........................................             4
1.3    Warnhinweise.............................................         1.3   Warning Notes............................................            5
1.4    Einsatzmöglichkeiten..................................            1.4   Operating scopes........................................             5

2        Inbetriebnahme...........................................       2        Getting Started............................................       8
2.1      ...am Buskabel............................................      2.1      ...with cable operation................................           8
2.2      ...über Funk.................................................   2.2      ...wireless operation...................................          8
2.3      Anzeige und Grundbedienung.....................                 2.3      Display and basic operation........................               9
2.4      Tastenblock (Zifferntasten).........................            2.4      Keyboard (number buttons).......................                 10
2.5      Notstop-Funktion........................................        2.5      Emergency-STOP.......................................            10

3        Lok steuern.................................................    3        Loco operation............................................       11
3.1      Fahren und Grundfunktion..........................              3.1      Driving with standard settings....................               11
3.2      Binary State Funktionen..............................           3.2      Binary State Functions................................           13
3.3      Lokadresse wechseln..................................           3.3      Changing the locomotive address...............                   13
3.3.1    Belegte Lok................................................     3.3.1    Occupied loco............................................        14
3.3.2    Abmelden einer Lok....................................          3.3.2    Deselecting a locomotive............................             14
3.3.3    Einfangen einer Lok nach Lokwechsel........                     3.3.3    Re-selecting running locomotives (catch)..                       15
3.4      Fahren einer analogen Lok..........................             3.4      Operating an analog locomotive.................                  15
3.5      Lok konfigurieren........................................       3.5      Loco Configuration.....................................          16
3.5.1    Einstellung der Fahrstufen..........................            3.5.1    Setting the Speed Steps..............................            16
3.5.2    Einstellung der Funktionstasten..................               3.5.2    Function Key Settings.................................           17
3.5.3    Auswahl des Lokbildes...............................            3.5.3    Selecting the locomotive picture.................                18
3.5.4    Eingabe des Loknamens.............................              3.5.4    Entering a loco name..................................           18
3.5.5    Konfiguration im Decoder speichern..........                    3.5.5    Saving the configuration to the Decoder.....                     19
3.5.6    Lokkonfiguration speichern........................              3.5.6    Saving the loco configuration.....................               20
3.5.7    Lokadresse löschen....................................          3.5.7    Deleting a loco address..............................            20

4        Die 2. Funktionsebene................................           4        The secondary function layer......................               20
4.1      Systemanzeige............................................       4.1      System information....................................           21
4.2      Schaltbefehle (für Weichen und Signale)....                     4.2      Switch commands (turnouts & signals).....                        21
4.3      Fahrstraßen (für Weichen und Signale)......                     4.3      Turnout routes (turnouts & signals)...........                   22
4.4      Zweite Lok steuern.....................................         4.4      Operating a secondary locomotive..............                   22
4.5      Erweiterte Schaltbefehle (eS).....................              4.5      Enhanced Switch Commands (eS).............                       23
4.6      Rückmeldeanzeige......................................          4.6      Feedback display........................................         24

5        Loktraktion.................................................    5        Consist.......................................................   24

6        Programmieren...........................................        6        Programming.............................................         26
6.1      Lokadresse.................................................     6.1      Loco address..............................................       26
6.2      CV‘s schreiben und lesen............................            6.2      Writing and Reading CV‘s...........................              27
6.3      POM Lokdecoder........................................          6.3      POM Loco Decoder.....................................            28
6.4      POM Schaltdecoder....................................           6.4      POM Switch Decoder..................................             28
6.5      Registerprogrammierung...........................               6.5      Register Programming...............................              29

7        Automatische Funktionen...........................              7        Automatic Functions...................................           30
7.1      Fahrstraßen programmieren.......................                7.1      Programming Turnout Routes....................                   30

2
7.2    Traktionen programmieren.........................                 7.2    Programming Consists...............................               31
7.3    Fahrautomatik.............................................        7.3    Automatic Operation...................................            31
7.4    Schaltautomatik..........................................         7.4    Automatic Switch.......................................           33

8      Navigator konfigurieren..............................             8      Navigator Configuration..............................             34
8.1    Hintergrundbeleuchtung.............................               8.1    Backlight.....................................................    34
8.2    Notaus Modus............................................          8.2    Emergency STOP Mode..............................                 35
8.3    Spracheinstellungen...................................            8.3    Language Settings......................................           36
8.4    Geräte ID....................................................     8.4    Device ID....................................................     36
8.5    Sperrfunktion / Kindersicherung.................                  8.5    Locking Function / Childlock.......................               37
8.6    Spezialmodus.............................................         8.6    Special Modes............................................         38
8.7    Werkseinstellung........................................          8.7    Factory Settings..........................................        39
8.8    Lokdatenbank sortieren..............................              8.8    Sort the Loco Database..............................              39
8.9    Funkbetrieb konfigurieren...........................              8.9    R/C Mode Configuration.............................               40
8.10   Zentrale konfigurieren.................................           8.10   Central Station Configuration......................               41

9      Update........................................................    9      Update........................................................    42
10     Tips & Tricks für Servicezwecke.................                  10     Tips & Tricks for Service Purposes............                    42
11     Funkeinbau oder -umbau............................                11     Retrofit R/C Installation..............................           42
12     Technische Daten: Kabelbetrieb..................                  12     Technical Specifications: Cable op. ............                  42
12.1   Technische Daten: Funkbetrieb...................                  12.1   Technical Specifications: R/C op. ...............                 43
13     Gewährleistung & Kundendienst.................                    13     Warranty, Service, Support.........................               43
14     Hotline........................................................   14     Hotline........................................................   43

                                                                                                                                                  3
WICHTIGER HINWEIS IMPORTANT NOTE
Sehr geehrte Kunden, wir empfehlen diese Produktdoku- Dear customer, we strongly recommend that you read this
mentation und vor allem auch die Warnhinweise vor der manual and the warning notes thoroughly before installing
Inbetriebnahme unbedingt gründlich zu lesen und diese zu and operating your decoder. Massoth is not responsible
beachten. Für Schäden durch Nichtbeachtung der Hinweise for any damage if this manual or the warning notes are
übernimmt Massoth keine Haftung. disregarded.
Beachten Sie das einige Funktionen erst durch den Spezial- Note that some functions can only be activated by the
modus aktiv werden, siehe Kap. 8.6. special mode, see chap. 8.6.
1. Information und Hinweise 1. Information
1.1 Beschreibung (Funktionsumfang) 1.1 General Information
• einfache Bedienung • easy operation
• großes, gut lesbares Grafikdisplay • large and easy to read display
• einstellbare Hintergrundbeleuchtung • adjustable backlight
• bei Sonne ablesbar • can be read in the sun
• ergonomisch geformt • shaped ergonomically
• für Links- und Rechtshänder geeignet • for left- and right handed users
• 10 Sprachpakete per Download verfügbar • 10+ language packages available
• deutsch- und englischsprachiges Handbuch • German and English manual
• für Kinder zu bedienen, inkl. Kindersicherung • can be used by children
(Sperrfunktion) (incl. childlock feature)
• beleuchteter Drehknopf mit Zustandserkennung • illuminated wheel knob with status indication
• individueller Lokname je Adresse • individual locomotive name for each address
• 2 Betriebsmodi für den Drehknopf • 2 operation modes for the wheel knob
• für NMRA/DCC und Motorola-Betrieb • NMRA/DCC and Motorola mode
• 14/28/128 Fahrstufen • 14/28/128 speed steps
• 99 Funktionen pro Lok • 99 functions per loco
(Funktionsadressen F0...F28 + 60 Binary States) (function addresses F0...F28 + 60 Binary States)
• parallele und serielle Funktionsdaten • parallel and serial functions
• bis zu 240 Lokbilder (Schmal- und Regelspur) • up to 240 loco pics (narrow + regular gauge)
• 2 Loks gleichzeitig steuern • controls 2 locos at the same time
• 2 STOP-Tasten (programmierbare STOP-Tasten) • 2 STOP-keys (programmable STOP-functions)
• Funk- und Kabelbetrieb (systemabhängig) • R/C and cable operation (depends on system)
• Funkmodul nachrüstbar • R/C transmitter can be retrofitted
• verschiedene Farbvarianten erhältlich • several colors available
• verschiedene Programmierarten • supports several programming methods
• Anzeige der Systemleistung / Systemauslastung • shows system status (performance / utilization)
• 2 x 2048 Weichen- und Signalbefehle • 2 x 2048 switch and signal commands
• bis zu 32 Weichenstraßen programmierbar • up to 32 switch routes programmable
• geeignet für folgende Bussysteme: • supports the following bus systems:
Massoth, XpressNet V 3.6*, LocoNet* Massoth, XpressNet* V 3.6, LocoNet*
(* setzt separaten Funkempfänger voraus) (*requires 8130101 R/C Receiver)
1.2 Lieferumfang 1.2 Scope of supply
• 1 x DiMAX Navigator • 1 x DiMAX Navigator
• 1 x Anschlusskabel • 1 x bus cable
• 1 x Handbuch • 1 x manual
41.3 Warnhinweise 1.3 Warning Notes
• Der DiMAX Navigator ist nur für den Betrieb von • The DiMAX Navigator may only be operated
Modelleisenbahnanlagen mit den angegebenen on model train layouts with the referenced
Steuerkomponenten geeignet. components.
• Der DiMAX Navigator kann und darf nur mit den • The DiMAX Navigator may only be used with
in dieser Anleitung beschriebenen Komponenten components referenced in this manual. Other
betrieben werden. Eine anderweitige Verwen- use is permitted.
dung ist nicht zulässig. • Only connect the DiMAX Navigator to com-
• Schließen Sie den DiMAX Navigator nur an ponents referenced in this manual. Do not
die in dieser Anleitung beschriebenen Geräte connect it to other/unknown products even
an. Auch wenn andere Geräte die gleichen if they come with the same type connector.
Steckverbinder verwenden, ist der Betrieb The DiMAX Navigator uses a Massoth specific
mit diesen Geräten nicht möglich. Es führt zur bus system. If connected to unknown busses
Beschädigung des DiMAX Navigators, sowie it may be harmful for the Navigator or other
der anderen Komponenten. components.
• Achten Sie bitte darauf, dass der DiMAX • Make sure that the Navigator never falls. Do not
Navigator niemals herunterfällt. Setzen Sie ihn expose it to shocks or impacts. This will lead to
keinen Stößen oder Schlägen aus. Dies kann zur damage of the device.
Beschädigung des Gerätes führen. • Do not expose the Navigator to direct heat radia-
• Setzen Sie den DiMAX Navigator nicht dauerhaft tion, sunshine or humidity. This may impair the
direkter Wärme- bzw. Sonneneinstrahlung functionality.
oder Feuchtigkeit aus. Dies kann die Funktion • Only open the housing of Navigator when
beeinträchtigen. instructed by the Massoth service team or if
• Öffnen Sie den DiMAX Navigator nur auf required when installing a R/C transmitter.
Anweisung. Dies kann zu Beschädigung und • To clean the Navigator do not use harsh deter-
Beeinträchtigung des Gerätes führen. gents, cleaning solutions or chemicals.
• Reinigen Sie den DiMAX Navigator niemals
mit scharfen Reinigungsmitteln, Reinigungslö-
sungen oder ätzenden Chemikalien.
1.4 Einsatzmöglichkeiten 1.4 Operating scopes
Der DiMAX Navigator ist für den direkten Betrieb The DiMAX Navigator is designed to oper-
an den MASSOTH Zentralen vorgesehen. ate the MASSOTH Central Stations.
Er kann auch an der PIKO (35010) und LGB MZS It can also be used with PIKO (35010) and
III (55006) Zentrale genutzt werden. Mit der LGB MTS III (55006) Central Station. The
LGB MZSIII (55006) sind folgende Funktionen LGB MTS III (55006) offers the following
nutzbar: 14 + 28 Fahrstufen, F0 .. F16, nur CV features: 14 + 28 speed steps, F0...F16, CV
Programmierung, keine Automatikfunktion. programming, no automatic functions.
Für den Einsatz an den Analogfahrreglern To use the Navigator with the analog throttles
PIKO 35002 und LGB 51070 lesen Sie bitte die PIKO 35002 and LGB 51070 please refer to
Anleitung DiMAX Funkempfänger 8133101. the manual of the R/C Receivers 8133101.
Darüber hinaus kann der Navigator über With the R/C Receiver 8130101 the Navigator
den Funkempfänger 8130101 auch an may also be used with Central Stations support-
Zentralen mit XpressNet®- oder LocoNet®- ing the XpressNet®- and LocoNet® bus system.
Steuerbus betrieben werden.
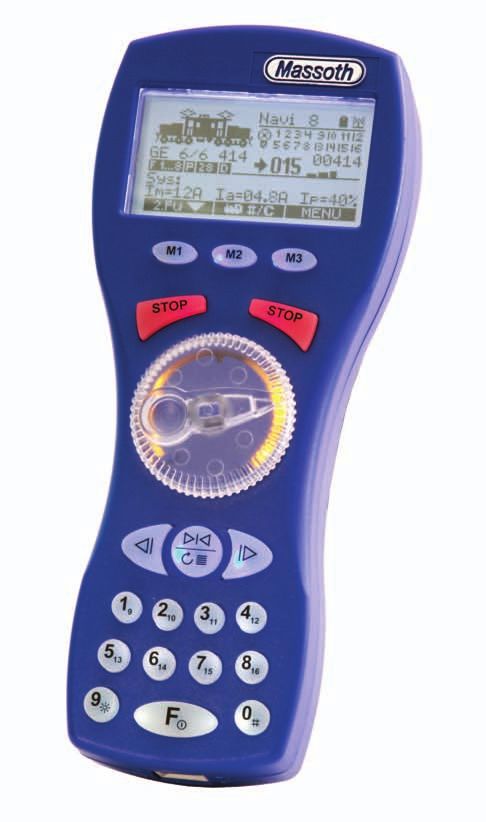
5Display
Menütasten
Menu keys
STOP links / rechts
STOP left / right
Drehregler
Dial knob
Tasten für 2. Funktion
Secondary function keys
Funktionstasten
Function keys
F-Taste
F-Key
6FAHRBETRIEB Von jedem Untermenü
DRIVING MODE From every submenu
Loktraktion Lok fahren
Consisting Loco-Control
Lok Adresse
Decoder Progr.
Loco Address
CV Lesen / Progr. Reg Programmieren
CV Read / Progr. Reg Programming
PoM Lokdecoder PoM Schaltdecoder
PoM Loco Addr. PoM Switch Addr.
Automatik Progr. Fahrstrasse Schaltautomatik
Automatic Progr. Turnout Route Prg Automatic Switch
Traktion Fahrautomatik
Consist Progr. Automatic Drive
Navigator Konfig. Beleuchtung Loks sortieren
Navigator Config. Backlight Loco sort
Notausmodus Werkseinstellung
Emergency Stop Factory Settings
Sprache wechseln Spezial Modus
Change Language Special Mode
ID-Nummer Progr.
ID-Number Progr.
Sperren
Code
Weitere ...
more ...
Funksender Konfig. Kanalwahl
RC Config. Channel
Frequenzband = Taste / Key M1
Wave Band
= Taste / Key M2
Abschaltzeit = Taste / Key M3
Switch off time
Zentrale Konfig. Akku laden
Central St. Config. Accu charge
72. Inbetriebnahme 2. Getting Started
Nach dem Einschalten meldet sich der Hand- After turning on, the Navigator will automatically
regler automatisch an der Zentrale an. Kann connect to the Central Station. If no connec-
eine Verbindung nicht hergestellt werden, so tion can be established it will be shown on
erscheint dies als Nachricht auf dem Display. the display. The actual type of connection
Der aktuelle Verbindungstyp wird im Display (wireless or cable) is indicated on the display.
symbolisch dargestellt.
2.1 ... am Buskabel 2.1 ...with cable operation
Verbinden Sie den Busanschluss des DiMAX Connect the Navigator with the bus
Navigators mit dem Busanschluss der Zentrale. cable to the Central Station. The Navi-
Der Navigator schaltet sich automatisch ein. gator will start automatically.
2.2 ... über Funk 2.2 ...wireless operation
Beachten Sie, das der Funkbetrieb nur For wireless operation 3 batteries (type
mit eingelegten Batterien (3 x Baugröße AA) are required. The Navigator needs to
AA) möglich ist. Der Navigator muss mit be equipped with a R/C transmitter also.
einem Funksender ausgestattet sein. • Start the Navigator with the F key
• Der Navigator wird mit der Taste F eingeschaltet • Holding the F key (>1sec.) will turn it off again
• Durch längeres drücken der Taste F (>1Sek.)
schaltet sich der Navigator wieder aus
Eine Funkstreckenreichweite von 50 bis 100 A radio range of 50 to 100 meters (150 to
Meter ist im Freien problemlos möglich. In 300 feet) should be no problem outdoors. The
Räumen kann die Reichweite durch unter- indoor radio range will be less due to walls and
schiedliche Bausubstanzen eingeschränkt sein. other building materials. Other R/C components
Beachten Sie, dass Störungen des Systems like garage door openers, computer mice and
durch andere Funkkomponenten, wie z.B. keyboards, wireless earphones etc. may inter-
drahtlose Computermäuse oder Tastatu- fere with the R/C transmission. This may reduce
ren, Garagentüröffner und Funkstrecken für the radio range, in some cases it may even
Audioübertragung (Audiokopfhörer) prinzi- make the R/C transmission impossible. In this
piell möglich sind. Dies kann Leistung und case, please change the R/C channel in order to
Reichweite des Funksignals beeinträchtigen improve R/C transmission (see chapter 8.9).
oder komplett unmöglich machen. Durch einen
Kanalwechsel kann der Betrieb möglicher- All R/C operated Navigators need to
weise verbessert werden (siehe Kap. 8.9) have their own radio ID in order to oper-
ate correctly. If two Navigators have the
Beim gleichzeitigen Betrieb mehrerer same ID, R/C operation will be avail-
Funk-Navigatoren müssen diese auf able or show strange behavior.
verschiedene ID-Nummern programmiert
werden. Wenn eine ID mehrfach verwen-
det wird ist der Funkbetrieb gestört, bzw.
es kommt zu seltsamem Verhalten.
82.3 Anzeige und Grundbedienung 2.3 Display and basic operation
Statuszeile / Status bar
Hauptfunktionsfeld / Main function array
Nebenfunktionsfeld / Auxiliary function array
Menübelegung / Menu assignment
Abbildung 1: Das Display ist in vier Bereiche aufgeteilt
Illustration #1: The has four functional sections
Das große Grafikdisplay gibt jederzeit detaillierte The large graphics display gives detailed
Auskunft über den Zustand der Lok und der information about the locomotive and layout.
Anlage. Unter anderem zeigt das Display For example, it shows the loco configuration
im Betrieb die Konfigurationsdaten wie z.B. details like picture, name, address, functions,
Lokbild, Lokname, Lokadresse, ansteuerbaren parallel or serial, active functions 1 to 28,
Fahrstufen, paralleler oder serieller Ansteue- actual speed in speed steps, a graphical bar
rung der Funktionen, aktive Funktionen von indicating the speed, etc. The backlight can be
1 bis 28, Fahrtrichtung, aktuelle Geschwin- activated and adjusted in the Navigators menu.
digkeit in Fahrstufen, Aussteuerungsanzeige
für die gefahrene Geschwindigkeit, etc..
Die Hintergrundbeleuchtung des Displays
wird im Menü ein- und ausgeschaltet.
Navigator ID Kabel-/ Funkbetrieb
Wired-/ RC mode
Akku Ladezustand
Accu charge state
Abbildung 2: Die Statuszeile zeigt Geräte ID, Batteriestatus und Betriebsart
Illustration #2: The Status bar shows the Navigator ID, Battery state and operation mode
Loksymbol Licht Funktionsanzeige
Loco symbol Light Function display
Lokname / Loco name Lokadresse / Loco address
Funktionsebene / Function level Geschwindigkeitgraph
Betriebsart Aktuelle Fahrstufen Actual speed graph
Operation mode Actual speed steps
Fahrstufen Richtung
Speed steps Direction
DCC Protokoll
DCC Protocol
Abbildung 3: Das Hauptfunktionsfeld informiert über die aktuell gewählte Lok und deren Zustand
Illustration #3: The main function array informs about the selected locomotive and its status
9Systemmeldungen
System messages
Eingestellte Strombegrenzung Last in Prozent bezogen auf Im
Regulated current limiting Load in percent relating to Im
Aktuelle Stromaufnahme
Actual current drawn
Abbildung 4: Das Nebenfunktionsfeld zeigt im Normalzustand die Systeminformation an
Illustration #4: The Auxiliary function array shows system details in the standard operation mode
Auswahl 2. Funktion Hauptmenü
Selection 2. function Main menu
Lokwechsel + Konfiguration
Change loco + configuration
Abbildung 5: Die Menüzeile zeigt die aktuelle Belegung der Tasten M1, M2 und M3
Illustration #5: The menu bar shows the function assigned to the keys M1, M2 and M3
2.4 Tastenblock (Zifferntasten) 2.4 Keyboard (number buttons)
Das Ziffernfeld wird für die Haupt- und Neben- The keyboard is used for main- and auxiliary
funktion genutzt. Die Umschaltung erfolgt über: functions. Switching between the main function
• F: Zifferntasten Hauptfunktion zugeordnet display and the auxiliary function display:
(mehrfaches Drücken der F-Taste wechselt die • F: keyboard is assigned to the main function
Funktionsgruppen F1-F8, F9-F16, etc.) display (using the F key additionally will assign
• M1: Zifferntasten Nebenfunktion zugeordnet from F1-F8 to F9-F16, etc.)
• M1: keyboard is assigned to auxiliary functions
2.5 Notstop-Funktion 2.5 Emergency-STOP
Der Navigator verfügt über zwei separate STOP- The Navigator provides two different STOP-
Tasten. Diese sind unabhängig voneinander functions which may be programmed individu-
programmierbar (siehe Kapitel 8.2). Im Ausliefe- ally (see chapter 8.2). Per factory default, the
rungszustand wird mit der rechten STOP-Taste Navigator triggers an Emergency-STOP with
der NOTAUS ausgelöst. Das heißt, der Strom auf the right STOP key which will cut the cur-
dem Gleis wird sofort ausgeschaltet. Mit der lin- rent from the track immediately. Use the left
ken STOP-Taste wird der NOTAUS anschließend STOP-key to release the Emergency-STOP.
wieder aufgehoben. Ist der Notstop ausgelöst, When an Emergency-STOP is triggered, both
blinken beide STOP Tasten, im Nebenfunkti- STOP keys will flash, the auxiliary display
onsfeld steht STOP in der Systemanzeige. will display STOP as system message.
103. Lok steuern 3. Loco operation
Mit kurzem Druck auf M2 können Sie die Use M2 to enter the loco selection mode and
Lokadresse eingeben. Bestätigen Sie mit M3. enter a loco address. Confirm with M3.
Nun kann die Lokomotive bereits mit dem The selected locomotive may now already be
Drehregler gesteuert werden. Der erste operated with the dial know. A simple driving
Fahrbetrieb ist sofort möglich. Die Loko- operation is available. The locomotive is oper-
motive erhält ihre Fahrdaten mit 28 Fahr- ated with 28 speed steps and parallel functions.
stufen und parallelen Funktionsdaten.
Detaillierte Funktionsangaben, Lokbild, Detailed function settings, loco picture,
Lokname, etc. werden in der LOK KONFI- loco name, etc. can be assigned in the
GURATION (siehe Kapitel 3.5) definiert. loco configuration (see chapter 3.5).
WICHTIGER HINWEIS IMPORTANT NOTE
Beachten Sie, dass bei Lokomotiven mit konfigurierten Locomotives configured with 14 speed steps will
14 Fahrstufen, das Licht nicht korrekt funktioniert, wenn have a strange light behavior (flashing), when oper-
sie mit 28 Fahrstufen angesteuert werden. Das gleiche ated with 28 speed steps. Locomotives configured
gilt für Lokomotiven die auf 28 Fahrstufen eingestellt with 28 speed steps but operated with 14 speed
sind jedoch mit 14 Fahrstufen angefahren werden. steps will also show a wrong light function.
3.1 Fahren und Grundfunktion 3.1 Driving with standard setting
Die Hauptsteuerfunktion des DiMAX Navigators The main driving operation of the Navigator
wird durch den runden Drehregler ausgeführt. is done with the wheel knob. The wheel knob
Mit dem Regler wird Richtung und Geschwin- controls direction and speed of the assigned
digkeit der Lok oder Loktraktion vorgegeben. locomotive. The center point of the wheel
Der Nullpunkt des Drehreglers wird bei knob is lit red in centered position (zero speed
Nullstellung rot hinterleuchtet. Zusätzlich kann steps). The wheel knob may be illuminated
der Drehregler, genauso wie das Display separat separately (check the Navigators menu). Func-
beleuchtet werden. Die Einstellung hierzu finden tion key 9 (lower left side) triggers the light
Sie im Menü des Navigators. Die Taste 9 (unten function of the actually assigned locomotive.
11links) schaltet die Lichtfunktion der aktuell The light function is independent from F1 to F28
gesteuerten Lok ein und aus. Die Lichtfunktion and is operated separately. If the wheel knob
wird von den Funktionen F1 bis F28 unab- is in centered position the locomotive stands.
hängig betrachtet und wird daher hier separat Speed step 000 is shown in the display. The
behandelt. In der Mittelstellung des Drehknopfs driving direction of the locomotive is shown
steht die Lok. Die Fahrstufe 000 wird im Display with the arrows in front of the speed steps.
angezeigt. Die Fahrtrichtung der Lok wird durch Functions are triggered with the keys F1 to F8.
den Pfeil vor der Fahrstufenzahl angezeigt. Die If a locomotive is operated with serial functions
Funktionen lösen Sie mit den Funktionstasten the F1 function will flash as many times as
1 bis 8 aus. Empfängt die Lok hingegen serielle the triggered function. Use the F key to switch
Funktionen, so blinkt die Funktion F1 mehrmals the function layers from F1...F8 to F9...F16,
auf. Mit der Taste F schalten Sie die Funktions- F17...F20 and F21...F28. The function mode
ebenen von F1...F8 auf die Funktionen F9...F16, F17...F20 also offers the binary state function
F17...F20 und F21...F28. Im Funktionsbereich operation from 30...99 by entering the function
F17...F20 sind auch die Binary States von 30-99 address with the keyboard. Use the F key as
per Eingabe verfügbar. Durch nochmaliges often as required to finally return to F1...F8.
drücken der Taste F, werden die Funktionstasten
wieder auf die Funktionen 1 bis 8 zurückgestellt.
123.2 Binary State Funktionen 3.2 Binary State Functions
Um die Binary State Funktionen 30-99 zu In order to operate Binary State Functions
aktivieren, muss der Spezialmodus A3 aktiviert from 30-99 the special mode A3 needs to be
werden. Die Binary State Funktionen sind activated. The Binary State functions may be
im Bereich F17-F20 per Eingabe verfüg- entered on the function address screen F17-F20.
bar. Mit Taste 0 wird die Eingabe gestartet. Start the input with 0 (zero). In order to send
Zum Senden eines Ausschaltbefehls wird a deactivation command a second 0 (zero)
nochmal die 0 gedrückt. (Anzeige o statt x). is required (screen shows o instead of x).
Dann wird die Funktionsnummer 2-stellig Then enter the function address with 2 digits
(30-99) eingegeben und sofort ausgeführt. (30-99). The command is sent immediately.
3.3 Lokadresse wechseln 3.3 Changing the locomotive address
• Mit kurzem Druck der Lokwahltaste M2 • Pressing M2 enters the loco loco selection
gelangen Sie in das Eingabefenster für die mode. Enter the loco address with the keyboard,
Lokadresse. Durch die Eingabe einer Lokadresse for example address 3 and press M3 to select
über die Tastatur, z. B. Lokadresse 3 und einer the locomotive. The locomotive is assigned to
Bestätigung mit M3 wird die gewünschte Lok the Navigator with a standard decoder setting.
bereits für den schnellen Fahrbetrieb definiert. The Navigator automatically starts the driving
Anschließend springt der Navigator in den mode.
Fahrmodus zurück. • Previously configured locomotives are stored in
• Bereits definierte Lokomotiven sind in Zentrale the Central Station and the Navigator and may
und Navigator gespeichert und können im be selected on the loco selection mode. Saved
Lokwahlmodus geladen werden. Gespeicherte locos may be selected with M1 (up) and M2
Loks können mit den Tasten M1 (Auf) und M2 (down) from the database. Confirm your selec-
(Ab) in der Datenbank gesucht werden. Ist die tion with M3.
gewünschte Lok gefunden, wird wieder mit M3 • If the selected loco address is not configured
bestätigt. you will automatically start with a standard de-
• Ist die eingegebene Lokadresse nicht definiert, coder setting with undefined loco specifications
so befinden Sie sich im ersten Fahrbetrieb neuer
Lokomotiven mit undefinierten Eigenschaften
der Lok. .
13• Möchten Sie aus dem Lokwahlmenü wieder • You may return to the operation mode without
zurückkehren, ohne eine neue Lok zu wählen, selecting a new locomotive, if you have not
können Sie durch Drücken der Taste M3 in selected or entered a new loco address with M3.
den Fahrmodus zurückspringen, wenn Sie
noch keine neue Adresse eingegeben oder Lok
ausgewählt haben.
3.3.1. Belegte Lok 3.3.1. Occupied Loco
Wenn Sie eine belegte Lok auswählen, wird dies If you select an occupied loco, this is in-
im Display mit einem Loksymbol mit durchge- dicated in the display with a loco symbol
kreuztem Loksymbol angezeigt. Das bedeutet with a dwarted loco symbol. This means the
die angezeigte Lok ist in der Zentrale als belegt displayed loco is characterized in the as oc-
gekennzeichnet. Diese muss erst ordnungsge- cupied. These must first be logged properly.
mäß abgemeldet werden.
Zusätzlich gibt es noch Sondermeldungen In addition there are special messages in
im Display, die folgende Bedeutung haben: the display have the following meanings:
• „T“= Timeout: Zentrale antwortet auf Lokanmel- • „T“= Timeout: Central station does not reply to
dung nicht loco registration
• „L“= Lokspeicher voll: Anzahl aktivierter Loks in • „L“= Loco memory full: Increase number of
Zentrale erhöhen activated locos in the central station
3.3.2. Abmelden einer Lok 3.3.2. Deselecting a locomotive
Eine auf dem DiMAX Navigator angemeldete Operated locomotives are assigned to the
Lokomotive ist reserviert und kann durch andere used Navigator and are not available for oth-
Teilnehmer nicht übernommen werden, wenn ers unless it is deselected. The actual loco
diese von Ihnen nicht explizit freigegeben wird. is automatically deselected when the loco
Dies geschieht ganz einfach durch das Öffnen selection mode is started with M2. The
des Lokwahlmenüs (Kurz Taste M2). Dabei wird recently used locomotive immediately released
die gesteuerte Lok automatisch abgemeldet. and may be selected by other players.
14WICHTIGER HINWEIS IMPORTANT NOTE
Die Verwaltung der Lokomotiven erfolgt in der Digitalzen- All known locomotives of the system are managed by the
trale. Wählen Sie eine der verfügbaren Lokomotiven, wird Central Station. If a locomotive is selected by a Navigator,
diese in der Zentrale als belegt gekennzeichnet und kann the Central Station assigns it to the Navigator. It is marked
von weiteren Teilnehmern nicht angesprochen werden. as assigned and is not available to other players. This
Dies ist unabhängig vom Betriebszustand der Lokomotive. is independent from the locomotives operation state.
Eine fahrende Lok wird immer passiv abgemeldet, da sie The system distinguishes between running locomotives
weiterhin Daten von der Digitalzentrale erhalten muss. Sie and idle (standing) locomotives when the locomotive is
wird also nur auf dem Steuerbus abgemeldet und kann deselected. A running loco will be deselected in passive
von einem anderen Teilnehmer geladen werden. Melden mode. This means it is still operated (active) by the
Sie dagegen eine Lokomotive ab wenn sie steht, wird sie Central Station but no Navigator is assigned to operate
aktiv abgemeldet. Das heißt, sie wird auch in der Zentrale it. A standing locomotive will be deselected in active
abgemeldet und ist nicht mehr aktiv. Dies kann im Display mode. This means it will be canceled from the list of
der Zentrale leicht überprüft werden. Hier wird die Anzahl active locomotives in the Central Station and is not active
aktiver Loks immer angezeigt. Das aktive Abmelden anymore. The number of active locomotives in the Central
beschleunigt die Datenübertragung auf dem Gleis. Station is shown on its standard operation screen. Less
active locomotives means sending less control commands
on the track and results in a faster system reaction.
3.3.3. Einfangen einer Lok nach Lokwechsel 3.3.3. Re-selecting running locomotives (catching)
Wechseln Sie während dem Spielen zu einer When changing operation between running
Lokomotive, die bereits auf dem Gleis fährt, so locomotives you will have to catch up with the
müssen Sie die Lokomotive mit Ihrer aktuellen actual speed of the re-selected locomotive.
Geschwindigkeit einfangen, um diese Steuern After re-selecting a locomotive the display
zu können. Nach dem Laden der Lok wird im will show the actual speed of the locomotive
Display die aktuell gefahrene Geschwindigkeit (speed steps) and the driving direction. The
(Fahrstufe), sowie die Richtung angezeigt. Zur wheel knob will flash in the driving direc-
Verdeutlichung blinkt hier auch der Drehregler. tion. To catch up with the locomotives speed
Zum Fangen der Lok drehen Sie den Regler turn the wheel know in the flashing direction
so lange in die blinkende Fahrtrichtung, bis until the flashing stops (and the speed step
die Beleuchtung des Drehreglers nicht mehr setting changes). The locomotive is now
blinkt, bzw. bis sich die Anzahl der Fahrstu- re-selected and can be operated as usual.
fen ändert. Die Lok ist damit eingefangen und
sofort wieder steuerbar.
3.4 Fahren einer analogen Lok 3.4 Operating an analog locomotive
Natürlich kann auch eine analoge Lok mit dem The Navigator supports operating an analog
DiMAX Navigator gesteuert werden. Die Adresse locomotive (Central Station needs to support
einer analogen Lokomotive ist „0“. Die Definition this feature) with address “0”. No loco configu-
der Lokeigenschaften, wie zum Beispiel Fahr- ration is available for analog locomotives. The
15stufen oder Funktionen, ist bei einer analogen analog operating feature will show an analog
Lokomotive nicht möglich. Die Lok Konfigu- throttle as loco picture. If more than one analog
ration kann in diesem Fall nicht ausgeführt locomotive is on the layout, they will operate
werden. Eine analoge Lok wird im Display mit at the same time! This feature is also available
dem Bild eines Analogreglers dargestellt. Diese with Navigators connected to some analog
Funktion ist auch an Analogfahrreglern nutzbar. throttles (e.g. LGB 51070 or PIKO 35002).
WICHTIGER HINWEIS IMPORTANT NOTE
Ein hochfrequentes Pfeifen analoger Lokomotiven auf Analog locomotives will have a high-frequency whistle
dem Digitalgleis wird durch die besondere Form der effect caused by the DCC voltage on the track. This is
Digitalspannung verursacht. Sie ist für die Elektronik usually harmless for electronics and motor. (You may
der Lokomotive jedoch prinzipiell unschädlich. (Sehen want to check the locomotives manual for more details
sie hierzu in der Anleitung des Herstellers nach.) or contact the manufacturer for more information).
3.5 Lok konfigurieren 3.5 Loco Configuration
Legen Sie in der Lok Konfiguration den The loco configuration sets all the loco specific
Funktionsumfang Ihrer Lokomotiven fest. decoder settings such as the number of speed
Dazu gehören zum Beispiel Anzahl der steps, the operation mode, serial or paral-
Fahrstufen, die Betriebsart, serielle bzw. lel functions and the loco picture. Enter the
parallele Funktionsauslösung oder das Lokbild. configuration mode holding M2 for a moment.
Durch langes drücken der Taste M2 gelan-
gen Sie in das Lok Konfigurationsmenü.
3.5.1. Einstellung der Fahrstufen 3.5.1. Setting the Speed Steps
Nachdem Sie die Lok Konfiguration aufgerufen Entering the loco configuration will start with the
haben befinden Sie sich in der Fahrstufenkon- speed step setting. Use M2 to select between
figuration. Mit M2 wählen Sie zwischen 14D, 14D, 28D, 128D (D stands for DCC operation).
28D und 128D Fahrstufen. Das D steht für DCC- Confirm your selection with M3 to go to the
Betrieb. Bestätigen Sie anschließend Ihre Wahl next step. MTS III only supports 14 or 28 speed
mit M3 um zum nächsten Menü zu gelangen. steps.
Bei MZS III sind nur 14+28 Fahrstufen möglich.
163.5.2. Einstellung der Funktionstasten 3.5.2. Function Key Settings
Bei der Wahl der Funktionsdatenübertragung When configuring the function key settings you
kann mit der Taste M2 zwischen parallel P may select from parallel P and serial S with
und seriell S gewählt werden. Bestätigen Sie M2. Confirm your selection with M3 unless you
Ihre Wahl anschließend mit M3 wenn Sie nicht would like configure the single function keys
auch noch die F-Tasten konfigurieren möchten. as well. Usually DCC decoders are operated in
Üblicherweise werden alle DCC-Decoder im „P“- parallel mode. Older LGB sound locomotives
Modus gestartet. Einige ältere LGB-Soundloks may only support the serial function mode.
benötigen die spezielle „serielle Pulskette“.
Sie haben die Möglichkeit die Funktionen 1-16 You may also select momentary or permanent
auf Moment- oder Dauerbetrieb zu konfigurie- function mode for F1 to F16. To select F9 to
ren. Um die Tasten 9-16 auszuwählen drücken F16 press the F-key once. When the numbers
Sie einmal die F-Taste. Sind die Zahlen 1-16 im are displayed regularly (not inverted) func-
Display nicht invers abgebildet, so arbeiten die tion keys will operated in momentary function
Tasten wie üblich (1 x Drücken entspricht 1 x mode (pressing once will activate or deacti-
17Anschalten oder Ausschalten). Durch Drücken vate). When pressing the function address the
der entsprechenden Taste wird diese Zahl im number will be displayed with black background
Display invers dargestellt (im Beispiel 2 und (inverted). This function key will then oper-
4). Diese Taste ist dann im Dauerbetriebsmo- ate in permanent mode. The function will be
dus. Solange die Taste gehalten wird, wird activated until it is turned off with the function
die darauf programmierte Funktion ausgelöst key again. Confirm your selection with M3.
und nach dem loslassen wieder ausgeschaltet.
Bestätigen Sie Ihre Wahl anschließend mit M3.
3.5.3. Auswahl des Lokbildes 3.5.3. Selecting the locomotive picture
Mit den Tasten M1 und M2 können Sie aus The keys M1 and M2 will browse through
allen vorhandenen Loksymbolen das passende the list of available loco pictures. It is also
auswählen. Zusätzlich besteht die Möglichkeit, possible to enter the picture number with
per Eingabe über die Nummerntasten das the keyboard directly. Confirm your selection
Lokbild direkt anzuwählen. Bestätigen Sie Ihre with M3 when ready to go to the next menu
Wahl anschließend mit M3 um zum nächsten item. A list with the loco pictures is available
Menüpunkt zu gelangen. Die verfügbaren separately. It is updated from time to time and
Loksymbole finden Sie auf einem gesonder- available from the Massoth website. The loco
ten Beiblatt. Diese werden von Zeit zu Zeit pictures can be updated with a picture update.
aktualisiert und auf der Massoth Webseite
verfügbar. Für neue Loksymbole muss die
Bilderdatenbank per Update aktualisiert werden.
3.5.4. Eingabe des Loknamens 3.5.4. Entering a loco name
Hier definieren Sie Ihre persönlich bevorzugte Define your personal loco name which is
Lokbezeichnung, die im Fahrbetrieb unterhalb displayed below the locomotive picture in
des Loksymboles angezeigt wird. Auch bei the driving mode. The loco name is also
Nutzung der zweiten Lokfahrfunktion wird der displayed when a locomotive is oper-
Lokname angezeigt. Hierbei steht der Lokname ated in the secondary function layer. The loco
unterhalb der Lokadresse. Drücken Sie die Tas- name is shown below the loco address.
ten M1 und M2 oder drehen Sie langsam den Press M1 and M2 or rotate the wheel knob
Drehknopf um durch die verfügbaren Zeichen slowly to browse through the list of available
18zu gehen und wählen Sie den entsprechenden characters. You may choose characters from
Buchstaben oder das gewünschte Zeichen aus. 0-9, A-Z, -, /, _ .
Es stehen folgende Zeichen zur Vergabe des Select a corresponding character with the
persönlichen Loknamens zur Verfügung: 0-9, RIGHT ARROW KEY of the secondary function
A-Z, -, /, _ keys. You may now select the second character
Haben Sie sich für ein Zeichen entschieden, so and so on. Repeat the procedure until you have
bewegen Sie sich mit der rechten Pfeiltaste der finished entering the locomotive name. The
zweiten Funktion nach rechts. Jetzt kann das maximum length of the locomotive name is 10
nächste Zeichen definiert werden. Dies wieder- characters. After entering the locomotive name
holen Sie so lang, bis Sie die Bezeichnung kom- use the ROUND HALT KEY of the secondary
plett eingegeben haben. Die Lokbezeichnung function keys define the end of the loco name. If
kann bis zu 10 Zeichen lang sein. Mit der runden you would like to remove some characters of the
HALT-Taste der zweiten Lokfunktion wird der name, just go to the right digit next to the last
Endpunkt der Zeichenkette definiert. Möchten letter you want to remain and use the ROUND
Sie von einer Bezeichnung einen (hinteren) Teil HALT KEY to set the end of the loco name.
entfernen, so genügt es, wenn Sie an der ent- If the name has been mistyped use the LEFT
sprechenden Stelle den Endpunkt der Zeichen- KEY to jump back character by character. After
kette setzen. Bei einem Eingabefehler können confirming with M3 the new loco name is saved
Sie mit der linken Pfeiltaste zurückspringen. and will be shown on the operation screen.
Wenn Sie diese Änderung mit M3 bestätigen,
wird die Änderung der Lokbezeichnung über-
nommen und beim nächsten Laden der Konfi-
guration bzw. des Fahrmodus korrekt angezeigt.
Sie gelangen dann in den nächsten Menüpunkt.
WICHTIGER HINWEIS IMPORTANT NOTE
Der Name wird nur lokal in diesem Navigator ge- The loco name is saved individually on each Navigator.
speichert. So kann auf jedem Navigator für jede
Lok ein eigener Wunschname definiert werden.
3.5.5. Konfiguration im Decoder speichern 3.5.5. Saving the configuration to the Decoder
Vor dem Speichern können Sie die Einstellungen Prior saving the loco configuration itself
in den Decoder programmieren. Stellen Sie it is possible to save the configured de-
hierzu das Fahrzeug auf das Programmiergleis tails into the decoder. The loco needs to
und drücken dann die Taste M1. Alle wichtigen be placed on the programming track of
Decodereinstellungen werden direkt program- the central station (CV programming). M1
miert. will start the programming procedure.
193.5.6. Lokkonfiguration speichern 3.5.6. Saving the Loco configuration
Speichen Sie hier die Konfiguration Ihrer Saving the loco configuration with M2 (OK)
Lokomotive ab. Mit M2 werden die Daten will store the specifications permanently in
permanent übernommen und sind beim the Navigator. After turning on the system
nächsten Einschalten der Zentrale auch noch again the configuration is still available. If the
vorhanden. Speichern Sie die Daten dagegen configuration is saved with M3 (TEMP), the
nur temporär mit M3, so sind die Daten dieser configuration is stored temporarily only. This
Lokomotive nur während dieses Spielzyklu- means that the loco details are only available
ses vorhanden. Wird die Zentrale zu einem until the system is shut off. When the Central
späteren Zeitpunkt erneut eingeschaltet, sind station is switched on again, these details
diese Daten nicht mehr vorhanden. Sind die will not be available anymore. After saving
Daten der Lokomotive gespeichert, gelan- the configuration the Navigator will show
gen Sie direkt wieder in den Fahrmodus. the standard driving screen automatically.
3.5.7. Lokadresse löschen 3.5.7. Deleting a loco address
Durch langes Drücken der Taste M2 gelangen Holding M2 long (three seconds) will load the
Sie in das Lok Konfigurationsmenü. Im ersten loco configuration mode. The first configura-
Konfigurationsfenster haben Sie die Möglichkeit tion page provides a function to delete locos
eine nicht mehr benötigte Lok zu löschen. Durch that are not required anymore. Holding M1
Drücken von M1 wird die aktuelle Lok gelöscht. will delete the active loco from the Naviga-
Nun müssen Sie mit M1 oder M2 wieder eine tor. Afterwards a new loco can be selected
neue Lok auswählen und mit M3 bestätigen. with M1 and M2 and confirmed with M3.
4. Die 2. Funktionsebene 4. The secondary function layer
Der DiMAX Navigator bietet neben der Haupt- Besides the standard locomotive control
funktion zur Loksteuerung eine zweite Ebene with the dial knob, the Navigator supports a
für verschiedene Funktionen. So kann man mit secondary function layer for different functions.
dem Drehregler eine Lok steuern und zusätzlich This allows operating a locomotive with the
Weichen oder Fahrstraßen schalten oder sogar dial knob while turnouts or turnout routes are
eine zweite Lok steuern. Die zweite Steuerfunk- controlled. Even a second locomotive can be
tion des Handreglers wird mit den drei Tasten operated. The secondary function is controlled
unterhalb des runden Drehknopfs gesteuert. with the three keys below the dial know.
204.1 Systemanzeige 4.1 System Information
Beim Start des DiMAX Navigators wird der When the Navigator starts, the secondary func-
Infomodus der zweiten Funktion als Standard tion shows the system information screen. It
geladen. Dieser zeigt immer den maximalen shows the maximum amperage of the system,
Fahrstrom, aktuelle Auslastung in Ampere the actual amperes drawn and the percentage.
und Prozent an. Zusätzlich werden System- It also shows occurring system messages.
meldungen ausgegeben. Über die Taste M1 Using the M1 key the secondary function can
kann jederzeit die zweite Funktion des DiMAX be changed. If you press M1 the first time after
Navigators ausgewählt werden. Drücken initial start the keyboard (Keys 0... 9) is as-
Sie diese Taste zum ersten Mal, so wird die signed to the secondary function. This is clearly
Tastatur (Tasten 0 bis 9) zur Eingabe der indicated below the locomotive name with 2.Fu.
zweiten Funktion umgelegt. Dies ist unter dem instead of Fxx. The previously selected locomo-
Loknamen deutlich zu erkennen. Die Anzeige tive can still be controlled with the dial knob
wechselt von Fxx auf 2.Fu. Eine Lok kann although functions can not be triggered due to
dann wie gewohnt weiter gesteuert werden, the fact that the keyboard has been assigned to
jedoch können keine Funktionen mehr ausge- the secondary function. Pressing the F key will
löst werden. Mit der Taste F können Sie die reassign the keyboard to the main function.
Tastatur wieder der Hauptfunktion zuordnen.
4.2 Schaltbefehle (für Weichen und Signale) 4.2 Switch commands (for turnouts and signals)
Durch nochmaliges Drücken von M1 wech- Pressing M1 a second time will change the
seln Sie in den Schaltbefehl-Modus. Geben secondary function to the switch command
Sie die Adresse der Weiche über die Tastatur function. Just enter the address of the turnout
des DiMAX Navigators ein und schalten Sie and trigger the switch with the left and right
diese mit den Pfeiltasten der 2. Funktion arrow keys of the secondary function keys.
nach links oder rechts. Zusätzlich können Additionally the round key will step through
Sie mit der runden HALT-Taste die letzten the last 8 (or 16) switch addresses used. If you
8 (oder 16) bereits geschalteten Weichen have used the switch addresses #0001 and
durchblättern. Haben Sie also bereits Weiche #0006 previously, the round button will take
#0001 und #0006 einmal geschaltet, springen you to #0001 again followed by #0006 again.
Sie mit der runden Taste erneut zur Weiche This function also works, when the keyboard is
#0001, anschließend zur Weiche #0006. assigned to the main function (with the F key).
21Dies funktioniert auch, wenn die Tastatur You may operate the selected train and the last
bereits wieder zur Hauptfunktion zurückge- 8 (or 16) switch addresses at the same time.
schaltet wurde (mittels Taste F). Sie können
also eine Lok in vollem Umfang steuern und
dabei die letzten 8 oder 16 Weichen schalten.
4.3 Fahrstraßen (für Weichen und Signale) 4.3 Turnout routes (for turnouts and signals)
Neben der Schaltfunktion einer einzelnen Besides single switch commands the Navigator
Weiche können natürlich auch Fahrstraßen can also handle turnout routes (switch routes).
geschaltet werden. Diese müssen, wie in Kap. Turnout routes need to be configured seperate-
7.1 beschrieben, vorher definiert werden. ly before they can be triggered (Chapter 7.1).
Drücken Sie so oft M1 bis die Anzeige im Use the M1 button as often as required until
Nebenfunktionsfeld „Fahrstrasse“ anzeigt. “Switchroute” is shown. Enter the number of the
Geben Sie die Nummer der Fahrstraße über die desired switchroute and trigger it with the right
Tastatur ein und lösen Sie die Fahrstraße mit der secondary function key. All defined elements of
rechts Taste aus. Alle Elemente der Fahrstra- the switchroute will receive the predefined com-
ße erhalten damit nacheinander den zuvor mand. The left key will trigger all elements of the
definierten Schaltbefehl. Wie bei der Weichen- switchroute with the opposite switch command.
schaltfunktion auch, können die letzten 8 oder This is a good help for testing. The round
16 geschalteten Fahrstraßen mit der HALT- secondary function key will step through the
Taste (runde Taste) nacheinander aufgerufen history list of the last 8 or 16 switchroutes used.
werden und geschaltet werden. Zum Testen der
Fahrstrasse können mit der linken Pfeiltaste alle
Elemente entgegengesetzt geschaltet werden.
4.4 Zweite Lok steuern 4.4 Operating a secondary locomotive
Der DiMAX Navigator bietet die Möglichkeit, The DiMAX Navigator can operate two different
zwei Lokomotiven bzw. Züge gleichzeitig locomotives at the same time independently. The
und unabhängig voneinander zu steuern. Die second locomotive is controlled with the second-
Bedienung einer Lok in der 2. Funktionsebene ary function keys and is performed as follows:
unterscheidet sich in folgenden Punkten:
• Adresswechsel über Taste 0# • enter loco selection with key 0#
22• Loksuche (blättern) mit runder Taste • browse through the loco list with the round key
• Auswahl (OK) mit Pfeil rechts • select desired loco with the right key
Die gewünschte Lok muss konfiguriert sein. The desired loco has to be configured. To select
Um in diesen Modus zu gelangen, drücken Sie this option please use the M1 button as often
so oft M1 bis die Anzeige im Nebenfunktionsfeld as required in order to reach the loco menu
Lok: XXX anzeigt. Geben Sie nun die Lokadres- displayed with Loco: XXX. Enter the desired loco
se über die Tastatur ein oder wählen über die address with the keyboard or select the loco
runde Taste aus und bestätigen Sie Ihre Wahl from the existing list with the round secondary
anschließend mit der rechten Pfeil-Taste der function key and confirm your selection with
zweiten Funktion. Mit der zweiten Lokfunktion the right secondary function key. The secondary
können nur konfigurierte und gespeicherte loco can only be operated with preconfigured
Loks geladen werden. Die freie Eingabe einer and stored locomotives. Entering a new and
neuen unbekannten Lok ist nicht möglich. unknown loco address is not available.
Wurde die Lokadresse korrekt gewählt, werden When the loco address has been selected
im Display die Daten der Lok angezeigt. Dazu correctly, the loco details will be shown in
gehören: Lokadresse, Lokname (wenn verge- the display: Loco address, Loco name (if
ben), Licht, Funktionen 1 bis 8 und natürlich assigned), Light, Functions 1...8 as well as
Fahrtrichtung und Fahrstufe. Mit den Pfeiltasten driving direction and speed steps. The loco is
steuern Sie die zweite Lok. Die runde HALT- operated with the left and the right button of
Taste setzt die Lok automatisch auf Fahrstufe 0 the secondary function keys. The round button
und hält die Lok damit an. Auch können Sie mit (STOP) will reset the actual speed steps to 0
ihr im Stillstand die Richtung der Lok wechseln. which will stop the loco. It also changes the
Für die zweite gesteuerte Lok können nur loco driving direction without driving. Only
die Funktionen 1 bis 8 ausgelöst werden. functions 1...8 are available for the second-
Schalten Sie dazu die Belegung der Funktions- ary locomotive. Use the M1 key to assign
tasten mit M1 auf die zweite Funktion um. the keyboard to the secondary function.
4.5 Erweiterte Schaltbefehle (eS) 4.5 Enhanced switch commands (eS)
Ab Version 2.00 gibt es eine Funktion für From version 2.00 a new feature for en-
erweiterte Schaltbefehle. Diese kann über den hanced switching commands is available.
Spezialmodus B5 aktiviert werden und ist These can be activated via the special mode
ebenfalls in der 2. Funktionsebene hinter der B5 and is available in the 2nd function
2. Lokfunktion sichtbar. Hier können bis zu layer after the 2 loco function. Here up to
255 Zustände für Signale/Weichen pro Adresse 255 states for signals / switches per address
definiert werden. Die Adresseingabe erfolgt wie can be defined. The address is entered as
in Kapitel 4.2 beschrieben, es gibt jedoch keine described in Chapter 4.2, there is no scroll-
Durchblätterfunktion. Folgende Nutzung für Sig- ing function. The following use of signals
nale (IR-Signaldecoder) ist momentan möglich: (IR signal decoder) is currently possible:
< = rot (R) | 0 = Langsamfahrt (L) | > = grün (G) < = red (R) | 0 = Slow travel (L) | > = green (G)
234.6 Rückmeldeanzeige 4.6 Feedback display
Mit der aktivierten Rückmeldeanzeige (über Spe- When special mode 3 is activated, the feedback
zialmodus B3) ist es möglich, die ausgelösten data of triggered track contacts connected to
Gleiskontakte der Rückmeldemodule im Naviga- feedback modules are shown in the display
tor anzeigen zu lassen. In der 2. Funktionsebene of the Navigator. When the switch command
unter Schaltbefehl werden die Kontaktnummern function is selected for the secondary func-
in der unteren Zeile dargestellt. Vorne sehen tion display the feedback details are shown
sie die umgerechnete Kontaktnummer, wie sie below the switch address. The first four
bei der PC-Steuerung verarbeitet wird. Hinten digits show the triggered contact address
steht die programmierte Kontaktnummer. as it is used for PC control, the last 5 digits
show the programmed contact number.
5. Loktraktion 5. Consist
Bei einer Loktraktion werden mehrere Loks A consist is the combination of multiple
zu einem Zug zusammengestellt. Das kennt locos in one train. The known example of
man beispielsweise von langen Güterzü- long freight trains in the US. In order to use
gen aus den USA. Um eine Loktraktion zu a consist, it has to be configured first.
nutzen, muss diese erst definiert werden.
Als Standard wird die Traktion Nr. 1 geladen. Consist no. 1 is the standard setting to be acti-
Hier können Sie mit M2 die zuvor ein- vated when selecting the consist mode. Use the
gestellten Traktionen durchblättern. M2 key to select one of the preconfigured con-
Haben Sie die gewünschte Traktion, sists. Confirm the desired consist with the M3
wählen Sie diese mit M3 aus. key. Instead of the locomotive picture the con-
Nun werden im Traktionsmodus anstelle figured loco addresses of the chosen consist are
des Loksymboles die Adressen der bis zu 4 shown in the display. The consist is operated
Traktionsloks angezeigt. Die Steuerung der similar to a single loco, with the dial knob and
Traktion ist mit der Loksteuerung vergleich- the keyboard. If a configured loco of the consist
bar. Ist in der ausgewählten Traktion eine does not exist it is shown with an X behind the
falsch oder nicht konfigurierte Lokadresse loco address. This also applies to active locos
24Sie können auch lesen