MONTAGESTÄNDER III - Polo Motorrad
←
→
Transkription von Seiteninhalten
Wenn Ihr Browser die Seite nicht korrekt rendert, bitte, lesen Sie den Inhalt der Seite unten
MONTAGESTÄNDER III
                      Bedienungsanleitung

MOUNTING STAND III
BEQUILLE DE MONTAGE III
CAVALLETTO ALZAMOTO III
Instruction Manual • Mode d’emploi • Manuale d‘uso
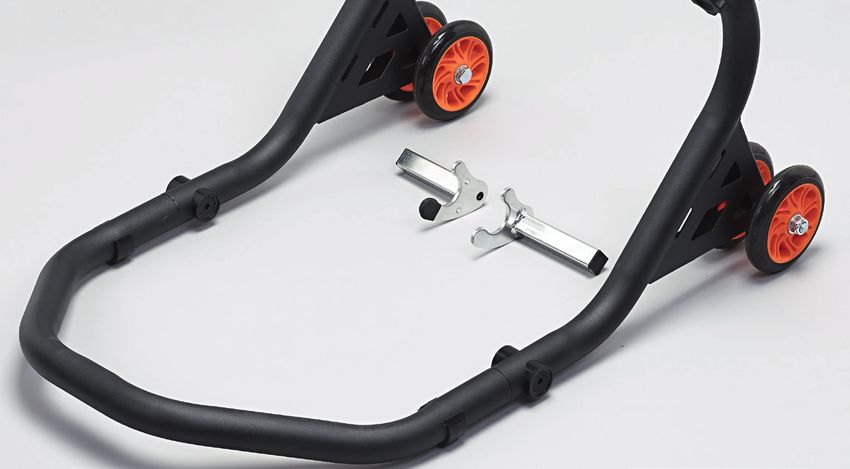
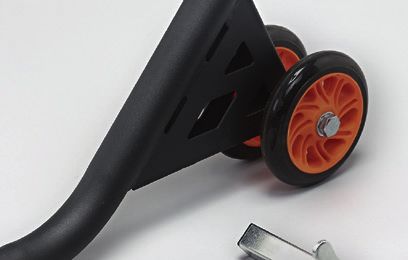
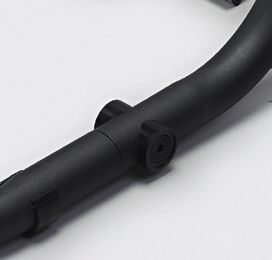
HI-Q TOOLS MONTAGESTÄNDER III
B.-Nr. 60150700070
LIEFERUMFANG
1 Montageständer
2 gummierte Schwingen-Auflagen
2 Racingadapter (V-Form)
Der HI-Q TOOLS Montageständer III erleichtert, richtig angewandt, unzählige Reparatur- und War-
tungsarbeiten an Ihrem Zweirad. Moderne Motorräder besitzen ein hohes Leergewicht von nicht selten
einigen hundert Kilogramm. Aus diesem Grund wenden Sie den HI-Q TOOLS Montageständer III je-
derzeit mit größter Sorgfalt gemäß dieser Bedienungsanleitung und den Vorgaben des Fahrzeug-
herstellers an, um Schäden an Ihrem Zweirad und mögliche Verletzungen beteiligter Personen zu
vermeiden. Der HI-Q TOOLS Montageständer III ist mit den mitgelieferten Schwingen-Auflagen nur
für das Aufbocken von Motorrädern mit gerader Kastenprofil-Hinterradschwinge geeignet.
Verwenden Sie den HI-Q TOOLS Montageständer III niemals für andere Zwecke als hier oben beschrieben.

MONTAGE
Der HI-Q TOOLS Montageständer III ist einsatzbereit, sobald die Auflagen (nach innen weisend) in die of-
fenen Holme des Hebers eingesteckt und mit den Sicherungsschrauben mögliche Breiten: mit Gummi-
winkel 22-31 cm, mit Racingadapter: 21-34 cm, fixiert wurden. Die selbstsichernden Muttern der
Sicherungsschrauben werden mit Gefühl angezogen, ohne das Profil des Hebers zusammenzuzie-
hen. Ist die Schwinge mit einer Gewindeaufnahme versehen, empfiehlt sich die Nutzung der oben auf-
geführten optional erhältlichen Racing Aufnahmeadapter mit Rollen.
Ist eine gerade Kastenprofilschwinge ohne Gewindeaufnahmen vorhanden, verwenden Sie die im
Lieferumfang enthaltenen gummierten Schwingen-Auflagen. Der Heber ist nicht für Dreiecksschwingen
oder gebogene „Bananenschwingen“ ohne Gewindeaufnahmen oder für Einarmschwingen geeignet.

ANWENDUNG
Vor der Verwendung des HI-Q TOOLS Montageständer III überprüfen Sie unbedingt, ob Ihr Motorrad
grundsätzlich die Voraussetzungen für ein Anheben mit dem HI-Q TOOLS Montageständer III erfüllt.
Die maximale Traglast des HI-Q TOOLS Montageständer III beträgt 150 kg – somit darf das Gesamt-
gewicht des Zweirades inklusive Zubehör 300 kg nicht überschreiten. Die Hinterradschwinge muss in
Ihrer Bauform für den HI-Q TOOLS Montageständer III geeignet sein (keinesfalls sind Formen wie oben
beschrieben geeignet). Soll das Hinterrad demontiert werden, ist die Achse vor dem Aufbocken des
Motorrades zu lösen. Das gleiche gilt für sonstige, sehr festsitzende Verschraubungen am Zwei-
rad. Bocken Sie das Fahrzeug nie allein auf – lassen Sie sich grundsätzlich und unbedingt von einer
zweiten, kräftigen Person helfen, die das Motorrad am Lenker in senkrechter Position sicher festhält.
Ein Anheben des Zweirades, wenn es schräg auf dem Seitenständer steht, führt durch die anfangs
einseitige Belastung zur Beschädigung des HI-Q TOOLS Montageständer III und eventuell zum
Abrutschen des Fahrzeugs.
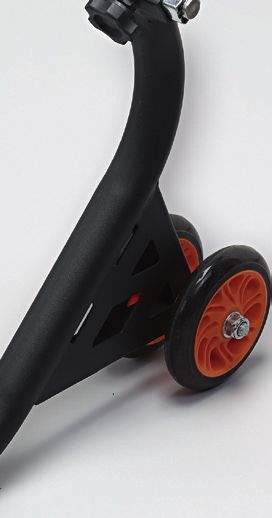
DE
ANWENDUNG MIT GUMMIERTEN SCHWINGEN-
AUFLAGEN DIREKT AN DER SCHWINGE
Montieren Sie die gummierten Schwingen-Auflagen und stellen Sie die Breite des HI-Q TOOLS
Montageständer III auf Ihr Zweirad ein. Dazu führen Sie die Auflagen von hinten an die Schwingen-
holme des Motorrades heran und verschieben die Auflagen so, dass diese komplett unter beide
Holme passen. Damit das Motorrad sicher getragen werden kann, müssen die Schwingenholme in
voller Breite auf die Schwingen-Auflagen gesetzt werden. Grundsätzlich dürfen die Schwingen-
holme nicht stark abgewinkelt am Fahrzeug positioniert sein. Achsen, Teile der Radjustierung, Stoß-
dämpferaufnahmen und andere hervorstehende Bauteile dürfen nicht auf die Schwingenholm-Auflagen
aufgelegt werden, um Schäden am HI-Q TOOLS Montageständer III oder Ihrem Fahrzeug zu vermei-
den. Setzen Sie den Heber mit den Auflagen am hinteren Drittel der Schwingenholme an, so dass
diese mit ganzer Breite sicher aufliegen. Bevor Sie das Motorrad anheben, vergewissern Sie sich noch
einmal, dass der HI-Q TOOLS Montageständer III sicher zusammengebaut wurde und dass der Helfer
das Fahrzeug sicher in Position hält. Dann drücken Sie den Motorradheber am Verbindungsrohr kraft-
voll, aber langsam und gleichmäßig unter das Fahrzeug, bis dieses auf dem Heber ruht.

ANWENDUNG MIT RACINGAUFNAHMEN DIREKT AN
DER SCHWINGE
Montieren Sie die Racingadapter und stellen Sie die Breite des HI-Q TOOLS Montageständer III auf Ihr
Zweirad ein. Dazu führen Sie die Auflagen von hinten an die aufgeschraubten Adapter der Schwinge
des Motorrades heran und verschieben die Racingaufnahmen, dass diese komplett die Adapter von
unten umfassen. Damit das Motorrad sicher getragen werden kann, müssen die Adapter der Schwin-
ge im vollem Umfang in den Racingaufnahmen liegen. Achsen, Teile der Radjustierung, Stoßdämp-
feraufnahmen und andere hervorstehende Bauteile dürfen nicht auf oder in den Racingaufnahmen
aufliegen, um Schäden am HI-Q TOOLS Montageständer III oder Ihrem Fahrzeug zu vermeiden. Bevor
Sie das Motorrad anheben, vergewissern Sie sich noch einmal, dass der HI-Q TOOLS Montageständer
III sicher zusammengebaut wurde und dass der Helfer das Fahrzeug sicher in Position hält. Dann
drücken Sie den Motorradheber am Verbindungsrohr kraftvoll, aber langsam und gleichmäßig unter
das Fahrzeug, bis dieses auf dem Heber ruht.
So gewährleisten wir gemeinsam, dass das Produkt richtig montiert und richtig benutzt wird.
POLO Motorrad und Sportswear GmbH
41363 Jüchen – www.polo-motorrad.de

03/2018
HI-Q TOOLS MOUNTING STAND III
Ord. Nr. 60150700070

CONTENT
1 mounting stand
2 rubbered swing arms
2 racing adapters (V-forme)
The HI-Q TOOLS mounting stand III simplifies a lot of reparation and mounting work on your
two-wheeler. Modern motorcycles often have a high empty weight of several hundred kilogramms.
Therefore please use the HI-Q TOOLS mounting stand III always with the greatest care in accordan-
ce to these operating instructions and the manufacturer‘s specifications to avoid damage on your
two-wheeler and injuries on involved persons. The HI-Q TOOLS mounting stand III with the delivered
swing arm supports is only appropriate for jacking up motorcycles with rear swing arm with straight
box profile.
Never use the HI-Q TOOLS mounting stand III for other purposes.

ASSEMBLY
The HI-Q TOOLS mounting stand III is ready as soon as the supports (pointing inwards) are put into
the open bars of the lift and fixed with the screws (on each side) possible widths: with rubbered angle
22-31cm, with racing adapter 21-34 cm. The self-locking nuts of the safety srews are tightenend
gently without tightening the profile of the stand. If the swingarm has a thread support, we recommend
to use the optionally available racing adapter with castors (view abbove).
If there is a swing arm with straight box profile with thread supports, use the rubbered swing arm sup-
ports (included in the delivery). The HI-Q TOOLS mounting stand III is not appropriate for triangle swing
arms or hooked „banana swing arms“ without thread supports or one arm swing arms.

USE
Before using the HI-Q TOOLS mounting stand III check if your motorcycle generally fulfils the condi-
tions to be lifted by the HI-Q TOOLS mounting stand III.
The max. load capacity is 150 kg – therefore the total weight of the two-wheeler incl accessories may
not exceed 300 kg. The rear swing arm has to be appropriate for the lift (no construction forms as de-
scribed above). If the rear swing arm shall be demounted, the axle has to be loosened before jacking
up the motorcycle. The same is valid for other tightened boltings on the two-wheeler. Never jack up
the motorcycle alone – let yourself help by a second strong person, keeping the motorcycle on the
handlebar in vertical position. Lifting the two-wheelers if it is standing inclined on the side stand, can
damage the HI-Q TOOLS mounting stand III and may cause that the vehicle slips off.
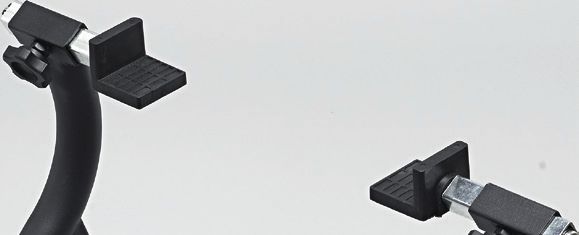
EN
USE WITH RUBBERED SWING ARM SUPPORTS
DIRECTLY ON THE SWING ARM
Mount the rubbered swing arm supports and adjust the width of the HI-Q TOOLS mounting stand III on
your two-wheeler. Put the supports from the back on the swing arm bars of the motorcycle and move
the supports so they are completely under both bars. The swing arm bars have to be put onto the
swing arm supports in full width to make sure the motorcycle is carried safely. Generally the swing
arm bars do not have to be positioned strongly angled on the vehicle.
Axle, pieces of the wheel adjustment, shock absorber mountings and other protruding construction
pieces do not have to be put on the swing arm supports to avoid damage on the HI-Q TOOLS moun-
ting stand III or your vehicle. Put the HI-Q TOOLS mounting stand III with the supports on the rear
third of the swing arm bars, so they rest safely on full width. Before lifting the motorcycle make sure
again, that the HI-Q TOOLS mounting stand III is safely assembled and the helping person keeps the
vehicle safely in position. Then press the motorcycle lift on the connection tube strongly but slowly
under the vehicle until it lies on the lift.

USE WITH RACING ADAPTERS DIRECTLY ON THE
SWING ARM
Assemble the racing adapters and adjust the width of the HI-Q TOOL mounting stand III on your
two-wheeler. Put the supports from the back on the premounted adapters of the swing arm and
move the racing adapters so they are coating the adapters from the bottom completely. The swing
arm adapters have to lie entirely on the racing adapters to make sure the motorcycle is supported
safely. Axes, wheel adjustment pieces, shock absorber supports and other protruding construction
pieces may not lie on the racing supports to avoid damage on the HI-Q TOOLS mounting stand III or
on your vehicle. Before lifting the motorcycle make sure again that the HI-Q TOOLS mounting stand
III is safely assembled and the helping person keeps the vehicle safely in position. Then press the
mounting stand on the connection tube strongly but slowly and consistently under the vehicle until
it rests on the stand.
Thus we can guarantee the correct mounting and use of the product.
POLO Motorrad und Sportswear GmbH
41363 Jüchen – www.polo-motorrad.de

03/2018
HI-Q TOOLS BEQUILLE DE MONTAGE III
Réf. 60150700070

CONTENU DE LIVRAISON
1 béquille de montage
2 supports en caoutchouc pour bras oscillants
2 adaptateurs racing (en forme de V)
La béquille de montage III HI-Q TOOLS facilite de nombreux travaux de réparation et d‘entretien sur
votre deux-roues. A vide, les motos modernes pèsent souvent plusieurs centaine de kilos. Utilisez
donc toujours la béquille de montage III HI-Q TOOLS avec le plus grand soin selon ce mode d‘emploi
et les prescriptions du fabricant du véhicule pour éviter tout dommage sur votre moto et tout risque
de blessures des personnes impliquées. La béquille de montage III HI-Q TOOLS convient au levage
de motos à bras oscillant droit à section carré.
N‘utilisez la béquille de montage III HI-Q TOOLS à toute fine autre que ceux décrits ci-dessus.

MONTAGE
La béquille de montage III HI-Q TOOLS est prête à l‘emploi dès que les supports (orientés vers
l‘intérieur) sont emboités dans les longerons ouverts de la béquille et qu‘ils sont fixés à l‘aide des vis
de fixation. largeurs possibles: avec angle caoutchouté 22-31cm, avec adaptateur racing 21-34 cm.
Les écrous autobloquantes des vis de sécurité doivent être serrés avec précaution, sans déformer
les profil de la béquille. Si le bras oscillant est équipé avec un diabolo, il est recommandé d‘utiliser
les adaptateur Racing incl. roulettes.
Si la moto est équipée d‘un bras oscillant droit à section carré sans diabolos, utilisez les
supportspour bras oscillants en caoutchouc fournis. La béquille de montage III HI-Q TOOLS ne con-
vient ni aux bras oscillants triangulaires, ni aux bras oscillants courbés „banane“ sans corps fileté ni
aux mono-bras oscillants.

UTILISATION
Avant l‘utilisation de la béquille de montage III HI-Q TOOLS, contrôlez si votre moto satisfait aux
conditions pour un levage à l‘aide de la béquille de montage III HI-Q TOOLS. La capacité de char-
ge maximale est de 150 kg – le poids total de la moto, accessoires inclus, ne doit pas excéder
300 kg. La forme du bras oscillant arrière doit être adaptée à la béquille (les formes décrites
au-dessus ne conviennent en aucun cas). Pour démonter la roue arrière, desserez l‘essieu avant
de soulever la moto. La même chose vaut pour les boulonnages très serrés du deux-roues. Ne
levez jamais le véhicule seul – demandez à une deuxieme personne forte de vous aider et de tenir la
moto par le guidon à la verticale. Lorsque le deux-roues est incliné sur la béquille latérale, le levage
peut endommager la béquille de montage III HI-Q TOOLS et provoquer un glissement du véhicule en
raison de la contrainte unilatérale exercée au début de l‘opération.
FR
UTILISATION AVEC SUPPORTS EN CAOUTCHOUC
POUR BRAS OSCILLANTS DIRECTEMENT SUR LE
BRAS OSCILLANT
Montez les supports en caoutchouc pour bras oscillants et ajustez la largeur de la béquille de monta-
ge III HI-Q TOOLS à votre moto. Rapprochez par l‘arrière les supports aux longerons des bras oscillants
de la moto et glissez les supports de manière qu‘ils s‘insèrent complètement au-dessous des deux
longerons. Afin de garantir la stabilité de la moto, les longerons des bras oscillants doivent reposer
sur toute la largeur sur les supports pour bras oscillants. Fondamentalement, les longerons des bras
oscillants ne doivent pas être positionné avec une forte inclinaison sur la véhicule. Afin d‘éviter tout
dommage sur la béquille de montage III HI-Q TOOLS ou sur votre véhicule, les essieux, les pièces d‘alig-
nement de la roue, les fixations de l‘amortisseur et les autres pièces en saillie ne doivent pas reposer sur
les supports des bras oscillants. Positionnez la béquille de montage III HI-Q TOOLS avec les supports
sur le dernier tiers des longerons des bras oscillants en veillant à ce que les longerons des bras oscil-
lants reposent en toute sécurité sur toute la largeur. Avant de soulever la moto assurez-vous encore
une fois que la béquille de montage III HI-Q TOOLS a correctement été assemblée et que la personne
qui aide tient fermement le véhicule en position. Poussez ensuite vigoureusement, mais lentement et
de manière homogène, la bèquille de montage contre le tube de raccordement au-dessous du véhicule,
jusqu‘à ce qu‘il repose sur la béquille.

UTILISATION AVEC SUPPORTS RACING
DIRECTEMENT SUR LE BRAS OSCILLANT
Montez l‘adaptateur racing et ajustez la largeur de la béquille de montage III de HI-Q TOOLS sur votre
moto. Rapprochez par l‘arrière les supports aux adaptateurs prémontés du bras oscillant de la moto
et déplacez les supports racing de manière qu‘ils gainent complètement les adaptateurs du bas. Pour
être levé de manière sûre, les adaptateurs du bras oscillant doivent être placés entièrement dans les
supports racing. Axes, pièces de l‘ajustement de la roue, supports d‘amortiseurs et autres pièces de
construction protubérantes ne doivent pas etre placés sur les supports racing pour éviter tout
dommage à la béquille de montage III de HI-Q TOOLS ou à votre véhicule. Avant de soulever la moto
assurez-vous encore une fois que la béquille de montage III de HI-Q TOOLS a correctement été
assemblée et que la personne qui aide, tient fermement le véhicule en position. Poussez ensuite
vigoureusement mais lentement et de manière homogène le lève-moto contre le tube de raccorde-
ment au-dessous du véhicule, jusqu‘à ce qu‘il repose sur la béquille de montage.
Ainsi nous assurons ensemble que le produit est monté et utilisé de manière correcte.
POLO Motorrad und Sportswear GmbH
41363 Jüchen – www.polo-motorrad.de

03/2018
HI-Q TOOLS CAVALLETTO ALZAMOTO III
Nr.ord. 60150700070
CONTENUTO DELLA FORNITURA
1 cavalletto alzamoto
2 supporti forcellone gommati
2 adattatori racing (forma di V)
Se utilizzato correttamente, il HI-Q TOOLS cavalletto alzamoto III semplifica l’esecuzione di innumer-
evoli interventi di riparazione e manutenzione sulla moto. Le motociclette moderne pesano molto a
vuoto, spesso qualche centinaio di chili. Per questo motivo, utilizzare il HI-Q TOOLS cavalletto alza-
moto III sempre con la massima attenzione attenendosi alle istruzioni contenute in questo manuale
e alle prescrizioni del costruttore del veicolo per evitare danni alla moto e possibili lesioni alle persone
impegnate nei lavori. Il HI-Q TOOLS cavalletto alzamoto III unitamente ai supporti per forcellone
forniti è adatto esclusivamente al sollevamento di moto con forcellone posteriore scatolato dritto.
Non utilizzare mai il HI-Q TOOLS cavalletto alzamoto III per scopi diversi da quelli sopra descritti.

MONTAGGIO
Il HI-Q TOOLS cavalletto alzamoto III è pronto all’uso quando i supporti (rivolti verso l’interno)
sono inseriti nei bracci aperti del cavalletto e fissati con le viti di bloccaggio – larghezze possibili:
con angoli gommati 22-31 cm, con adattatore racing 21-34 cm. Serrare i dadi autobloccanti delle
viti di bloccaggio della misura necessaria per non piegare il profilo del cavalletto. Se il forcellone
è provvisto di supporto filettato, si consiglia di utilizzare il summenzionato adattatore con rotelle
racing disponibile come optional. Se il forcellone scatolato dritto non dispone di supporti filettati,
utilizzare i supporti gommati contenuti nella fornitura. Il cavalletto non è adatto per forcelloni
triangolari o forcelloni “a banana” curvi senza supporti filettati, né per forcelloni monobraccio.

USO
Prima di utilizzare il HI-Q TOOLS cavalletto alzamoto III è indispensabile controllare che la motociclet-
ta soddisfi in generale i presupposti per essere sollevata con il HI-Q TOOLS cavalletto alzamoto III.
La portata massima del HI-Q TOOLS cavalletto alzamoto III è di 150 kg, pertanto il peso complessivo
della moto accessori inclusi non deve superare 300 kg. La forma costruttiva del forcellone posteriore
deve essere adatta al HI-Q TOOLS cavalletto alzamoto III (le forme descritte in precedenza non sono
adatte in nessun caso). Se si deve smontare la ruota posteriore, allentare il perno prima di sollevare
la moto. Lo stesso vale per altri raccordi a vite ben serrati sulla moto. Non sollevare mai il veicolo da
soli: è indispensabile farsi aiutare da un’altra persona robusta, che tenga saldamente la motocicletta
dal manubrio in posizione verticale. Sollevare la moto quando è appoggiata obliqua sul cavalletto
laterale fa sì che il carico iniziale su un solo lato possa danneggiare il HI-Q TOOLS cavalletto alzamoto
III ed eventualmente far cadere il veicolo.
IT
USO CON I SUPPORTI FORCELLONE GOMMATI
MONTATI DIRETTAMENTE SUL FORCELLONE
Montare i supporti forcellone gommati e regolare la larghezza del HI-Q TOOLS cavalletto alzamoto III
sulla moto. Avvicinare quindi i supporti da dietro ai bracci del forcellone della motocicletta e spostarli
fintanto che sono completamente inseriti sotto i due bracci. Per poter spostare la moto in sicurezza,
i bracci del forcellone devono poggiare per tutta la larghezza sui supporti forcellone. In generale, i
bracci del forcellone non devono essere posizionati troppo angolati sul veicolo. Non appoggiare perni,
elementi di regolazione della ruota, attacchi ammortizzatore e altri componenti sporgenti sui supporti
del braccio forcellone per non danneggiare il HI-Q TOOLS cavalletto alzamoto III o il veicolo. Posizi-
onare il cavalletto con i supporti sul terzo posteriore dei bracci del forcellone in modo che poggino
saldamente con l’intera larghezza. Prima di sollevare la moto, assicurarsi ancora una volta che il HI-Q
TOOLS cavalletto alzamoto III sia stato assemblato in sicurezza e che l’aiutante tenga saldamente il
veicolo in posizione. Spingere quindi il cavalletto alzamoto dal tubo di collegamento con forza, ma
lentamente e in modo uniforme sotto il veicolo finché quest’ultimo poggia sul cavalletto.

USO CON GLI ADATTATORI RACING MONTATI
DIRETTAMENTE SUL FORCELLONE
Montare gli adattatori racing e regolare la larghezza del HI-Q TOOLS cavalletto alzamoto III sulla
moto. Avvicinare quindi i supporti da dietro agli adattatori vissati del forcellone della moto e spostare
gli adattatori racing fintanto che abbraccino completamente gli adattatori. Per poter spostare la moto
in sicurezza, gli adattatori devono poggiare per tutta la larghezza dentro gli adattatori racing. Non
appoggiare perni, elementi di regolazione della ruota, attacchi ammortizzatore e altri componenti
sporgenti sugli adattatori racing per non danneggiare il HI-Q TOOLS cavalletto alzamoto III o il veicolo.
Prima di sollevare la moto, assicurarsi ancora una volta che il HI-Q TOOLS cavalletto alzamoto III sia
stato assemblato in sicurezza e che l’aiutante tenga saldamente il veicolo in posizione. Spingere
quindi il cavalletto alzamoto dal tubo di collegamento con forza, ma lentamente e in modo uniforme
sotto il veicolo finché quest’ultimo poggia sul cavalletto.
In questo modo, garantiamo insieme che il prodotto sia montato e utilizzato correttamente.
POLO Motorrad und Sportswear GmbH
41363 Jüchen – www.polo-motorrad.de

03/2018
Hergestellt für • Produced for • Fabriqué pour • Fabbricato per:
POLO Motorrad und Sportswear GmbH
Polostr. 1 • D-41363 Jüchen
Tel. +49 21 65/84 40-200 • E-Mail: info@polo-motorrad.com
POLO Motorrad Schweiz GmbH
Gärtnereiweg 4B • CH-4665 Oftringen
Tel. +41 34/4 08-80 60 • E-Mail: info@polo-motorrad.ch
Sie können auch lesen