Read first - then unpack Zuerst lesen - dann auspacken D'abord lire - ENSUITE DEBALLER - YT Industries
←
→
Transkription von Seiteninhalten
Wenn Ihr Browser die Seite nicht korrekt rendert, bitte, lesen Sie den Inhalt der Seite unten
®

      read first – then unpack
Zuerst lesen – dann auspacken
D’abord lire – ENSUITE DEBALLER
27
28 26
25
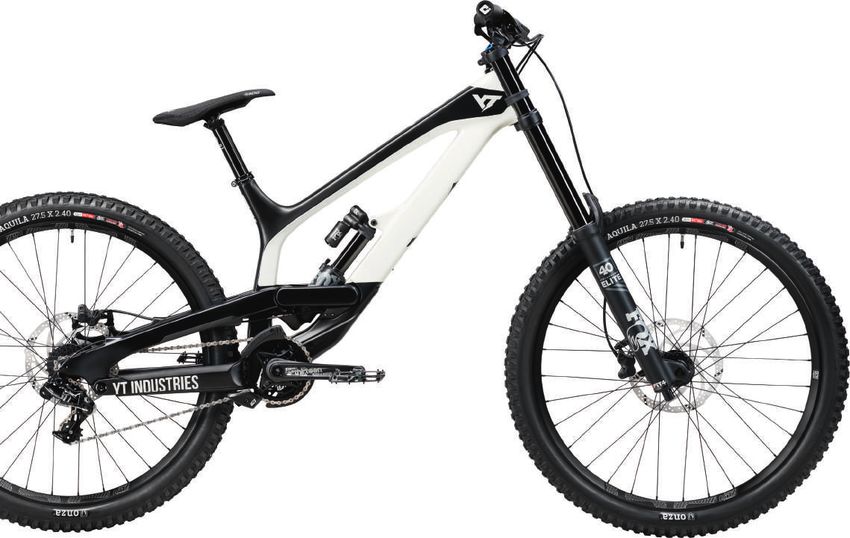
RAHMEN / FRAME / CADRE
29
9
FEDERGABEL / SUSPENSION
22 FORK / FOURCHE
1
10 23
6
2
11
7
3
35
24
14 13
5 31
16
15 14
20
12
8 4 17 30
21
18 34
19
32
LAUFRAD / WHEEL / ROUE
33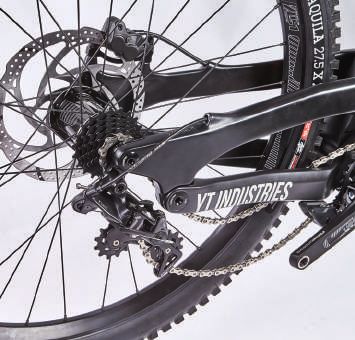
DE                          EN                FR
                                                                                         Intro – DE                                                                 05
1    Oberrohr                    Toptube           Tube Supérieur                        Aufbauanleitung                                                            06
2    Unterrohr                   Downtube          Tube Oblique
                                                                                         H I N W E I S E Z U R H A N D H A B U N G d e r s at t e l s t ü t z e     18
3    Sitzrohr                    Seattube          Tube de selle

4    Kettenstrebe                Chainstay         Base                                  Ta b e l l e : d r e h m o m e n t e                                       19
5    Sitzstrebe                  Seatstay          Hauban

6    Steuerrohr                  Headtube          Tube de direction                     Einstellungen nach dem Aufbau                                              22
7    Stoßdämpfer                 Rear-Shock        Amortisseur                           HINWEISE ZUR HANDHABUNG UND NUTZUNG VON
8    Ausfallende                 Drop out          Pattes                                BIKE-RAHMEN AUS DEM WERKSTOFF CARBON (CFK)                                 24
9    Sattel                      Saddle            Selle                                 H i n t e r b a u d e m o n ta g e u n d M o n ta g e                      26
10   Sattelstütze                Seatpost          Tige de selle

11   Sattelstützenklemme         Seatpost Clamp    Collier de serrage de tige de selle

12   Bremse vorne                Front brake       Frein avant
                                                                                         Intro – EN                                                                 29
13   Bremse hinten               Rear brake        Frein arrière

14   Bremsscheibe                Disc              Disque                                A S S E M B LY I N S T R U C T I O N S                                     30
15   Zahnkranz                   Cassette          Cassette

16   Kettenführung               Chain Guide       Guide-Chaîne
                                                                                         I N F O R M A T I O N O N T H E H A N D L I N G o f t h e s e at p o s t   42
17   Kettenblatt                 Chainring         Plateau
                                                                                         C h a r t: T o r q u e s                                                   43
18   Schaltwerk                  Rear Derailleur   Dérailleur arrière

19   Kette                       Chain             Chaîne                                A D J U S T M E N T S A F T E R A S S E M B LY                             46
20   Tretkurbel                  Crankset          Pédalier
                                                                                         INFORMATION ON THE HANDLING AND USE OF
21   Pedal                       Pedal             Pédale
                                                                                         BIKE FRAMES MADE FROM CARBON (CFRP)                                        48
22   Gabelkrone                  Crown             Té
                                                                                         r e a r t r i a n g l e D i s a s s e m ly a n d A s s e m b ly            50
23   Standrohr                   Stanchions        Plongeur

24   Tauchrohr                   Casting           Fourreaux

25   Vorbau                      Stem              Potence
                                                                                         Intro – FR                                                                 53
26   Bremshebel                  Brake Lever       Levier de frein

27   Lenker                      Handlebar         Cintre                                I N S T R U C T I O N S D E M O N TA G E                                   54
28   Schalthebel                 Shifter           Commande de Vitesses

29   Steuersatz                  Headset           Jeu de direction                      Insertion Maximale de la Tige de Selle                                     66

30   Schnellspanner-Steckachse   Quickrelease      Blocage de Roue
                                                                                         TA B L E A U D E S C O U P L E S D E S E R R A G E                         67
31   Nabe                        Hub               Moyeu
                                                                                         R É G L A G E S A P R è S L’A S S E M B L A G E                            70
32   Speiche                     Spoke             Rayon
                                                                                         CONSEILS D’UTILISATION DE CADRES DE
33   Felge                       Rim               Jante

34   Reifen                      Tire              Pneu
                                                                                         VÉLOS EN FIBRE DE CARBONE (CFRP)                                           72
35   Ventil                      Valve             Valve
                                                                                         T r i a n g l e A r r i è r e D é m o n ta g e E T M o n ta g e            74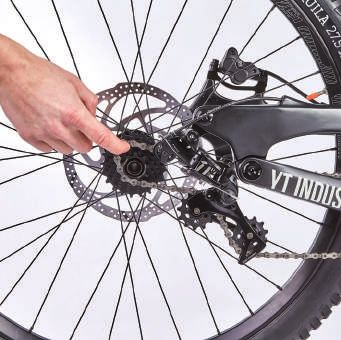
Montage-werkzeug              ASSEMBLY TOOLS                 OUTILS DE MONTAGE

                     I IIIIII

                                                                Drehmomentschlüssel Inbus-    Torque wrench with Allen key   Clé dynamométrique avec insert
                                                      II
                                                          III

                                                                aufsatz Größe 4, 5 und 6 mm   adapter size 4, 5 and 6 mm     Clé Allen, taille 4, 5 et 6 mm

                                                                Inbusschlüssel
                                                                                              Allen key size 4, 5 and 6 mm   Clé Allen, taille 4, 5 et 6 mm
                                                                Größe 4, 5 und 6 mm

                     I IIIIII

                                                                Drehmomentschlüssel           Torque wrench with             Clé dynamométrique avec insert
                                                          II
                                                          III

                                                                Torxaufsatz Größe T25         Torx key size T25              Torx T25

                                                                Seitenschneider               Wire cutter                    Pince coupante

                          IIII IIIII
                     II

                                                                Dämpferpumpe                  Shock pump                     Pompe amortisseur
                                   II
        IIII IIIII

                                       I I II I I I I I
            II

                                  II
                     IIII IIIII

                                                                (Modelle mit Luftfeder)       (models with air suspension)   (modèles avec amortisseur à air)

                                                                Reifenpumpe                   Tire pump                      Pompe de gonflage des pneus

                                                                Montagefett                   Assembly grease                Graisse de montage

                                                                Carbon-Montagepaste           Carbon Paste                   Graisse spéciale carbone

04 yt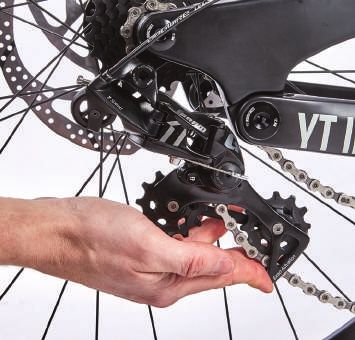
DE
A l l e s r i c h t i g g e m a c h t: Y T v e r t r a u t, b i k e b e s t e l lt, g o o d t i m e s g e b u c h t.
Glückwunsch & danke dafür!
Und jetzt: ready to ride! Naja, fast. Vorher musst du dein Bike natürlich noch auspacken. Mach es so, dass du die YT BikeBox danach
nochmal verwenden kannst. Und der Aufbau – mit diesem Manual weniger kompliziert als du denkst!

Ein Manual ist mehr als auf dem Hinterrad zu surfen. In diesem hier zeigen wir dir – Schritt für Schritt – die richtige Technik für
Aufbau und Wartung deines Bikes. Denn beides erfordert technisches Wissen und handwerkliches Geschick. Darum beschreiben
wir hier alle grundlegenden Einstellungen und Wartungsempfehlungen für dein YT: Wenn du den einzelnen Anweisungen folgst,
wird alles glatt gehen. Natürlich kann diese Anleitung eine Fachausbildung im Fahrradhandwerk nicht ersetzen; und auf keinen Fall
kannst du mit ihr ein Bike aus Einzelteilen zusammenbauen. Du musst aber auch nicht MacGyver sein.
Wir machen das zusammen!

     T I P P : H e b e d i e Y T B i k e B o x i n k l u s i v e A l l e r V e r p a c k u n g s m at e r i a l i e n
     a u f. S o k a n n s t d u d e i n B i k e f ü r e i n e n T r a n s p o r t w i e d e r v e r p a c k e n .

Aufbau, Wartung und Reparaturen fachgerecht durchzuführen bekommst du trotzdem nicht auf die Kette? Kein Grund zu
verzweifeln! Bieg in einer Fachwerkstatt ab und lass die Andern machen. Oder melde dich einfach bei uns: Wir helfen dir weiter.
Unser Service wird dir bei deinen Fragen zur Seite stehen.

Eines sei jedoch gesagt: Das Ganze passiert im Rahmen unserer Gewährleistungs- und Haftungsausschlüsse. Bei telefonischen
oder schriftlichen Nachfragen können wichtige Details nämlich auch mal auf der Strecke bleiben: Wir können nie 100% sicher sein,
dass die Art und der Umfang der anfallenden Arbeiten vollständig und richtig beschrieben werden. Ferndiagnosen unterliegen
deshalb immer einer gewissen Unsicherheit und genauso können wir natürlich auch nicht überprüfen, inwieweit unsere Arbeitsan-
weisungen von dir richtig und vollständig umgesetzt wurden.
Klar, dass wir für Schäden oder Unfälle, die auf nicht fachgerechte Wartung oder selbst durchgeführte Reparaturen zurückgehen,
keine Haftung übernehmen können. Verstehste, ne?

Du erreichst uns über: serv i c e@ y t- i n d u st r i es.c o m

                                                                                                                                  yt 05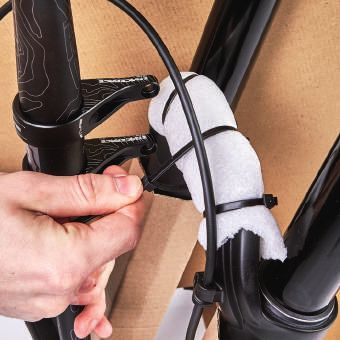
1 BIKE AUSPACKEN

        a                                                       b                                                       c

  1 a // Durchtrenne die Verpackungsbänder mit einem         1 b // Pass dabei nur auf, dass du die BikeBox nicht   1 c // Hebe die Laufräder nach oben aus dem Karton
  Seitenschneider oder Cutter.                               beschädigst. Jetzt kannst du die Verschlusslaschen     heraus.
                                                             herausziehen und die BikeBox öffnen.

        d                                                       e                                                       f

  1 d // Stelle die Laufräder dann auf die Seite, an einen   1 e // Jetzt kannst du dein Bike nach oben aus der     1 f // Stelle den Rahmen auf dem Front- / Rear-Axle-Stand
  sicheren Platz.                                            BikeBox ziehen.                                        ab. Achte auf einen sicheren Stand des Bikes!

06 yt
2 . 1 LENKERMONTAGE – RACEFACE ATLAS / CHESTER DIRECT MOUNT

                                                                                                                                                                                               DE
    a                                                            b                                                              c

2.1 a // Entferne die Schrauben des Vorbaus von der          2.1 b // Setze die Schrauben im Vorbau ein und platziere den   2.1 c // Montiere den Vorbau auf der Gabelbrücke (Inbus
oberen Gabelbrücke (Inbus 5 mm).                             Lenker und Vorbau auf der Gabelbrücke.                         5 mm). Ziehe die Schrauben schrittweise mit jeweils
                                                                                                                            nur einer Umdrehung über Kreuz an. Nur so erreichst du
                                                                                                                            eine gleichmäßige Klemmung.

    d

                                                                                                                                 H a lt e b e i d e r M o n ta g e b i t t e d i e
                                                                                                                                 D r e h m o m e n t-a n g a b e n d e r
                                                                                                                                 Hersteller ein:

                                                                                                                                 RaceFace Atlas Direct Mount // 9 Nm
                                                                                                                                 RaceFace Chester Direct Mount // 12 Nm

2.1 d // Das Drehmoment der Schrauben sollte genau den
Herstellerrichtlinien des Vorbaus und / oder Lenkers
entsprechen (siehe schwarzes Feld rechts). Achte auf
einen gleichmäßigen Klemmspalt und auf den genauen,                                                                                                                           I IIII

mittigen Einbau des Lenkers. Die Einstelllinien helfen dir
                                                                                                                                                                                   II
                                                                                                                                                                                       IIIII
dabei.

                                                                                                                                                                                 yt 07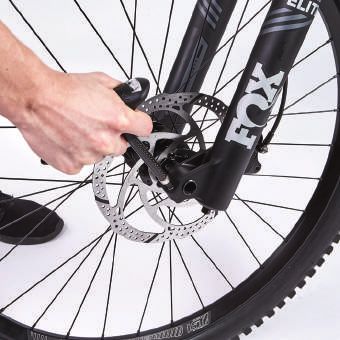
2 . 2 LENKERMONTAGE – RENTHAL FATBAR CARBON 35

        a                                                    b                                                            C

  2.2 A // Entferne die Kabelbinder am Lenker mit dem    2.2 b // Fette die Schraubengewinde ein und montiere         2.2 c // Ziehe die Schrauben mit dem entsprechenden
  Seitenschneider und löse die Lenkerklemmung auf dem    die Grundplatte des Vorbaus mit den hinteren, kurzen         Drehmoment an (siehe schwarzer Infokasten S. 9).
  Lenker (5 mm Inbus).                                   Schrauben auf der Gabelbrücke (Inbus 5 mm).

        d                                                    e                                                            F

  2.2 d // Schraube jetzt mit den langen Schrauben die   2.2 e // Beginne unbedingt in dieser Reihenfolge und achte   2.2 f // Befestige nun die vorderen Schrauben der Lenker-
  Lenkerklemmung durch die mittigen Löcher der Grund-    beim Anziehen wieder auf das korrekte Drehmoment.            klemmung an der Grundplatte des Vorbaus. Achte
  platte hindurch auf die Gabelbrücke.		                 Achte darauf, dass kein Spalt entsteht (zero gap).           wieder auf das richtige Drehmoment, einen gleichmäßi-
  				                                                                                                                gen Klemmspalt und auf den genauen, mittigen Einbau
                                                                                                                      des Lenkers. Die Einstelllinien helfen dir dabei.

08 yt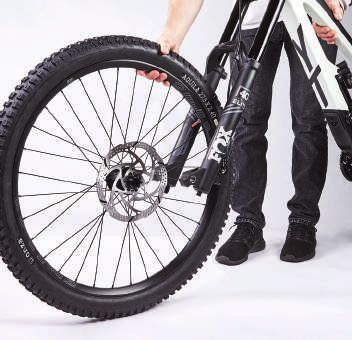
3 SCHALTWERKMONTAGE

                                                                                                                                                                                          DE
    a                                                          b                                                           c

3 a // Achte darauf, dass dein Bike sicher auf dem Rear-   3 b // Drehe den Rear-Axle-Stand auf die Seitenfläche, um   3 c // Entferne mit dem Seitenschneider den Kabelbinder
Axle-Stand steht.                                          die Achse etwas abzusenken. Entferne vorsichtig die Luft-   am Schaltwerk – vorsichtig, um ein Lösen der Bauteile
                                                           polsterfolie mit einem Seitenschneider.                     zu verhindern – und ziehe den den Kettenstrebenschutz
                                                           				                                                        ab.

    d                                                          e
                                                                                                                            H a lt e b e i d e r M o n ta g e b i t t e d i e
                                                                                                                            D r e h m o m e n t-a n g a b e n d e r
                                                                                                                            Hersteller ein:

                                                                                                                            Renthal Integra II:
                                                                                                                            Schrauben Gabelbrücke // 10 Nm
                                                                                                                            Schrauben Lenkerklemmung // 6 Nm

                                                                                                                            Schaltwerkbefestigungsschraube // 8 – 10 Nm

3 d // Befestige das Schaltwerk am Schaltauge (Inbus       3 e // Ziehe die Schraube des Schaltwerks mit dem Dreh-
5 mm). Vermeide dabei unbedingt eine Beschädigung des      moment-Schlüssel an. Achte darauf, dass der Anschlag
Gewindes durch schiefes Einschrauben.                      des Schaltwerks auf dem Anschlag des Schaltauges liegt.
                                                           Halte das Schaltwerk mit der anderen Hand fest, um ein                                                        I IIII

                                                           Verdrehen zu verhindern und so kein Spalt entsteht.
                                                                                                                                                                              II
                                                                                                                                                                                  IIIII

                                                                                                                                                                            yt 09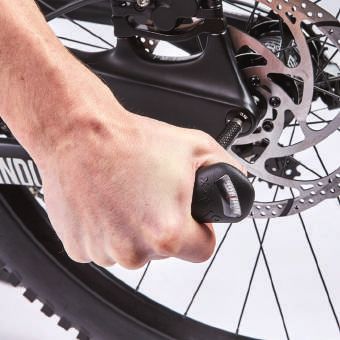
4 VORBEREITUNG EINBAU HINTERRAD

        a                                                       b                                                          c

  4 a // Entferne die Versandverpackung beider Laufräder.   4 b // Entferne das Frame Cover vom Hauptrahmen.           4 c // Ziehe die Transportsicherung aus dem Sattel
                                                                                                                       der Hinterradbremse. Hebe diese für einen erneuten
                                                                                                                       Transport des Bikes auf.

        d                                                       e                                                          f

  4 d // Ziehe den Käfig des Schaltwerks nach vorne und     4 e // Ziehe den Rear-Axle-Stand von der Hinterradachse.   4 f // Schraube die Hinterradachse aus dem Rahmen und
  drücke anschließend auf den Verriegelungsknopf                                                                       entferne den Transportschutz von der Achse.
  (Schloßsymbol), um den CAGE LOCK zu aktivieren.

10 yt
5 HINTERRADEINBAU
DE
a b c
5 a // Setze das Hinterrad in den Rahmen. Achte darauf, 5 b // Einführhilfen im Rahmen erleichtern die korrekte 5 c // Sichere das Hinterrad mit der Hinterradachse und
die Kette auf das kleinste Ritzel der Kassette zu legen. Positionierung des Hinterrads. verschraube es mithilfe des Drehmomentschlüssels.
Ziehe das Schaltwerk vorsichtig nach hinten, um das
Einführen zu erleichtern.
d e
H a lt e b e i d e r M o n ta g e b i t t e d i e
D r e h m o m e n t-a n g a b e n d e r
Hersteller ein:
Hinterradachse // 15 Nm
5 d // Sichere die Hinterradachse mit der Sicherungs- 5 E // Drücke den Käfig des Schaltwerks nach vorne, bis der
schraube (Inbus 5 mm). Achte auf die Drehmoment- CAGE LOCK entriegelt. Führe das Schaltwerk anschließend
angabe. vorsichtig nach hinten, bis die Kette gespannt ist.
I IIII
II
IIIII
yt 116 V O R B E R E I T U N G VORDERRADEINBAU
a b
6 b // Entferne den Front-Axle-Stand von der Vorder-
radachse.
c
6 c // Ziehe die Transportsicherung aus dem Sattel
fast fertig. der Vorderradbremse. Hebe sie für einen erneuten
Transport des Bikes auf.
12 yt7 . 1 VORDERRADEINBAU – FOX 40
DE
a b c
7.1 a // Schraube die Vorderradachse aus der Federgabel 7.1 b // Setze das Vorderrad in die Federgabel ein. Achte 7.1 c // Setze die Vorderradachse wieder ein und ver-
und ziehe sie heraus. dabei darauf, die Bremsscheibe vorsichtig in den Brems- schraube sie. Benutze einen Drehmomentschlüssel, um
sattel zu schieben, um eine Beschädigung zu verhindern. den korrekten Sitz der Vorderradachse zu gewährleisten.
d e
H a lt e b e i d e r M o n ta g e b i t t e d i e
D r e h m o m e n t-a n g a b e n d e r
Hersteller ein:
FOX 40:
Steckachse // 3 Nm
Klemmschrauben Vorderradachse // 3 Nm
7.1 d // Verklemme die Vorderradachse in der Gabel, 7.1 e // Kontrolliere anschließend mit dem Drehmoment-
indem du die 4 Klemmschrauben im Wechsel mit je- schlüssel den Sitz der Schrauben.
weils nur einer Umdrehung kreuzweise anziehst.
I IIII
II
IIIII
yt 13done
It‘s
14 ytDE
b e v o r e s l o s g e h t, g i b t ‘ s h i e r n o c h I n f o s
zur Einstellung und pflege deines Bikes.
yt 15PEDAL-MONTAG E
a
a // Verschraube die Pedale mit einem Inbusschlüssel
in der Kurbel. Fette die Gewinde der Pedale, sollten Un-
terlegscheiben beiliegen, verwende sie unbedingt! Achte
darauf, dass es ein linkes und ein rechtes Pedal gibt.
b
achtung
Luftgefederte Gabeln
und Dämpfer müssen
vor dem Gebrauch
unbedingt mit dem
korrekten Luftdruck
befüllt werden. Dazu
b // Das Pedal auf der Nichtantriebsseite hat ein Linksge- haben wir deinem YT
winde und wird gegen den Uhrzeigersinn zugezogen. eine Dämpferpumpe
Ziehe die Schrauben mit einem Drehmoment von miteingepackt. Wie’s
30-35 Nm fest. I
III
geht, erfährst du in
den beigelegten Her-
I
II
IIIII
steller-Manuals.
16 ytACHTUNG LEBENSGEFAHR!
TRP BREMSEN TAUSCHEN
DE
Führe den Seitenwechsel der TRP-Bremse nur selbst durch, wenn du dich wirklich damit auskennst.
a b c
a // Ziehe die Kunststoffhülse von der Leitungsbefes- b // Löse die Bremsleitung mit einem 8 mm Gabelschlüs- c // Löse beide Leitungen von den Bremsgriffen.
tigungsschraube ab. sel. Um Verunreinigungen am Rad zu vermeiden, hältst du
am besten ein Papiertuch oder ähnliches darunter.
d e F
d // Jetzt können die Leitungen vertauscht werden. In e // Nun verschraubst du beide Bremsleitungen wieder mit f // Bitte beachte dabei das vom Hersteller angegebene
der Regel müssen die Bremsen danach nicht erneut dem Bremsgriff (8 mm Gabelschlüssel). Drehmoment (8 – 10 Nm). Nach dem Öffnen der Brems-
entlüftet werden, da durch die Kapillarwirkung nur leitung musst du zwingend eine Funktionsprüfung in
sehr wenig Bremsmedium austritt. Trotzdem raten wir einer sicheren Umgebung durchführen. Sollte es nötig
dazu, hierbei sehr behutsam vorzugehen, um einem un- sein, die Bremse zu entlüften, liegt deinem Bike ein TRP
nötigen Verlust von Bremsflüssigkeit entgegenzuwirken. Entlüftungs-Set bei.
yt 17MAXIMALE EINBAUTIEFE DER SATTELSTÜTZE
a b c
a // Die Sattelstütze am TUES lässt zur Anpassung an b // Beim Einfahren der Stütze musst du dich in diesem c // Die Mindesttiefe, um die du die Stütze versenken
deine Körpergröße und deine Vorlieben einen Einstell- Bereich bewegen, um beim Fahren den Rahmen nicht zu musst, beträgt 10 cm. Wenn du sie weiter herausziehst,
bereich von 5 cm zu. beschädigen. kann der Rahmen bei Belastung brechen.
d e f
d // Die maximale Versenktiefe beträgt 15 cm. e // Bitte versenke die Stütze nicht tiefer im Sitzrohr, sonst f // Sichere die eingestellte Sattelstützenhöhe, indem du
besteht die Gefahr, dass sie bei einem heftigen Einschlag die Schraube der Sattelklemme auf 6 – 7 Nm festziehst.
im Rahmeninneren Schäden verursacht.
I IIII
II
IIIII
18 ytDE
D R E H M O M ENTE
Innenlager 33 – 41 Nm
Bremssattelschraube am Rahmen/Gabel 9,5 Nm
Schalthebel 2,5 – 4 Nm
Schrauben der Bremsscheibe auf Nabe 6 Nm
Schaltwerk (Befestigungsbolzen) 8 – 10 Nm
Schaltwerk (Zugklemmschraube) 4 – 5 Nm
Bremshebel 2,8 – 3,4 Nm
Freilaufnabe (Zahnkranzpaket-Sicherungsring) 40 Nm
Lenkerklemmung nach herstellerangaben
Vorbau (Gabelschaftklemmung) nach Herstellerangaben
Sattelklemmenschraube 6 – 7 Nm
Kettenblattschraube 12 – 14 Nm (Stahl ) 8 – 9 Nm (Aluminium)
30 - 35 Nm,
Pedale
nach herstellerangaben
Griffklemmung 2,5 – 4 Nm
Dämpferbolzen 10 – 12 Nm
ACHTUNG! Diese Angaben sind lediglich Richtwerte. Grundsätzlich gilt immer: Halte die Richlinien der Hersteller ein.
Diese liegen ebenfalls anbei oder findest du auf der Website des jeweiligen Herstellers.
yt 19SO V E R PA C KS T D U D EIN BIK E FÜR DE N RÜCKVE RSAN D / SE RV IC E
a b c
a // Verpacke die Laufräder mit den beiden Wheel- b // Befestige die Schaumstoff-Verpackungen am Rah- c // Schraube das Schaltwerk vom Schaltauge ab, um
Cover-Kartons und befestige sie mit einem langen men und sichere die Kette mit einem Kabelbinder, um eine Beschädigung des Rahmens zu verhindern. Ver-
Kabelbinder aneinander. Beschädigungen zu verhindern. packe das Schaltwerk mit Luftpolsterfolie und sichere
es mit einem Kabelbinder.
d e f
d // Befestige die Verpackungs-Kartonagen am Rahmen e // Platziere die Laufräder neben dem Rahmen. Für ein- f // Befestige das Schaumstoffpolster an der Gabel-
und stelle das Bike IN der BikeBox auf die Front- und en stabilen Stand sind im Boden des Verpackungskar- brücke. Benutze einen Kabelbinder, um auch den Lenker
Rear-Axle-Stands. Schraube den Lenker aus dem Vor- tons Schlitze vorgesehenen. Siehe auch Abb. rechts. an der Federgabel zu fixieren und so Beschädigungen
bau und stelle ihn senkrecht neben der Federgabel auf. zu verhindern.
Achte darauf, dabei keine Leitungen zu beschädigen.
20 ytDE
Alles im Kasten
Wenn’s in deinem Karton so
aussieht, hast du alles richtig
gemacht. Die Schaubilder
oben und rechts zeigen dir
nochmal, wie die einzelnen
Teile innen drin angeordnet
sein sollten.
So verpackt kann dein Bike
sicher auf Reisen gehen und
kommt immer heil bei uns an.
yt 21EINSTELLUNGEN NACH D EM AUFBAU
EINSTELLEN DER FEDERELEMENTE LERNE DEIN BIKE KENNEN • die Funktion der Bremsen.
( H I N T E R B A U D Ä M P F E R B Z W. F E D E R G A B E L ) Mach dich mit deinem neuen Bike vertraut. Kontrol- • Anzeichen von Materialermüdung (Deformationen,
liere noch einmal, ob alle Schrauben mit dem rich- Brüche, Risse, Schlagstellen usw.).
Die von uns verwendeten Federelemente lassen
viele Einstellungen zu. Beachte hierzu unbedingt die tigen Drehmoment angezogen sind. Die Tabelle auf • alle weiteren Komponenten auf Stabilität und
ausführlichen Anleitungen der jeweiligen Hersteller. Seite 19 gibt dir einen schnellen Überblick über alle
Betriebssicherheit.
Aktuelle Hinweise findest du auf den Websites von: Anzugsmomente. Unsere Bikes verfügen über
moderne Scheibenbremsanlagen mit außerordent- • die notwendigen Drehmomente aller
FOX: http://www.ridefox.com Verschraubungen.
lichen Bremsleistungen. Zudem steigt die Brems-
RockShox: https://www.sram.com/de/rockshox leistung nach kurzer Einfahrzeit. Deshalb solltest du Fahre nicht, wenn auch nur einer der
dich zunächst an das Bremsverhalten gewöhnen, möglichen Mängel vorliegt!
ACHTUNG! BETREIBE DEIN BIKE NIE MIT ZU auch auf unterschiedlichen Untergründen. Positio-
W E N I G B Z W. Z U V I E L L U F T D R U C K ! niere die Bremshebel „griffgerecht“, damit du sie ohne
Verkrampfungen kraftvoll ziehen kannst. Gleiches
A C H T U N G ! VIBRATIONEN IM EINSATZ DES
BESCHÄDIGUNGEN DER GABEL ODER DES gilt für den Schalthebel. Schalte ruhig und möglichst MOUNTAINBIKES KÖNNEN ZUM LÖSEN VON
DÄMPFERS SIND DIE FOLGE. ohne großen Druck auf die Pedale, um die Antriebs- VERSCHRAUBUNGEN FÜHREN (AUCH BEI
komponenten zu schonen.
Bitte wähle für deine ersten Probefahrten und VERSCHRAUBUNGEN MIT SICHERUNGSKLEBER)!
GRUNDLEGENDE EINSTELLUNGEN
Fahrübungen ein ungefährliches, vertrautes Ge-
Sowohl das Gewicht des Fahrers als auch seine lände. Weitere Informationen zu deinem Bike findest DU HATTEST EINEN STURZ
Position auf dem Bike bestimmen die Einstellkriter- du auch in unserer Broschüre „SAFETY FIRST.“. Mach
ien des Dämpfers und der Federgabel. Schon beim dich mit dem Handbuch vertraut, bevor du das erste Stürze beanspruchen das Material und die Bauteile
Aufsitzen wird ein bestimmter Federweg – der so Mal aufs Bike steigst. deines Bikes stark. Überprüfe dein Bike daher – be-
genannte „Sag“ – verbraucht. Er sollte bei Enduro sonders nach harten Einschlägen – auf Beschädi-
Bikes zwischen 25 – 30 %, bei Downhill Bikes gungen und beeinträchtigte Funktionen (siehe hier-
zwischen 30 – 40 % und bei Dirt Bikes zwischen V O R J E D E M E I N S A T Z D E I N E S M O U N TA I N B I K E S zu „Vor jedem Einsatz deines Mountainbikes“), bevor
10 – 20 % des gesamten Federweges liegen. Den du weiter fährst.
Mountainbikes werden naturgemäß stark be-
genauen Sag-Wert, der deiner Fahrweise entspricht, Benutze dein Bike nicht weiter, wenn auch nur ein-
ansprucht. Die Komponenten des Bikes reagieren
ermittelst du am besten durch einige Probefahrten. er der möglichen Mängel vorliegt. Bei Unklarheiten
auf die Belastungen unterschiedlich: Die Begleiter-
Durch das Ausprobieren unter realen Bedingungen oder Fragen wende dich gerne direkt an uns über:
scheinungen reichen von Verschleiß bis hin zu nicht
kannst du zusätzlich die Einstellungen der Ein- und service@yt-industries.com.
offensichtlichen Materialermüdungen. Es kann
Ausfedergeschwindigkeiten der Federelemente auf
deshalb zu plötzlichem Versagen einzelner Bau-
deine persönlichen Vorlieben abstimmen.
teile kommen. Bitte überprüfe dein Bike aus diesem FA H R E N A U F Ö F F E N T L I C H E N W E G E N
Grund regelmäßig auf Verschleiß und Schadstellen, IN DEUTSCHLAND
ACHTUNG! BITTE BERÜCKSICHTIGE bzw. lass in ausreichend kurzen Abständen Inspek-
Mit jeder Veränderung dieser Einstellungen beein- tionen durchführen. Die deutsche Straßenverkehrs-Zulassungsordnung
flusst du das Fahrverhalten deines Bikes. Deshalb (StVZO) schreibt für den Betrieb von Fahrrädern auf
ist auf den ersten Probefahrten Vorsicht geboten, öffentlichen Straßen und Wegen folgende Sicher-
Ü B E R P R Ü F E V O R J E D E R FA H R T
sonst droht Sturzgefahr! Vermeide es grundsätzlich, heitseinrichtungen vor:
die Federelemente so einzustellen, dass sie häufig • den festen Sitz der Laufräder in Rahmen und • Brems- und Beleuchtungsanlage und eine hell
durchschlagen. Gabel und Dämpfer werden es dir Gabel und den Sitz der Sattelstütze. tönende Glocke.
mit einem langen Leben danken. • Weiterhin ist jeder Fahrradfahrer verpflichtet, sein
• die Funktion der Laufräder auf Leichtgängigkeit.
Bei Unklarheiten oder Fragen kontaktiere uns gerne • den Luftdruck der Bereifung, die Spannung der Gefährt in einem verkehrssicheren und fahr-
über: service@yt-industries.com. Speichen und das Spiel der Nabenlagerung.
22 ytAUS F ÜHR L I CH E IN FO RMA TION EN RU ND U M DEI N B I KE FI NDEST DU I M B EI GELE GT E N
DE
„SAFET Y FIRST. “ - HA ND BUCH
tüchtigen Zustand zu halten. WICHTIGE ALLGEMEINE HINWEISE MONATLICHE INSPEKTIONEN
Wir weisen ausdrücklich darauf hin, dass unsere Wir haften nicht für Sach- und Personenschäden, die • Profilhöhe und Seitenwände der Bereifung prüfen;
Bikes keine Straßenzulassung nach der StVZO sich aus dem Betrieb des Mountainbikes selbst erge- abgefahrene oder „ausgewaschene“ Reifen ersetzen.
haben! ben. Insbesondere bei Ausfällen durch mangelnde • Stärke der Scheibenbremsbeläge messen. Brems
Mehr dazu liest du im Handuch „SAFETY FIRST.“ Wartung und Pflege.
beläge ggf. austauschen (dazu bitte die Hersteller-
auf Seite 75 – 78. Die Fähigkeiten von professionellen Mountainbikern
angaben beachten).
wirken von außen betrachtet manchmal als leicht
nachzuahmen. Tatsächlich stecken hinter diesen • Bremsanlage auf Dichtheit kontrollieren. Bei
FA H R E N A U F Ö F F E N T L I C H E N W E G E N Undichtigkeiten Fachwerkstatt aufsuchen.
Leistungen oft jahrelanges Training und ständige
AUSSERHALB VON DEUTSCHLAND Übung. • Lagerspiel an Tretlager, Lenkungslager, Nabe und
Erkundige dich bitte nach den gültigen Be- Trage zu deiner Sicherheit immer eine dem Einsatz Pedalen überprüfen und ggf. nachziehen.
stimmungen des jeweiligen Landes, in dem du mit entsprechende Schutzbekleidung. Wir empfehlen • Rundlauf und Speichenspannung der Laufräder
deinem Bike auch auf öffentlichen Straßen fahren grundsätzlich das Tragen eines Schutzhelms. überprüfen und ggf. Speichen spannen.
willst. Things always seem to happen when you least • Drehmomente an Schrauben und Muttern
expect them! kontrollieren. Falls erforderlich, Schrauben und
BESTIMMUNGSGEMÄSSE NUTZUNG Muttern nachziehen.
P F L E G E - U N D S E R V I C E I N T E R VA L L E • Antrieb und Schaltwerk reinigen und schmieren.
Neben der Aufbauanleitung liegen dem Mountain-
bike die Bedienunsanleitungen der Komponenten- Nur regelmäßige Inspektionen, Pflege und Wartun-
Hersteller bei. Hier findest du alle Informationen zur gen, die umgehende fachgerechte Reparatur oder
korrekten Nutzung, Wartung und Pflege. Bitte be-
JÄHRLICHE INSPEKTIONEN
der Austausch beschädigter Bauteile gewährleistet
folge diese Anleitungen und bewahre sie gut auf. die dauerhaft sichere Funktion deines Bikes. • Federgabel-Service: Beachte hier die Angaben des
Schäden, die durch Unfälle entstehen, oder weil du Falls du nicht über die nötigen Fachkenntnisse und Herstellers.
dein YT unsachgemäß oder nicht bestimmungs- Werkzeuge verfügst, um die anfallenden Arbeiten • Tretlager demontieren, säubern und Montage-
gerecht nutzt, schließt unsere Garantie nicht ein. selbst auszuführen, bleibt der Gang in eine Fach-
gewinde neu fetten.
Hierzu zählen: werkstatt unerlässlich. Für deine Orientierung
haben wir einige Wartungshinweise ausgearbei- • Lenkungslager demontieren, überprüfen und
• unsachgemäße bzw. mangelnde Wartung und tet. Die erste Inspektion empfehlen wir, je nach Lagersätze neu einfetten.
Pflege. Beanspruchung, nach 5 bis 15 Betriebsstunden. • Vorbau, Lenker und Sattelstütze demontieren und
• Beschädigungen durch Sturz oder Überbelastung. Sie umfasst: auf Risse und Schäden überprüfen, ggf. aus-
• Drehmomente aller Schrauben und Muttern tauschen.
• Veränderung am Rahmen oder der Gabel.
kontrollieren; falls erforderlich Schrauben • Bowdenzug auf Schadstellen (Brüche, Knicke,
• Veränderung von Komponenten. Korrosion …) überprüfen und ggf. austauschen.
und Muttern nachziehen.
• Sprünge oder andere Beanspruchungen, die zu • Längenänderungen des Bowdenzuges durch
Überbeanspruchung führen. Nachstellen der Zugspannung ausgleichen
• Betreiben des Bikes mit einem Gesamtgewicht von (Stellschraube am Schalthebel).
über 120 kg, bzw. mit einem Gesamtgewicht von • Rundlauf und Speichenspannung der Laufräder
über 100 kg bei Ausstattung von DT Swiss und prüfen, bei Bedarf Speichen spannen.
Mavic Laufrädern.
• Vorspannung des Steuersatzlagers auf Spiel
Bitte beachte hierzu auch unsere AGBs unter prüfen und bei Bedarf sanft nachjustieren.
www.yt-industries.com.
yt 23HINWEISE ZUR HANDHABUNG UND NUTZUNG VON
BIKE-RAHMEN AUS DEM WERKSTOFF CARBON (CFK)
U M D I E G E FA H R V O N P E R S O N E N - U N D S A C H - UNTER FOLGENDEN GEGEBENHEITEN IST • Sattelstützen aus Aluminium dürfen nur unter
SCHÄDEN ZU VERMEIDEN, BITTEN WIR DIE ES UNABDINGBAR, DEN RAHMEN DURCH Verwendung einer Carbon-Montagepaste montiert
werden.
NACHFOLGENDEN HINWEISE ZU BEFOLGEN YT UNTERSUCHEN ZU LASSEN
• Die Sattelklemme darf bei ausgebauter Sattel
Der Einsatz von Carbon (kohlefaserverstärkter • nach einem Sturz. stütze nicht geschlossen werden – Bruchgefahr!
Kunststoff / CFK) erlaubt es uns, sehr leistungsstarke • nach großen mechanischen Beanspruchungen.
Produkte für unsere Kunden zu entwickeln. Diese Carbon-Lenker
• bei ungewöhnlicher Geräuschbildung des
Komponenten und Rahmenteile können unter Besondere Vorsicht und genaues Arbeiten ist bei
Rahmens (z. B. Knackgeräusche).
bestimmten Bedingungen jedoch empfindlich und Carbon-Lenkern notwendig. Hier darf das vorge-
sensibel sein. Daher besteht bei unsachgemäßem schriebene Drehmoment keinesfalls überschritten
Gebrauch, Fehlern in der Montage oder bei schlechter INFORMATIONEN ZUM RAHMENBAU werden und der Vorbau darf keine scharfen Kanten
Wartung und Pflege die Gefahr von Brüchen, die zu oder Grate haben.
Die Herstellung dieser High-End-Produkte erfolgt in
Unfällen und Sachschäden führen können. Deshalb
Handarbeit. Dadurch können Unterschiede im • Beachte hierbei das vorgeschriebene Anzugs-
sind Kenntnisse zu diesem Werkstoff wichtig, um
Oberflächenfinish auftreten, die jedoch keinen moment des Herstellers.
langfristig Freude an einem CFK-Rahmen zu haben.
Reklamationsgrund darstellen.
Bei Überbelastungen entsteht an Carbon-Rahmen • Carbon-Lenker dürfen nur unter Verwendung
keine bleibende Verformung, obwohl innerlich be- einer Carbon-Montagepaste montiert werden.
reits eine Schädigung der Struktur vorliegen könnte.
SO BEHANDELST DU DEINEN
• Wenn du den Lenker kürzen willst, achte ebenfalls
Außerdem können Steinschläge oder ein Aufprall CARBON-RAHMEN RICHTIG auf die Angaben des Herstellers oder kontaktiere
auf Kanten zu unsichtbaren Beschädigungen im uns direkt.
Carbon-Gewebe und/oder zu Delaminationen (= ein Allgemein
Lösen der verklebten Carbon-Schichten) führen. Aus • Montiere auf keinen Fall Schellen, Verschrau- Hinterradachse
diesen Gründen kann ein Bauteil oder Rahmen aus bungen, Klemmungen oder andere Elemente, • Um Beschädigungen an den Sitzstreben zu
CFK im nachfolgenden Einsatz ohne wahrnehmbare vermeiden, solltest du ohne Laufrad im
die mechanische Kräfte auf das Carbon-Rohr
Vorankündigung versagen. Rahmen die Hinterradachse nie komplett zudrehen.
ausüben.
• Spanne dein Bike nie an einem Carbon-Rohr oder Transport
WENDE DICH NACH EINEM STURZ einer Carbon-Sattelstütze in die Klemmbacken
UMGEHEND AN YT Grundsätzlich ist beim Transport von Rädern mit
eines Montageständers oder Radtransportträgers.
Carbon-Rahmen besondere Vorsicht und Sorgfalt
• Vorsicht auch beim Gebrauch von Bügelschlös- geboten.
Bei ungewöhnlichen Knackgeräuschen des Car-
sern – diese können unter Umständen
bon-Rahmens ist Aufmerksamkeit geboten. Hier- • Schütze besonders den Rahmen vor dem Kontakt
deinen Rahmen beschädigen.
durch könnte sich ein drohender Materialdefekt mit anderen Teilen (nutze dazu Decken o. Ä.).
ankündigen. Wende dich in solch einem Fall bitte
Sattelklemmschelle / Sattelstütze • Verwende keinesfalls eine Transportfixierung,
direkt an YT und fahre das Bike NICHT weiter.
• Das vorgeschriebene Anzugsmoment der die die Sicherung mittels Klemmelement erzeugt.
Sattelklemmschellen-Schraube beträgt 5 Nm. Klemmkräfte können die Rahmenstruktur
schädigen.
• Das Sitzrohr darf nicht ausgerieben oder ander-
weitig mechanisch bearbeitet werden. • Lege keine Gegenstände auf den Rahmen.
• Sattelstütze und Sitzrohr dürfen nicht gefettet • Achte darauf, dass das Bike während des
werden. Bitte ausschließlich Carbon-Montage- Transports nicht verrutschen kann.
paste verwenden.
24 ytDE
• Transportiere dein Bike nie ohne montiertes
Hinterrad bzw. Hinterbautransportsicherung.
PFLEGEHINWEISE
Dein Carbon-Rahmen sollte regelmäßig gereinigt
OHNE RAD DIE HINTERRADACHSE NIE KOMPLETT ZUDREHEN!
werden. Geeignet sind die üblichen Lackpflege-
mittel mit oder ohne Silikonzusatz und kaltes bis
lauwarmes Wasser. Das Wasser darf alternativ auch
mit Spülmittel versetzt werden.
Meide dringend:
• Lösungsmittel aller Art, etwa Alkohole
(z. B. Ethanol oder Isopropanol).
• heißes Wasser mit alkalischen Zusätzen.
• Reinigung mit Dampfstrahlern und Hochdruck-
reinigern.
Überprüfe in regelmäßigen Intervallen (z. B. bei der
Pflege), ob dein Rahmen äußerliche Schäden auf-
weist:
• Risse • Lackschäden • Verfärbungen
• Deformationen (Beulen o. Ä.) TRANSPORTSICHERUNG VERWENDEN!
OBERFLÄCHENSCHUTZ
YT Industries Carbon-Rahmen sind an gefährdeten
Stellen mit Schutzfolien oder Protektoren aus Poly-
amid bzw. Polyurethan versehen. Bedingt durch
die Vielzahl von unterschiedlichen Einsatzgebieten
bzw. Einsatzbedingungen können weitere gefähr-
dete Stellen auftreten (z.B. durch das Tragen von
Knieprotektoren). Solche Bereiche müssen durch
zusätzliche Schutzfolien vor Beschädigungen oder
Scheuerstellen geschützt werden.
• Bitte überprüfe in regelmäßigen Abständen, ob
die Schutzfunktion der Folien noch ausreichend
vorhanden ist.
• Es ist empfehlenswert, die Schutzfolien im Bereich
der Züge jährlich zu erneuern. SCHUTZFOLIEN REGELMÄSSIG PRÜFEN!
yt 251// Im Hinterbau des TUES findest du drei Achsen, die mit einem Spreiz-Konus
montiert sind. Welche das sind, haben wir in der Zeichnung markiert.
2// Bei diesen Achsen wird zuerst die Achse eingeschraubt, danach der
dazugehörige Spreiz-Konus.
5 nm Loctite
1 20 nm Loctite
grease
5 nm Loctite
grease
15 nm
grease
grease grease
8 nm Loctite Loctite
17 nm
grease
12 nm Loctite
grease
grease grease
12 nm Loctite
2
12 nm Loctite
grease
26 yt! H I N T E R B A U DEMONTAGE & MONTAGE
DE
ACHTUNG: Montierst du die Achse falsch, besteht die Gefahr, dass du beim Fahren
den Rahmen beschädigst. Wenn du dir nicht sicher bist, überlasse die Montage in
jed em Fall einer Fachwerkstatt!
> Eine detaillier te Anleitung findest du auf unserer Website
YT-INDUSTRIES.COM/CONE_AXLE_MAINTENANCE.PDF
yt 2728 yt
EN
G o o d J o b . p u t y o u r t r u s t i n Y T: C h e c k . o r d e r e d y o u r b i k e : c h e c k .
g o o d t i m e s : c h e c k . c o n g r at s & t h a n k s f o r t h at !
And now you’re ready to ride! Well, almost. First you have to uncrate this machine, of course. Do it properly and you’ll be able to
use the YT BikeBox again, for transporting your YT or to send it in for a service. And setting it up? With this manual easier than you
might think.

You’ve guessed it, a manual is just so much more than drifting on your rear wheel. This one is a step-by-step guide for setting
up and maintaining your ride. For both involve technical knowledge, as well as craftsmanship. That’s why we’ll talk you through
all basic settings and maintenance recommendations for your YT: Follow the instructions and everything will run smoothly.
Needless to say, that this manual is not meant to provide the knowledge or skills required for professional bike assembly and it
won’t enable you to start building a bike from single pieces or repairing crucial equipment. But you don’t have to be MacGyver either.
Together we’ll get the job done!

:    T I P : D o n ’ t d i t c h t h e Y T B i k e B o x , k e e p i t, i n c l . a l l a d d i t i o n a l m at e r i a l .
     s o y o u c a n s a f e ly r e p a c k y o u r b i k e f o r t r a n s p o r t a g a i n .

You don’t feel ready to carry out set-up, maintenance and repair yourself? No need to break out in cold sweat. Play it safe and hand
the job over to a specialist workshop. Or get in touch with us: We’ll take care of you. Our service will stand by your side, answering
your questions.

There’s only one thing left to say: This will happen within the scope of our warranty and liability limitatons and exclusions. When
dealing with inquiries by phone or mail, important details may be overlooked or get lost in translation. We can never be 100 % sure,
that the type and scope of the required work have been described correctly and to their full extend. Furthermore there’s always a
degree of uncertainty in remote diagnostics and of course we cannot control whether you have followed our instructions appro-
priately. So we hope it’s obvious and reasonable that we can’t compensate and accept liability for damages and accidents that are
results of self-executed repairs or non-professional maintenance. In either of these cases warranty of components shall be void.
Fair enough, isn’t it?

Get in touch with us! serv i c e@ y t- i n d u st r i es.c o m

                                                                                                                                    yt 29
1 UNBOX YOUR BIKE
a b c
1 a // Cut the packaging straps using wire cutters or b // Now you can pull out the flaps and open it. 1 c // Lift the wheels out of the box.
a box cutter. Just make sure not to damage the
YT BikeBox.
d e f
1 d // Put the wheels in a safe place on the side of the 1 e // Now you can lift your bike upwards, out of the box. 1 f // Place the frame on the front /rear axle stand. Make
box. sure the bike is standing safely!
30 yt2 . 1 HANDLEBAR ASSEMBLY – RACEFACE ATLAS/CHESTER DIRECT MOUNT
EN
a b c
2.1 a // Remove the stem bolts from the upper fork crown 2.1 b // Put the screws in the stem then place the handlebar 2.1 c // Mount the stem on the upper fork crown (5 mm
(Allen key 5 mm). and the stem on the upper fork crown. Allen key). Tighten the screws in an X pattern. Do it step
by step with just one turn per screw at a time.This is the
only way to achieve an even clamping of the bolts.
d
Please follow the torque
s p e c i f i c at i o n s o f t h e
m a n u fa c t u r e r s :
RaceFace Atlas Direct Mount // 9 Nm
RaceFace Chester Direct Mount // 12 Nm
2.1 d // Torque the bolts exactly to the specifications of
the manufacturer of the stem and / or handlebar (refer
to the black box on the right of this page). Make sure
the gaps in the clamp are even and that the handlebar I IIII
is centered correctly – the adjustment graphics will help
II
IIIII
you with this.
yt 312 . 2 HANDLEBAR ASSEMBLY – RENTHAL FATBAR CARBON 35
a b C
2.2 A // Cut the zip ties with a wire cutter. 2.2 b // Grease the threads of the screws. Mount the stem 2.2 c // Tighten the bolts to the recommended torque
base plate on the upper fork crown using the shorter, (refer to the black box on page 31).
rear-side bolts (Allen key 5 mm).
d e F
2.2 d // Using the longer bolts, mount the stem clamps to 2.2 e // Make sure to begin in this order and tighten the bolts 2.2 f // Now mount the forward bolts of the stem
the upper fork crown through the holes in the middle of to the specified torque. Also ensure that there is no gap clamps to the base plate. Pay attention to the torque
the stem base plate. between the stem clamps and the stem base plate in this recommendations, even clamp gaps, and the correct
step (zero gap). alignment of the handlebar. The adjustment graphics
will help you with this.
32 yt3 REAR DERAILLEUR ASSEMBLY
EN
a b c
3 a // Make sure the bike is standing safely on the rear 3 b // Turn the rear axle stand on its side. Carefully cut the 3 c // Remove the foam transport protection from the
axle stand. rear derailleur’s cable tie using a wire cutter and remove chainstay.
the bubble wrap.
d e
Please follow the torque
s p e c i f i c at i o n s o f t h e
m a n u fa c t u r e r s :
Renthal Integra II:
Screws stem // 10 Nm
Screws stem // 6 Nm
Derailleur attachment screw // 8 – 10 Nm
3 d // Mount the rear derailleur on the derailleur hanger 3 e // Tighten the rear derailleur screw using the torque
(Allen key 5 mm). Please make sure the bolt is perpen- wrench. Make sure that the rear derailleur stop sits at
dicular to the hanger to avoid damaging the thread. the derailleur hanger stop. Hold the derailleur with your
second hand to avoid a twisting of the derailleur and a gap. I IIII
II
IIIII
yt 334 PREPARING FOR THE REAR WHEEL ASSEMBLY
a b c
4 a // Remove the cardboard packaging of both wheels. 4 b // Remove the frame cover from the main frame. 4 c // Pull the spacer out of the rear brake caliper. Please
keep it for future bike transports.
d e f
4 d // Open the rear derailleur cage and activate the 4 e // Remove the rear axle stand from the rear axle. 4 f // Unscrew the rear wheel axle from the frame and
CAGE LOCK by pressing the small button with the lock remove the axle´s transport protection.
symbol on it.
34 yt5 REAR WHEEL ASSEMBLY
EN
a b c
5 a // Place the rear wheel in the frame. Make sure to place 5 b // Guides in the frame will help you align the wheel 5 c // Secure the rear wheel with the rear wheel axle and
the chain on the smallest cog of the cassette. Carefully properly. tighten it using the torque wrench.
pull the shifter rearwards to make the insertion easier.
d e
Please follow the torque
s p e c i f i c at i o n s o f t h e
m a n u fa c t u r e r s :
Rear wheel axle // 15 Nm
5 d // Secure the rear wheel axle with the locking 5 E // Press the derailleur cage forwards to release the CAGE
screw (Allen key 5 mm). Pay attention to the torque LOCK. Once released, carefully guide the cage rearwards
specifications. until it puts tension on the chain.
I IIII
II
IIIII
yt 356 P R E P A R I N G F O R F R O N T W H E E L A S S E M B LY
a b
6 b // Remove the front axle stand from the front wheel
axle.
c
6 c // Pull the spacer out of the brake caliper. Please keep
you‘re almost there. it for future bike transports.
36 yt7 . 1 FRONT WHEEL ASSEMBLY – FOX 40
EN
a b c
7.1 a // Unscrew the front wheel axle from the fork and 7.1 b // Insert the front wheel in the fork dropouts. Make sure 7.1 c // Insert the front wheel axle and tighten it. Use a
remove it. the brake rotor is centered in the brake caliper to avoid torque wrench to ensure that the front wheel is properly
damages. secured.
d e
Please follow the torque
s p e c i f i c at i o n s o f t h e
m a n u fa c t u r e r s :
FOX 40:
Axle // 3 Nm
Axle clamping bolts // 3 Nm
7.1 d // Clamp the front wheel axle in the fork by tightening 7.1 e // Check the torque of the clamping bolts with a torque
the 4 clamping bolts in an alternating pattern, one turn wrench.
per bolt at a time.
I IIII
II
IIIII
yt 37done
It‘s
38 ytEN
before you go out and ride: here's a few
w o r d s o n y o u r b i k e s e t- u p a n d m a i n t e n a n c e .
yt 39PEDAL ASSEMB LY
a
a // Attach the pedals to the cranks using an allen wrench.
Apply some grease to the threads, if there are washers
make sure to use them! Please note that there’s a right
and a left pedal.
b
caution!
Airsprung forks and
shocks have to be filled
with the correct air
pressure before use!
That’s why we have
b // The non-drive side pedal has reverse threading and
included a shock pump
is therefore tightened counterclockwise.Tighten the
to your package:
pedals with a torque of 30 – 35 Nm.
I IIII
Please read the manu-
facturer manuals to
II
IIIII
learn how it works.
40 ytATTENTION: RISK OF DEATH!
TRP BRAKE SWAP
EN
Only attempt the TRP brake swap yourself if you are qualified to do so. If in doubt, see a specialist.
a b c
a // Pull the plastic sleeve away from the brake hose b // Loosen the brake hose with an 8 mm spanner. Keep c // Remove both hoses from the brake levers.
mounting bolt. your bike clean and hold a paper towel or something
similar underneath the brake lever.
d e F
d // You can now proceed to swap the hoses. In e // Attach both hoses to the brake levers again (spanner f // Please pay attention to the torque specifications of
general, it is not necessary to bleed the brakes following 8 mm). the manufacturer (8 – 10 Nm). After manipulating the
this procedure, as very little brake fluid is typically lost. brake hoses like this, you must perform a braking test
Nevertheless, we recommend working with caution to in a safe environment to make sure your brakes are still
minimize any fluid spillage. functioning properly. Should it prove necessary to bleed
the brakes, a TRP bleed kit is included with your bike.
yt 41MAXIMUM INSERTION DEPTH OF THE SEAT POST
a b c
a // The seat post of the TUES provides an adjustment b // Please note that you must run the seat post with- c // The minimum insertion depth of the seat post is
range of 5 cm to allow you to fine tune the seat height in the allowed adjustment range to avoid potential 10 cm. If you insert less, the frame can break under load.
to suit your body shape and your preferences. damage to the frame.
d e f
d // The maximum insertion depth is 15 cm. e // Please do not insert the seat post more than 15 cm f // Once you have properly adjusted your seat post
into the seat tube, otherwise it may cause damage to the height, tighten the seat post clamp with a torque of
frame in case of heavy impact. 6 – 7 Nm.
I IIII
II
IIIII
42 ytEN
T O R QU ES
Bottom bracket 33 – 41 Nm
Brake caliper screw to frame and fork 9,5 Nm
Shifter 2,5 – 4 Nm
Disc brake bolts to hub 6 Nm
Rear derailleur (fixing bolt) 8 – 10 Nm
Rear derailleur (clamp bolt) 4 – 5 Nm
Brake lever 2,8 – 3,4 Nm
Cassette retainer ring 40 Nm
Handlebar Clamp see manufacturer Specifications
Stem (steerer tube clamping) see manufacturer Specifications
Seat Post Clamp 6 – 7 Nm
Chain ring bolts 12 – 14 Nm (Steel ) 8 – 9 Nm (Aluminum)
30 - 35 Nm
Pedals
see manufacturer Specifications
Lock-on grip bolts 2,5 – 4 Nm
Shock bolts 10 – 12 Nm
CAUTION! These specifications are only guidelines. As a rule, you should always observe the manufacturers’ instructions.
These have also been included or can be found on the website of the respective manufacturer.
yt 43THI S I S H O W YO U PAC K YO UR BI KE FOR SH IPME N T OR SE RVI C E
a b c
a // Wrap both wheels using the cardboard wheel covers b // Attach the transport protection to the frame and se- c // Remove the rear derailleur from the derailleur hanger
and attach them to each other using a long cable tie. cure the chain to the chain stay using a cable tie in order to avoid frame damages. Wrap the rear derailleur in
to avoid damages. bubble wrap and secure everything with a cable tie.
d e f
d // Attach the cardboard covers to the frame and IN e // Place both wheels next to the frame in the box. There f // Fix some foam material to the arch of the fork. Use
the box put the bike on the front and rear axle stand. are cutouts in the bottom segments of the box to secure a cable tie to attach the handlebar to the fork as well, in
Remove the handlebar from the stem and put it upright a safe wheel placement. Also see picture on the right. order to prevent damages.
next to the fork. Make sure not to damage any cables or
hoses.
44 ytEN
A l l b ox e d u p
If your box looks like that,
you've done everything right.
See the pictures on top and
right for the correct place-
ment of all parts within it.
Boxed up like that, your bike
will make it to our workshop
safe and sound.
yt 45ADJUSTMENTS AFTER ASSEMBLY
ADJUSTING THE SUSPENSION ELEMENTS G E T T O K N O W YO U R B I K E • all additional components for stability and
(REAR SHOCK AND SUSPENSION FORK) Familiarize yourself with your new bike. Verify once operational safety.
again that all screws are tightened to the correct • the required torques for all screws.
The suspension elements we use allow for a variety
of adjustments. When making adjustments, please torque. The table on page 41 gives you an overview Do not ride even if only one of the possible defects
note the detailed instructions of the suspension of all torque specifications. Our bikes are equipped is present.
element manufacturer. You can find up-to-date with modern disc brake systems with exceptional
information on their websites: braking performance. In addition, the braking perfor- CAUTION! VIBRATIONS THAT OCCUR WHEN
mance increases after a short break-in period. Try
FOX: http://www.ridefox.com
to get used to the braking response and how it dif-
R I D I N G YO U R M O U N TA I N B I K E C A N L E A D T O
RockShox: https://www.sram.com/de/rockshox fers when riding over various surfaces. Position the SCREWS LOOSENING (EVEN FOR SCREWS
brake levers at your fingertips so that they can be WITH THREADLOCKER ADHESIVE)!
C A U T I O N ! N E V E R O P E R A T E YO U R B I CYC L E pulled without excessive effort. The same applies to
W I T H I N S U F F I C I E N T O R E XC E S S A I R the shifters. Shift smoothly and without applying too
much pressure on the pedals. This will help protect IN THE EVENT OF A CRASH
P R E S S U R E ! T H I S C O U L D R E S U LT I N D A M A G E your drive train components.
Crashes place a lot of strain on your bike’s materi-
TO THE FORK OR SHOCKS. Please choose a safe and familiar terrain for your in-
al and components. Therefore, before you continue
itial test and training rides. You can find all you need
your ride, check your bike for damage and impaired
BASIC SETTINGS to know about your bike in our ″SAFETY FIRST.″-
functions (see ″Check Before Every Ride″).
manual as well.
The weight of the rider and his position on the bi- Familiarize yourself with the bike manual before Do not continue your ride even if only one of the
cycle determine the adjustment criteria for the rear getting on your bike the first time. possible defects is present. If you are uncertain of
shock and suspension fork. When sitting on the bike, anything or have any questions, do not hesitate to
the suspension will compress to a certain degree – contact us directly at:
the so-called ″sag″. Sag should be between 25 – 30 % BEFORE EACH RIDE service@yt-industries.com.
for Enduro bikes, between 30 – 40 % for Downhill
By nature, mountain bikes are placed under a lot of
bikes, and between 10 – 20 % for Dirt bikes. The ″sag
strain. The components of the bike react differently RIDING ON PUBLIC ROADS IN GERMANY
value″ that corresponds to your riding style is best
to stresses, from wear and tear to material fatigue.
determined with a few test rides. Test rides and per- The German Road Traffic Licensing Regulations
Individual components may fail without warning.
sonal preferences will also determine the settings (Straßenverkehrs-Zulassungs-Ordnung, StVZO) dic-
Please check your bike regularly for signs of damage
of the compression and rebound speeds of the sus- tate the following safety devices when operating
and/or have your bike periodically inspected.
pension elements. bicycles on public roads:
CAUTION! PLEASE NOTE C H E C K B E F O R E E V E RY R I D E • A braking and lighting system and a bright
sounding bell.
Your bike’s handling is influenced by each and every • the seatpost and wheels are firmly secured in
the frame and fork. • Furthermore, every cyclist is obligated to maintain
adjustment to the suspension elements – therefore,
his vehicle in a roadworthy condition and a state
please be careful on your first test rides to avoid • the wheels spin freely.
that is safe for riding.
crashes. Avoid any adjustments that could lead to • the air pressure in the tires, the tension of the
We would like to explicitly point out that our bikes
the suspension elements frequently bottoming out. spokes and the hub bearing play.
are not in compliance with the German road traffic
They will thank you with a long service life. If you are • the brake function. licensing regulations!
uncertain of anything or have any questions, do not
• for signs of material fatigue (deformations,
hesitate to contact us at: Read more about this on pages 75 – 78 in the
fractures, cracks, signs of impact, etc.).
service@yt-industries.com. ″SAFETY FIRST.″-manual.
46 ytYO U C A N FIN D D ETA ILED INFOR M ATI ON AB OU T YOU R B I KE I N YOU R
EN
"SAFET Y FIRST. " - BIKE MANUAL
RIDING ON PUBLIC ROADS OUTSIDE OF GERMANY C A R E A N D S E R V I C E I N T E R VA L S ANNUAL INSPECTIONS
Please inquire about the respective regulations for Only regular inspections, care and maintenance, • Suspension fork service: Please note the
each country in which you want to ride your YT Bike immediate professional repair, and the replacement specifications of the manufacturer here.
on public roads. of damaged components can guarantee the safe
• Remove the bottom bracket, clean it, and regrease
function of your bike over the long term. If you do
the treads.
not possess the necessary specialist knowledge or
DESIGNATED USE tools to carry out the required work yourself, a trip • Remove the headset, check the bearings and
In addition to the assembly instructions, our moun- to the workshop is essential. For guidance, we have regrease them.
tain bikes are also supplied with the operating prepared some maintenance information: • Remove the stem, handlebar, and seatpost and
instructions from the manufacturers of the indi- We recommend an initial inspection, depending on check them for cracks and damage and replace
vidual components. You can find all information how hard you ride, after 5 to 15 hours of operation. them if necessary.
regarding use, maintenance, and care here. Please This includes:
• Check the shifter cable for damage (breaks, kinks,
follow these instructions and retain them. Damage • Checking the torques on all screws and nuts and corrosion, etc.) and exchange them if necessary.
that arises from improper or inappropriate use of tightening them if necessary.
your YT are not covered by our warranty.
• Changing the length of the shifter cable by
These include:
correcting the tension via adjustment (barrel
• Improper or inadequate maintenance and care. adjuster on the shifter).
• Damage from crashes or overstressing. • Checking the spoke tension on the wheels and that
• Modification to the frame or fork. the wheels are true and adjusting spoke tension if
necessary.
• Modification of components.
• Checking the headset preload and gently readjust
• Jumps or other stresses that lead to overstraining. if necessary.
• Operating the bike with a total weight of over
120 kg / 265 lbs. OR 100 kg / 220 lbs. if fitted with
DT Swiss an Mavic wheels. M O N T H LY I N S P E C T I O N S
Please refer to our General Terms and Conditions at • Checking the profile height and sidewalls of the
www.yt-industries.com. tires. Replacing worn or ″washed out″ tires.
• Measuring the strength of the disc brake pads.
I M P O R TA N T G E N E R A L I N F O R M A T I O N Replacing the brake pads if necessary (please note
the manufacturer specifications).
We are not liable for property damage or personal
injury resulting from the operation of the mountain • Checking the braking system for leaks. In the event
bike itself, in particular, in the event of failures due to of leaks, please visit a specialist workshop.
inadequate maintenance and care. • Checking bearing play in the bottom bracket, head
The abilities of professional mountain bikers may set, hubs, and pedals and tightening if necessary.
seem easy to imitate to laypersons. In reality, there • Checking the spoke tension on the wheels and that
are often years of training and constant practice
the wheels are true and adjusting spoke tension if
behind their skills. For your safety, always wear pro-
necessary.
tective clothing appropriate for the discipline.
We recommend always wearing a protective helmet. • Checking the torques on screws and nuts. If neces
sary, tightening screws and nuts.
Things always seem to happen when you least
• Cleaning and greasing the drivetrain and derailleur
expect them.
mechanism.
yt 47INFORMATION ON THE HANDLING AND USE
OF BIKE FRAMES MADE FROM CARBON (CFRP)
T O AV O I D D A M A G E T O P E R S O N S A N D IF THE FOLLOWING OCCURS, IT IS • Aluminum seat posts may only be installed when
P R O P E R T Y W E A S K YO U T O F O L L O W T H E S E A B S O L U T E LY E S S E N T I A L T O H AV E T H E carbon assembly paste is used.
• The seat clamp must not be closed when the seat
INSTRUCTIONS F R A M E I N S P E C T E D BY Y T I N D U S T R I E S
post has been removed. Risk of fracture!
The use of carbon (carbon fiber reinforced plastic / • after a crash
CFRP) makes it possible for us to produce high-per- • after major mechanical stresses Carbon Handlebar
formance products for our customers. Since these
• Unusual noises from the frame (e.g. snapping
components and frame elements can be sensitive Installing carbon handlebars requires great care and
sounds)
and delicate under certain conditions, there is a risk precision. Do not exceed the specified torque under
of breaks which could lead to accidents and proper- any circumstances and make sure that the stem
ty damage in the event of improper use, assembly INFORMATION ON FRAME CONSTRUCTION does not have any sharp edges or ridges.
errors or poor maintenance and care. That is why • Please note the prescribed tightening torque of
being knowledgeable about this material is impor- The manufacture of these high-end products is the stem manufacturer.
tant for enjoying a carbon frame in the long term. done by hand. This can lead to differences in the
finish which are not cause for complaint. • Carbon handlebars can only be installed using
When these products are overstressed, no last-
carbon assembly paste.
ing deformations are visible even though the inner
structure could be damaged. In addition, rock im- • If you would like to shorten the handlebar, note
pacts or messy falls involving impacts on edges H O W T O C O R R E C T LY H A N D L E the specifications of the manufacturer or contact
can result in invisible damages and/or delamination YO U R C A R B O N F R A M E us directly.
(= carbon layers dissolve) of the carbon material.
General information
Rear wheel axle
For these reasons, an element or frame made of
CFRP can fail without perceptible warning. • Under no circumstances should you install rings, • To prevent damages to the seat stays, the rear
screw connections, clamps or other elements wheel axle must never be completely closed if the
which exert mechanical forces on the carbon tube. wheel is not in the frame.
C O N TA C T Y T I M M E D I A T E LY A F T E R YO U H AV E • Never clamp the carbon tube or carbon seat post
A CRASH! of your bike on the gripping jaws of a work stand
Transport
or bike rack.
Pay attention if your carbon frame makes unusual • Be careful when using U-locks – under certain You must be particularly careful when transporting
cracking noises. This could be a sign of an impen- bikes with carbon frames:
circumstances, they can cause damage to your
ding material defect. If this occurs, STOP using the
frame. • Protect the frame in particular from contact with
bike immediately and turn to YT.
other parts (use covers, etc.).
Seat clamp / seat post
• Do not use transport fittings which use clamping
• The prescribed tightening torque of the seat elements. Clamping forces could damage the
clamp bolt is 5 Nm. frame structure.
• The seat post must not be rubbed out or other • Do not place any objects on the frame.
wise mechanically stressed. • Make sure the bike cannot slide around during
• The seat post and seat tube may not be transport.
lubricated. Only carbon assembly paste can be • Never transport without rear wheel or rear section
used. transport lock assembled.
48 ytSie können auch lesen