Seitensicherung System SR2 für - Bock.net
←
→
Transkription von Seiteninhalten
Wenn Ihr Browser die Seite nicht korrekt rendert, bitte, lesen Sie den Inhalt der Seite unten
DE Montage- und Gebrauchsanleitung Seitensicherung System SR2 für domiflex 1 livorno niedrig domiflex niedrig practico 25|80 domiflex niedrig classic practico 25|80 plus domiflex 2 floorline 15|80 domiflex 2 wash combiflex belluno practico economic
DE

Sehr verehrter Kunde,

mit Ihrer Entscheidung zum Kauf einer Seitensicherung aus dem Hause
Hermann Bock GmbH erhalten Sie ein langlebiges Pflegeprodukt mit erst-
klassiger Funktionalität auf höchstem Sicherheitsniveau.

Im Mittelpunkt steht dabei der pflegebedürftige Mensch, dessen Vertrauen
es zu stärken und dessen Leben es zu schützen gilt. Die Voraussetzungen
dafür haben wir mit diesem Pflegeprodukt geschaffen.

Wir bitten Sie, Ihrerseits durch die genaue Einhaltung der Sicherheits- und
Gebrauchshinweise sowie durch die erforderliche Wartung möglichen
Funktionsstörungen und Unfallgefahren vorzubeugen.

 Klaus Bock

                                 2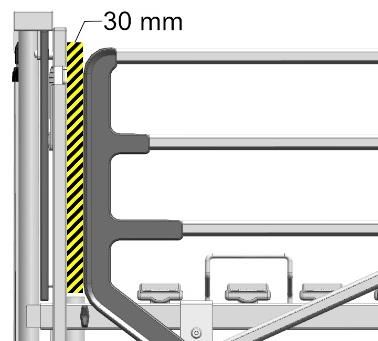
DE
Inhaltsverzeichnis

1 Vorwort und allgemeine Hinweise ....................................................................... 4
  1.1    Verweis auf Montage- und Gebrauchsanleitung des Pflegebettes ................... 4
  1.2    Definition der Personengruppe ......................................................................... 4
  1.3    Sicherheitshinweise........................................................................................... 4
  1.4    Lebensdauer / Garantie..................................................................................... 5
2 Allgemeine Funktionsbeschreibung ..................................................................... 6
  2.1    Konstruktiver Aufbau und Funktion .................................................................. 6
  2.2    Halterungsvarianten - Homecare und Objekt ................................................... 6
  2.3    Demontage der vorhandenen Seitensicherung ................................................ 7
  2.4    Montage der Seitensicherung SR2 für Homecare Betten ................................. 8
  2.5    Montage der Seitensicherung SR2 für Objekt Betten ..................................... 10
  2.6    Demontage der Seitensicherung SR2 .............................................................. 11
  2.7    Bedienung der Seitensicherung SR2................................................................ 11
  2.8    Transport-, Lagerungs- und Betriebsbedingungen .......................................... 12
  2.9    Entsorgung ...................................................................................................... 13
3 Reinigung, Pflege und Desinfektion ................................................................... 13
4 Regelmäßige Inspektionen mit Service .............................................................. 13

                                                             3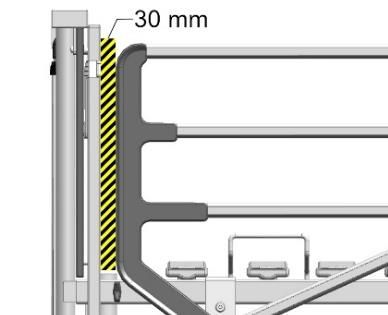
DE
        1      Vorwort und allgemeine Hinweise

Diese Montage- und Gebrauchsanleitung beschreibt die Montage der Seitensicherung SR2
für die definierten Pflegebetten der Hermann Bock GmbH und die Benutzung der Seiten-
sicherung SR2. Lesen Sie diese Montageanleitung vollständig durch, um Schäden durch
fehlerhafte Montage und Handhabung zu vermeiden.

Eine Montage der Seitensicherung SR2 ist ausschließlich durch Fachpersonal vorgesehen
und darf keinesfalls durch einen privaten Anwender erfolgen.

Die Montage der Seitensicherung SR2 ist für die definierten Pflegebetten ab dem Her-
stelldatum Januar 2016 freigegeben. Vorbereitungen am Pflegebett werden durch eine
ergänzende Anleitung vorgegeben.

Diese Montage- und Gebrauchsanleitung enthält Sicherheitshinweise. Alle Personen,
die mit den Pflegebetten arbeiten, müssen den Inhalt dieser Anleitung kennen. Unsach-
gemäße Bedienung kann zu Gefährdungen führen.

1.1         Verweis auf Montage- und Gebrauchsanleitung des Pflegebettes

Die Montage- und Gebrauchsanleitung des jeweiligen Pflegebettes der Hermann Bock
GmbH ist zu beachten.

                                     Bock-Hinweis
      Wenn Sie diese Montage- und Gebrauchsanweisung erhalten haben, weist Ihr Produkt eine
      zusätzliche Ausstattung auf, die nicht in der Hauptmontage- und Gebrauchsanweisung be-
                        schrieben ist. Bitte fügen Sie daher diese Anleitung der
                            Hauptmontage- und Gebrauchsanweisung bei.

1.2         Definition der Personengruppe

Fachpersonal
Als Fachpersonal werden Mitarbeiter des Betreibers bezeichnet, die aufgrund ihrer Aus-
bildung oder Unterweisung berechtigt sind, das Pflegebett auszuliefern, zu montieren, zu
demontieren und zu transportieren. Diese Personen sind – neben der Bedienung, Mon-
tage und Demontage des Pflegebettes - in die Vorschriften zur Reinigung und Desinfektion
des Pflegebettes eingewiesen.

1.3         Sicherheitshinweise

Der bestimmungsgemäße Gebrauch aller beweglichen Bauteile ist zur Vermeidung von
Gefahren für die pflegebedürftige Person genauso entscheidend wie für die Sicherheit der

                                                4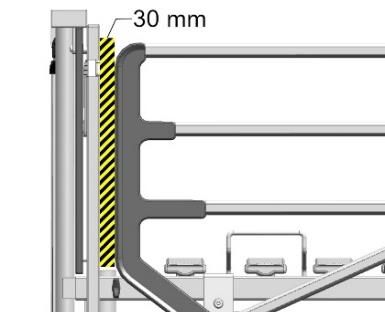
DE
Angehörigen und / oder des Pflegepersonals. Voraussetzung dafür sind die richtige Mon-
tage und Bedienung der Seitensicherung. Auch die individuelle physische Konstitution der
Pflegeperson sowie Art und Umfang der Behinderung müssen unbedingt bei dem Betrieb
der Seitensicherung berücksichtigt werden.

Diese Empfehlungen gelten insbesondere dann,

       –    wenn die Pflegeperson oder das Pflegepersonal durch ungewollte Verstel-
            lungen gefährdet werden können,
       –    wenn sich die Seitensicherungen in hochgestellter Position befinden und
            es zu Einklemm- und Quetschungsgefahren kommen kann,
       –    wenn sich Kinder unbeaufsichtigt mit dem Bett in einem Raum aufhalten.

Die Bedienung der Seitensicherung sollte grundsätzlich nur von eingewiesenem Pflege-
personal bzw. Angehörigen oder im Beisein von eingewiesenen Personen erfolgen.

Beim Verstellen der Seitensicherungen ist besonders darauf zu achten, dass sich keine
Gliedmaßen in den Seitensicherungen im Verstellbereich befinden.

Bitte beachten Sie, dass auch die Sicherheitshinweise der Hauptmontage- und Gebrauchs-
anleitung des Pflegebettes gelten.

Bei der Nutzung der Seitensicherungen an inkompatiblen Betten kann es zu Einklemmun-
gen kommen.

1.4    Lebensdauer / Garantie

Diese Seitensicherung wurde so entwickelt, konstruiert und gefertigt, dass Sie über einen
langen Zeitraum sicher funktionieren kann. Die Lebensdauer richtet sich nach den Einsatz-
bedingungen und -häufigkeiten. Beachten Sie hierzu die Hauptmontage- und Gebrauchs-
anleitung Ihres Pflegebettes.

Achtung: Bei nicht autorisierten technischen Änderungen am Produkt erlö schen alle
Garantieansprüche.

Dieses Produkt ist nicht für den nordamerikanischen Markt, insbesondere den Verei-
nigten Staaten von Amerika (USA), zugelassen. Die Verbreitung und Nutzung des Pfle-
gebettes in diesen Märkten, auch über Dritte, ist seitens des Herstellers untersagt.

                                           5
DE
2 Allgemeine Funktionsbeschreibung
2.1 Konstruktiver Aufbau und Funktion
Die Seitensicherung SR2
Alle Seitensicherungsvarianten dienen dem Herausfallschutz. Die Seitensicherungen SR2
ermöglichen gleichzeitig ein sicheres und bequemes Ein- und Aussteigen. Durch einen ein-
fachen Auslösemechanismus lässt sich jedes einzelne Seitensicherungselement in eine
hoch- oder tiefgestellte Position bringen.
2.2 Halterungsvarianten - Homecare und Objekt
Halterung für Homecare Betten Halterung für Objekt Betten
Für folgende Pflegebetten geeignet: Für folgende Pflegebetten geeignet:
domiflex 1 livorno niedrig
domiflex niedrig practico 25|80
domiflex niedrig classic practico 25|80 plus
domiflex 2 floorline 15|80
domiflex 2 wash
combiflex
belluno
practico economic
6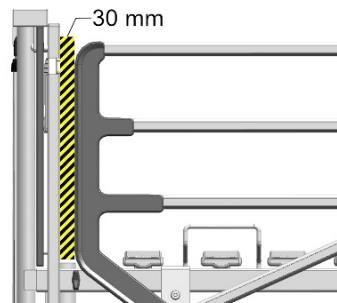
DE

2.3    Demontage der vorhandenen Seitensicherung

Bei der Demontage der vorhandenen Seitensicherung müssen Sie die in der Hauptmon-
tage- und Gebrauchsanleitung angegebenen Schritte zur Montage in umgekehrter Rei-
henfolge für die Seitensicheurng umsetzen. Die weitere Demontage der Beschläge ist
hier erklärt.

Fahren Sie das Pflegebett zur einfacheren
Demontage in die höchste Position.

Die zwei Holme müssen demontiert wer-
den.

Der Beschlag muss ebenfalls aus der C-
Schiene entfernt werden.

Schraube unten an der C-Schiene lösen,
den Beschlag nach unten hin entfernen
und die Verschraubung wieder einsetzen.

Nun ist die C-Schiene ohne Beschlag und
für die weitere Montage der Seitensiche-
rung SR2 vorbereitet.

                                            7
DE
2.4 Montage der Seitensicherung SR2 für Homecare Betten
Fahren Sie das Pflegebett zur einfacheren
Montage in die höchste Position.
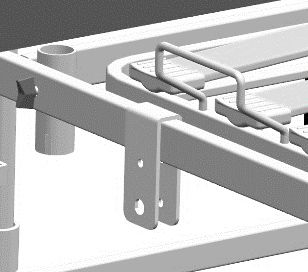
Die zwei Halterungen für die Homecare
Betten jeweils mit der größeren Bohrung
nach Außen auf die Längszarge zum je-
weilgen Ende hin auflegen.
Die Halterung mit der Schraube
M8x40mm und der Sicherungsmutter ver-
binden, diese nur locker anschrauben.
Die Verbindung muss noch auf der Längs-
zarge verschiebbar bleiben.
Den Ansatzbolzen in die Seitensicherung
einstecken.
8DE
Den Abstandshalter auf den Ansatzbolzen
schieben.
Die Seitensicherung mit dem Ansatzbolzen
in das größere Loch bis zum Anschlag ein-
schieben.
Zwischen dem U-Profil, die Hülse beim
einschieben als Distanzstück justieren.
Von der inneren Seite die untere Schraube
wie abgebildet festschrauben.
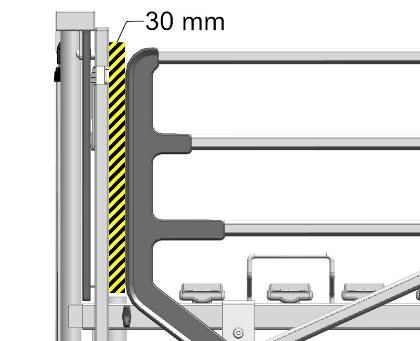
Die Seitensicherung in die obere Stellung
bringen.
Beachtung: Das Maß zwischen der senk-
rechten Außenkante der Seitensicherung
und dem nächstmöglichen Bauteil muss
horizontal 30mm betragen.
Die obere Schraube M8x40mm fest anzie-
hen.
Funktionskontrolle. Seitensicherung her-
ablassen und wieder Aufstellen.
9DE
2.5 Montage der Seitensicherung SR2 für Objekt Betten
Fahren Sie das Pflegebett zur einfacheren Mon-
tage in die höchste Position.
An der Längszarge des Pflegebettes sind Bohrun-
gen für die Seitensicherung vorhanden. Diese
sind mit Kunststoffstopfen verschlossen, bitte
entfernen Sie diese Kunststoffstopfen.
Die Halterungen werden nun an der Längszarge
montiert. Beachten Sie, dass die untere, größere
Bohrung nach außen zeigt.
Dazu nehmen Sie, wie abgebildet, die Halterung
und befestigen diese indem die Schraube
M8x60mm durch das Bauteil und den Rahmen
gesteckt und angezogen wird.
Der Ansatzbolzen wird nun durch die Seitensiche-
rung geschoben, wobei der Ansatz nach Außen
zeigt.
Anschließend wird von der inneren Seite der Ab-
standshalter über den Bolzen geschoben.
Die Seitensicherung wird nun in die untere, grö-
ßere Bohrung mit dem Bolzen bis zum Anschlag
eingeschoben.
10DE
Von der inneren Seite die Schraube wie abgebil-
det festschrauben.
Funktionskontrolle. Seitensicherung herablassen
und wieder Aufstellen.
2.6 Demontage der Seitensicherung SR2
Die Demontage der Seitensicherung erfolgt in umgekehrter Reihenfolge zur Montage.
2.7 Bedienung der Seitensicherung SR2
Jedes Seitensicherungselement kann unabhängig von den anderen Seitensicherungsteilen
verstellt werden. Der Auslöseknopf für die Verstellung befindet sich in der Mitte der Sei-
tensicherung, dieser Auslöseknopf muss nach unten gezogen werden und zum anderen
am entsprechenden Längsholm der Seitensicherung gezogen werden.
Um ein Seitensicherungselement abzusenken, fassen Sie
mit einer Hand an den oberen Holm der Seitensicherung
und mit der anderen Hand lösen Sie den Auslöseknopf
indem Sie Ihn leicht nach unten ziehen.
Anschließend lässt sich die Seitensicherung mit einer Be-
wegung in Längsrichtung nach unten absenken.
11DE
Die Seitensicherung befindet sich nun in abgesenkter
Position.
Um die Seitensicherung in die obere Position zu brin-
gen, fassen Sie mit einer Hand an den oberen Seiten-
sicherungsholm und ziehen Sie die Seitensicherung
nach oben.In der Obersten Position, rastet der Auslö-
seknopf hörbar ein. Die Seitensicherung befindet sich
nun in hochgezogener Position.
Bock-Gefahren-Hinweis
Bitte beachten Sie das erhöhte Einklemmrisiko, welches durch die hochgezogenen Seitensi-
cherungen beim Verstellen der Rücken- und Oberschenkellehne entsteht.
Beim Einsatz unterschiedlicher Matratzenstärken darf die Mindesthöhe von 22 cm, ge-
messen von der oberen Kante der Seitensicherung über der Matratze, ohne Kompression
nicht unterschritten werden.
Für eine sichere Anwendung der Seitensicherungen müssen daher die folgenden Maße
eingehalten werden:
Höhe über der Matratze: ≥ 220mm
Spaltmaße zwischen Holmen und zur Liegefläche: < 120mm
Spaltmaße zwischen Seitensicherung und Endstück: < 60mm oder > 318mm
2.8 Transport-, Lagerungs- und Betriebsbedingungen
Transport und Lagerung Betrieb
Temperatur 0°C bis +40°C 10°C bis +40°C
Relative Luftfeuchte 20% bis 80% 20% bis 70%
Luftdruck 800hPa bis 1060hPA
12DE
2.9 Entsorgung
Die einzelnen Materialkomponenten aus Kunststoff und Metall sind recyclingfähig und
können der Wiederverwertung entsprechend den gesetzlichen Bestimmungen zugeführt
werden. Generell ist bei der Entsorgung darauf zu achten, dass die zu entsorgenden Kom-
ponenten nicht infektiös oder kontaminiert sind.
3 Reinigung, Pflege und Desinfektion
Durch die Beachtung der Pflegehinweise der Hauptmontage- und Gebrauchsanweisung
bleiben die Gebrauchsfähigkeit und der optische Zustand Ihres Pflegebettes und der Sei-
tensicherung lange erhalten. Für die Seitensicherung gilt das Kapitel „Reinigung, Pflege
und Desinfektion“ Ihres Pflegebettes.
4 Regelmäßige Inspektionen mit Service
Regelmäßige Inspektionen dienen der Beibehaltung des höchstmöglichen Sicherheitsni-
veaus und sind damit eine wichtige Schutzvorkehrung. Medizinprodukte müssen entspre-
chend den vorgegebenen Fristen des Herstellers und den allgemein anerkannten Regeln
der Technik regelmäßig inspiziert werden. Für die Seitensicherung gilt das Kapitel „Regel-
mäßige Inspektionen mit Service“ Ihres Pflegebettes.
13DE
Hermann Bock GmbH
Nickelstr. 12
D-33415 Verl
Telefon: +49 52 46 92 05 - 0
Telefax: +49 52 46 92 05 - 25
Internet: www.bock.net
E-Mail: info@bock.net
Unsere VERTRIEBSPARTNER
Unsere Geschäftspartner setzen, wie wir selbst, auf Qualität, Innovation und überdurchschnittliche Standards,
die international anerkannt sind. Wir können uns auf unsere Partner ebenso gut verlassen, wie Sie sich auf uns.
Beachten Sie bitte, dass nur durch unser autorisiertes Personal und unsere Vertriebspartner, Schulungen, Ersatz-
teilversorgung, Reparaturen, Inspektionen und sonstiger Service gewährleistet werden kann. Ansonsten gehen
sämtliche Garantieansprüche verloren.
Eine Auflistung unserer aktuellen Vertriebspartner finden Sie unter www.bock.net/kontakt/vertriebspartner
© eingetragenes Warenzeichen
890.02524 Rev. 00
Stand: 2021-05
Techn. Änderungen vorbehaltenEN Assembly and operation manual Side rail system SR2 for domiflex 1 livorno low domiflex low practico 25|80 domiflex classic low practico 25|80 plus domiflex 2 floorline 15|80 domiflex 2 wash combiflex belluno practico economic
EN

Dear valued customer,

With your decision to purchase a side rail from Hermann Bock GmbH, you
will receive a durable care product with superior functionality at the highest
safety level.

This product was designed with a focus on persons in need of care, whose
confidence must be reinforced and whose life needs protection. With this
health care product, we meet these requirements.

We urge you to prevent potential malfunctions and the risk of accidents by
complying strictly with the safety and operating instructions and by carry-
ing out the necessary maintenance.

 Klaus Bock

                                   2
EN
Table of contents
1 Preface and general instructions ......................................................................... 4
1.1 Reference to the assembly and operation manual for the nursing care bed ... 4
1.2 Definition of person groups .............................................................................. 4
1.3 Safety instructions ............................................................................................. 4
1.4 Service life / warranty ....................................................................................... 5
2 General description of the functions .................................................................... 6
2.1 Construction design and function ..................................................................... 6
2.2 Mounting variants - homecare and- residential care beds ............................... 6
2.3 Removal of the existing side rails ...................................................................... 7
2.4 Assembly of the side rail SR2 on homecare beds .............................................. 8
2.5 Assembly of the side rail SR2 on residential care beds ................................... 10
2.6 Disassembly of the side rail SR2 ...................................................................... 11
2.7 Operation of the side rail SR2 ......................................................................... 11
2.8 Transport, storage and operating conditions .................................................. 12
2.9 Disposal ........................................................................................................... 13
3 Cleaning, maintenance and disinfection ............................................................ 13
4 Regular inspections with service ........................................................................ 13
3EN
1 Preface and general instructions
This assembly and operation manual describes the assembly of the side rails system SR2 -
for the defined nursing care beds of Hermann Bock GmbH, and use of the side rail system
SR2 . Read these assembly instructions completely to avoid damage due to incorrect as-
sembly and handling.
Assembly of the side rail system is only to be carried out by qualified personnel and must
under no circumstances be carried out by a private user.
The installation of the side rail system SR2 is approved for the defined care beds from
the production date January 2016. Preparations on the nursing care bed are specified in
supplementary instructions.
This assembly and operation manual contains safety instructions. All persons who work
with the nursing care beds must be familiar with the contents of these instructions. Im-
proper operation can result in personal injuries.
1.1 Reference to the assembly and operation manual for the nursing care bed
The assembly and operation manual of the respective Hermann Bock GmbH nursing care
bed must be observed.
Bock Note
If you have received these instructions for assembly and use, then your product has additional
equipment that is not described in the main instructions for assembly and use. Therefore,
please attach these instructions to the main assembly and operating instructions.
1.2 Definition of person groups
Qualified personnel
Employees of the operator are referred to as qualified personnel. They are entitled to
deliver the nursing care bed, assemble, dismantle and transport it, based on their training
or instructions. Besides knowing how to operate, mount and dissemble the nursing care
bed, these persons must be instructed according to the guidelines concerning the cleaning
and disinfection of the nursing care bed.
1.3 Safety instructions
The intended use/operation of all moving parts is as important for the safety of the per-
sons in need of care as well as for the relatives and the caregivers/nursing staff to avoid
4EN
potentially dangerous situations. The prerequisite for this is the correct assembly and op-
eration of the side rails. When operating the side rails, it is also essential to take the indi-
vidual physical constitution of the person in need of care into account, as well as the type
and extent of the disability.
These recommendations apply particularly:
– if the person in need of care or the caregivers could be at risk due to those
accidental adjustments;
– if the side rails are in a raised position and there could be danger of trapping
and crushing,
– if children are unsupervised in the room with the bed.
The side rails should only be operated by trained caregivers or relatives or in the presence
of trained persons.
When adjusting the side rails, particular care must be taken to ensure that no limbs are
located in the side rails within the adjustment range.
Please note that the safety instructions in the main assembly and operating instructions
for the nursing care bed also applies.
When using the side rails on incompatible beds, entrapment may occur.
1.4 Service life / warranty
This side rail system SR2 has been designed, engineered and manufactured to function
safely over a long period of time. The service life depends on operating conditions and
frequencies. Please refer to the main assembly and operating instructions for your nursing
care bed.
Attention: Unauthorised technical changes to the product voids all warranty claims.
This product is not approved for the North American market, particularly not for the
United States of America (USA). Distribution and use of the nursing care bed in these
markets, including through third parties, is prohibited by the manufacturer.
5EN
2 General description of the functions
2.1 Construction design and function
The side rail system
All side rail variants serve to protect against falling out of bed. The side rail system SR2
allows a safe and convenient entry and exit at the same time. By means of a simple release
mechanism, each individual side rail element can be brought into a raised or lowered po-
sition.
2.2 Mounting variants - homecare and- residential care beds
Bracket for homecare beds Bracket for residential care beds
Suitable for the following nursing care Suitable for the following nursing care
beds: beds:
domiflex 1 livorno low
domiflex low practico 25|80
domiflex classic low practico 25|80 plus
domiflex 2 floorline 15|80
domiflex 2 wash
combiflex
belluno
practico economic
6EN
2.3 Removal of the existing side rails
When removing the existing rails, you must follow the steps for assembly of the side rails
given in the main assembly and use instructions of the nursing care bed in reverse order.
The further disassembly of the fittings is explained here.
Move the nursing bed to the highest posi-
tion for easier dismantling.
The two bars must be removed.
The fitting must also be removed from the
C-guide rail.
Loosen the screw at the bottom of the C-
guide rail, remove the fitting downwards
and put the screw connection back into
place.
Now the C-rail is without fittings and pre-
pared for the further installation of the
hinged side safety catch.
7EN
2.4 Assembly of the side rail SR2 on homecare beds
Move the nursing care bed to the highest
position for easier assembly.
Place the two brackets for the homecare
beds with the larger hole facing outwards
on the longitudinal frame towards the re-
spective end.
Connect the bracket with the screw
M8x40mm and the lock nut, screw it only
loosely.
The joint must still be able to slide on the
longitudinal frame.
Insert the shoulder bolt into the side rail.
8EN
Slide the spacer onto the shoulder bolt.
Push the side rail with the attachment bolt
into the larger hole as far as it will go.
Between the U-profile, adjust the sleeve
as a spacer when inserting.
From the inner side, tighten the screw as
shown.
Move the side rail SR2 to the upper posi-
tion.
Attention: The dimension between
the vertical outer edge of the side rail
and the nearest possible component
must be 30 mm in the horizontal di-
rection.
Tighten the upper screw M8x40mm.
Functional check. Lower the side rails and
put them back in place.
9EN
2.5 Assembly of the side rail SR2 on residential care beds
Move the nursing care bed to the highest posi-
tion for easier assembly.
Holes are provided on the longitudinal frame of
the nursing care bed for the side rails. These are
sealed with plastic plugs, please remove these
plastic plugs.
The brackets are now mounted on the longitudi-
nal frame. Note that the lower, larger hole faces
outward.
To do this, take the bracket as shown and fix it by
inserting the M8x60mm screw through the com-
ponent and the frame and tighten it.
The attachment bolt is now pushed through the
side rail SR2, with the attachment pointing out-
wards.
Then slide the spacer over the bolt from the in-
ner side.
The side rail SR2 is now pushed into the lower,
larger hole with the bolt as far as it will go.
10EN
Tighten the screw from the inside as shown in
the picture.
Functional check. Lower the side rails and put
them back in place.
2.6 Disassembly of the side rail SR2
Disassembly of the side rail SR2 is done in reverse order to assembly.
2.7 Operation of the side rail SR2
Each side rail element can be adjusted independently. The release button for the adjust-
ment is located in the middle of the side rail SR2, this release button must be pulled down-
wards and with the other hand pulled on the corresponding longitudinal bar of the side
rail.
To lower a side rail SR2, grap the upper bar of the side
rail with one hand and release the release button with
the other hand by pulling it slightly downwards.
The side rails SR2 can then be lowered in one longitudi-
nal movement
11EN
The side rail SR2 is now in the lowered position.
To move the side rail SR2 to the upper position, grap
the upper side rail with one hand and pull the side
guard rail upwards into the upper position, the re-
lease button clicks audibly into place. The side rail
SR2 is now in a pulled-up position.
Hazard note from Bock
Please note the increased risk of trapping caused by the raised side rails when adjusting the
backrest and upper leg rest.
When using different mattress thicknesses, the minimum height must not be below 22
cm, measured from the upper edge of the side rails above the mattress, without compres-
sion.
Therefore, the following measurements must be observed for safe use of the side rails:
Height above the mattress: ≥ 220mm
Gap dimensions between bars and to the lying surface:EN
2.9 Disposal
The individual material components made of plastic and metal are recyclable and can be
recycled in accordance with legal requirements. In general, when disposing of the device,
make sure that the components to be disposed of are not infectious or contaminated.
3 Cleaning, maintenance and disinfection
By following the care instructions in the main assembly and use instructions, the usability
and visual condition of your nursing care bed and side rails will be maintained for a long
time. The chapter "Cleaning, care and disinfection" for your nursing care bed applies to
the side rails.
4 Regular inspections with service
Regular inspections facilitate the maintaining of the highest possible safety level, and are
considered to be an important safety precaution. Medical devices must be inspected reg-
ularly in terms of safety according to the stipulated regulations of the manufacturer and
the generally accepted rules of technology. The chapter "Regular inspections with service"
of your nursing care beds applies to the side rails.
13EN
Hermann Bock GmbH
Nickelstr 12
D-33415 Verl, Germany
Tel.: +49 52 46 92 05 - 0
Fax: +49 52 46 92 05 - 25
Internet: www.bock.net
E-Mail: info@bock.net
Our SALES PARTNERS
Our business partners pursue the same strategy as we do: quality, innovation and above-average standards that
are internationally recognized. You can rely on our business partners as you can rely on us.
Please note that only our authorised personnel and our sales partners can provide training, supply of spare parts,
repairs, inspections and other service. Otherwise, all warranty claims will be void.
A listing of our current distributors can be found under www.bock.net/kontakt/vertriebspartner
© registered trademark
890.02524 Rev. 00
Current as of: 2021-05
Technical changes reservedES Instrucciones de uso y montaje Barandillas SR2 para domiflex 1 livorno baja domiflex baja practico 25|80 domiflex baja classic practico 25|80 plus domiflex 2 floorline 15|80 domiflex 2 wash combiflex belluno practico economic
ES

Estimado cliente:

Al tomar la decisión de comprar una barandilla de la casa Hermann Bock
GmbH, ha adquirido un producto terapéutico con una larga vida útil que
presenta una funcionalidad de primera clase y un máximo nivel de
seguridad.

Concentramos nuestra atención en las personas que requieren asistencia,
así como en ampliar la confianza de estas personas y en proteger su vida. Y
con este producto terapéutico hemos creado las condiciones necesarias
para ello.

Por su parte, usted, como usuario, deberá mantener de forma estricta las
advertencias de uso y seguridad y realizar las tareas de mantenimiento
necesarias para prevenir posibles errores de funcionamiento o riesgos de
accidentes.

 Klaus Bock

                                 2
ES
Índice de contenido
1 Prólogo y advertencias generales ........................................................................ 4
1.1 Consulta de las instrucciones de montaje y funcionamiento de la cama
articulada ....................................................................................................................... 4
1.2 Definición del grupo de personas...................................................................... 4
1.3 Advertencias de seguridad ................................................................................ 5
1.4 Vida útil/Garantía .............................................................................................. 5
2 Descripción general del funcionamiento .............................................................. 6
2.1 Diseño y funcionamiento .................................................................................. 6
2.2 Variantes de soporte - Asistencia domiciliaria y hospitalaria............................ 6
2.3 Desmontaje de las barandillas existentes ......................................................... 7
2.4 Montaje de la barandilla SR2 para las camas de asistencia domiciliaria........... 8
2.5 Montaje de la barandilla SR2 para camas asistenciales en residencias .......... 10
2.6 Desmontaje de la barandilla SR2 ..................................................................... 11
2.7 Uso de la barandilla SR2 .................................................................................. 11
2.8 Condiciones de transporte, almacenamiento y uso ........................................ 12
2.9 Eliminación ...................................................................................................... 13
3 Limpieza, cuidado y desinfección ....................................................................... 13
4 Inspecciones periódicas con servicio técnico...................................................... 13
3ES
1 Prólogo y advertencias generales
Estas instrucciones de montaje y uso describen el montaje de la barandilla SR2 para las
camas articuladas definidas de Hermann Bock GmbH, así como el uso de dicha barandilla
SR2. Lea estas instrucciones de montaje en su totalidad para evitar daños debidos a un
montaje y una manipulación incorrectos.
La instalación de la barandilla SR2 debe correr a cargo de personal especializado y en
ningún caso debe ser realizada por un usuario particular.
La instalación de la barandilla SR2 está aprobada para las camas de cuidados definidos
a partir de la fecha de fabricación enero de 2016. Los preparativos en la cama de
cuidados se especifican en las instrucciones complementarias.
Estas instrucciones de montaje y funcionamiento contienen advertencias de seguridad.
Todas las personas que trabajen con las camas articuladas deben conocer el contenido
de estas instrucciones. Un uso inadecuado puede provocar riesgos.
1.1 Consulta de las instrucciones de montaje y funcionamiento de la cama
articulada
Observe las instrucciones de montaje y funcionamiento de la cama articulada de Hermann
Bock GmbH que corresponda.
Advertencia de Bock
Si ha recibido estas instrucciones de montaje y uso, significa que su producto presenta un
equipamiento adicional que no se describe en las instrucciones principales de montaje y
funcionamiento. Por lo tanto, adjunte estas instrucciones a las instrucciones principales de
montaje y funcionamiento.
1.2 Definición del grupo de personas
Personal especializado
Se considera personal especializado a los trabajadores del operador que, en virtud de su
formación o la instrucción recibida, están autorizados a entregar, montar, desmontar y
transportar la cama articulada. Estas personas han recibido formación relativa a las
normas para la limpieza y la desinfección de la cama articulada, además de su manejo,
montaje y desmontaje.
4ES
1.3 Advertencias de seguridad
El uso debido de todos los componentes móviles es crucial, tanto para evitar riesgos para
la persona que necesita asistencia como para garantizar la seguridad de los familiares y
de los cuidadores profesionales. Para conseguir esto, es imprescindible realizar un
montaje y un manejo correctos de la barandilla. Del mismo modo, a la hora de utilizar la
barandilla, es preciso tener en cuenta la constitución física de la persona asistida, así como
el tipo y el alcance de la discapacidad que esta presenta.
Estas recomendaciones se aplican sobre todo
– cuando la persona asistida o el cuidador profesional pueden verse en peligro
debido a ajustes no deseados,
– cuando las barandillas se encuentran en la posición elevada y existe riesgo de
atrapamiento o aplastamiento,
– cuando hay niños no vigilados en la habitación en la que se encuentra la cama.
El manejo de la barandilla SR2 debe correr a cargo exclusivamente de cuidadores
profesionales o familiares que dispongan de la formación suficiente o actúen en presencia
de personas con la debida formación.
Al ajustar las barandillas SR2, asegúrese de que ningún miembro del paciente se encuentre
en el área de ajuste de las barandillas.
Recuerde asimismo, que también se aplican las instrucciones de seguridad que figuran en
las instrucciones principales de montaje y funcionamiento de la cama articulada.
Si se utilizan las barandillas SR2 en camas incompatibles, puede producirse un
atrapamiento.
1.4 Vida útil/Garantía
Esta barandilla SR2 se ha desarrollado, construido y fabricado para funcionar de forma
segura durante un período de tiempo prolongado. La vida útil depende de las condiciones
y de la frecuencia de uso. Consulte también las instrucciones principales de montaje y
funcionamiento de su cama articulada.
Atención: Si se realizan modificaciones técnicas no autorizadas en el producto, todas las
reclamaciones de la garantía quedarán anuladas.
Este producto no cuenta con la autorización para su uso en Norteamérica, en concreto
en los Estados Unidos (EE.UU.) de América. Así, el fabricante prohíbe la difusión y el uso
de esta cama articulada en estos mercados, aun cuando esto se realice a través de
terceros.
5ES
2 Descripción general del funcionamiento
2.1 Diseño y funcionamiento
La barandilla SR2
Todas las variantes de barandillas sirven para proteger al paciente frente a caídas. Las
barandillas SR2 permiten al mismo tiempo subir a la cama o bajar de ella con mayor
seguridad y comodidad. Un sencillo mecanismo de activación permite colocar todos los
elementos de la barandilla SR2 en una posición más alta o más baja.
2.2 Variantes de soporte - Asistencia domiciliaria y hospitalaria
Soporte para camas de asistencia Soporte para camas de asistencia en
domiciliaria residencias
Adecuado para las siguientes camas Adecuado para las siguientes camas
articuladas: articuladas:
domiflex 1 livorno baja
domiflex baja practico 25|80
domiflex baja classic practico 25|80 plus
domiflex 2 floorline 15|80
domiflex 2 wash
combiflex
belluno
practico economic
6ES
2.3 Desmontaje de las barandillas existentes
Al desmontar la barandilla existente, debe seguir los pasos de montaje indicados en las
instrucciones principales de montaje y funcionamiento para las barandillas en orden
inverso. El desmontaje posterior de los accesorios se explica aquí.
Coloque la cama en la posición más alta
para facilitar el desmontaje.
Los dos largueros deben ser desmontados.
El herraje también debe ser retirado del
riel
Afloje el tornillo de la parte inferior del
riel, retire el herraje hacia abajo y vuelva a
colocar la tuerca
Ahora el riel está sin herrajes y preparado
para el montaje posterior de la barandilla
SR2.
7ES
2.4 Montaje de la barandilla SR2 para las camas de asistencia domiciliaria
Coloque la cama articulada en la posición
más alta para facilitar el montaje.
Coloque los dos soportes para camas de
asistencia domiciliaria con el orificio más
grande hacia afuera sobre el borde
longitudinal y apuntando hacia el extremo
correspondiente.
Una el soporte con el tornillo M8×40mm y
la contratuerca y atorníllelo sin apretarlo
del todo.
La unión debe poder seguir deslizándose
sobre el borde longitudinal.
Introduzca el perno de fijación en la
barandilla.
8ES
Deslice el espaciador hacia el perno de
fijación.
Empuje la barandilla hasta el tope del
agujero más grande utilizando el perno de
fijación.
Entre el perfil en U, ajuste el manguito al
insertarlo como espaciador.
Apriete el tornillo desde el lado interior tal
como se muestra en la figura.
Mueva la barandilla hacia la posición
superior.
Atención: La dimensión entre el borde
exterior de la barandilla y el componente
más cercano posible debe ser de 30 mm
en la dirección horizontal.
Apriete el tornillo superior M8×40mm.
Prueba de funcionamiento. Baje la
protección lateral y vuelva a colocarla.
9ES
2.5 Montaje de la barandilla SR2 para camas asistenciales en residencias
Coloque la cama articulada en la posición más
alta para facilitar el montaje.
El borde longitudinal de la cama articulada
incorpora orificios para la barandilla SR2, que
están tapados con tapones de plástico. Así pues,
retire estos tapones.
Los soportes están ahora montados en el borde
longitudinal. Asegúrese de que el orificio inferior,
más grande, esté orientado hacia el exterior.
Para ello, tome el soporte tal como se muestra
en la figura y, a continuación, fíjelo introduciendo
el tornillo M8×60mm a través del componente y
del bastidor y apriételo.
Acto seguido, empuje el perno de fijación a
través de la barandilla, con la fijación apuntando
hacia fuera.
A continuación, deslice el espaciador sobre el
perno desde el lado interior.
Introduzca ahora la barandilla hasta el tope en el
orificio inferior, más grande, utilizando el perno.
10ES
Apriete el tornillo desde el lado interior tal como
se muestra en la figura.
Prueba de funcionamiento. Baje la barandilla y
vuelva a colocarla.
2.6 Desmontaje de la barandilla SR2
El desmontaje de la barandilla se realiza en orden inverso al montaje.
2.7 Uso de la barandilla SR2
Cada uno de los elementos de la barandilla SR2 puede regularse independientemente de
los demás componentes de dicha protección. El botón de activación para el ajuste se
encuentra en el centro de la barandilla. Tire hacia abajo de este botón de activación y,
después, tire del larguero correspondiente de la protección lateral.
Para bajar un elemento de la barandilla, agarre con una
mano el larguero superior de la protección lateral y, con
la otra, active el botón de activación tirando de él
ligeramente hacia abajo.
De este modo, la barandilla puede bajarse con un solo
movimiento longitudinal
11ES
La barandilla SR2 se encuentra ahora en la posición
bajada.
Para mover la barandilla SR2 a la posición superior,
sujete el larguero superior de dicha protección con
una mano y tire de la protección lateral hacia arriba.
En la posición superior, el botón de activación de
forma audible. La barandilla SR2 se encuentra ahora
en la posición elevada.
Advertencia de peligro de Bock
Tenga en cuenta el mayor riesgo de atrapamiento que surge al subir las barandilla, al ajustar
el respaldo y el apoyo para los muslos.
Si se utilizan diversos grosores de colchón, se debe alcanzar como mínimo una altura de
22 cm, medida desde el borde superior de la barandilla SR2 por encima del colchón sin
compresión.
Así pues, para utilizar de forma segura las barandillas, es preciso mantener las siguientes
medidas:
Altura por encima del colchón: ≥220 mm
Ranura entre el larguero y el somier:ES
2.9 Eliminación
Los diferentes componentes de plástico y metal son reciclables y pueden llevarse a un
lugar de reprocesamiento de acuerdo con las disposiciones legales que se encuentren en
vigor. En general, a la hora de realizar la eliminación, asegúrese de que los componentes
que va a eliminar no sean infecciosos ni estén contaminados.
3 Limpieza, cuidado y desinfección
Tenga en cuenta las instrucciones de cuidado incluidas en las instrucciones principales de
montaje y funcionamiento para mantener las propiedades de uso y el aspecto estético de
la cama articulada y de la barandilla SR2 durante más tiempo. El capítulo «Limpieza,
cuidado y desinfección» de la cama articulada se aplica también a la barandilla SR2.
4 Inspecciones periódicas con servicio técnico
Las inspecciones periódicas sirven para mantener el nivel de seguridad más alto posible y,
por lo tanto, representan una medida preventiva muy importante. Los productos
sanitarios deben someterse periódicamente a una inspección conforme a los plazos
predefinidos por el fabricante y siguiendo las reglas de la técnica reconocidas de forma
general. El capítulo «Inspecciones periódicas con servicio» de la cama articulada se aplica
también a la barandilla SR2.
13ES
Hermann Bock GmbH
Nickelstr. 12
D-33415 Verl
Teléfono: +49 52 46 92 05 - 0
Fax: +49 52 46 92 05 - 25
Página web: www.bock.net
Correo electrónico: info@bock.net
Nuestros DISTRIBUIDORES
Al igual que nosotros, nuestros socios comerciales apuestan por la calidad, la innovación y los servicios por encima
de la media que están reconocidos en el ámbito internacional. Así, depositamos en nuestros socios la misma
confianza que usted deposita en nosotros.
Tenga en cuenta que nuestro personal autorizado y nuestros distribuidores son los únicos que pueden encargarse
de impartir sesiones de formación, suministrar piezas de repuesto, realizar reparaciones o inspecciones y ofrecer
cualquier otro tipo de servicios. De lo contrario, todas las reclamaciones de garantía quedarán anuladas.
Puede consultar la lista de nuestros distribuidores actuales en la dirección
www.bock.net/kontakt/vertriebspartner
© Marca registrada
890.02524 Rev. 00
Versión: 2021-05
Sujeto a modificaciones técnicasFR Instructions de montage et d'utilisation Système de barrières latérales SR2 pour les modèles domiflex 1 livorno bas domiflex bas practico 25|80 domiflex bas classique practico 25|80 plus domiflex 2 floorline 15|80 domiflex 2 wash combiflex belluno practico economic
FR

Cher client,

en décidant d'acheter une barrière latérale de la société Hermann Bock
GmbH, vous disposez d’un équipement de soins de longue durée, doté de
fonctions haut de gamme et garantissant une sécurité optimale.

Ce produit est tout particulièrement adapté aux personnes nécessitant des
soins, dont la confiance doit être renforcée et la santé protégée. Ces condi-
tions ont été prises en compte lors de la conception de cet équipement de
soins.

Nous vous prions de respecter les consignes de sécurité et d'utilisation et
d'effectuer la maintenance nécessaire afin d'éviter les dysfonctionnements
éventuels et les risques d'accident.

 Klaus Bock

                                  2
FR
Sommaire
1 Avant-propos et informations générales .............................................................. 4
1.1 Référence aux instructions de montage et d'utilisation du lit médicalisé ........ 4
1.2 Définition des groupes de personnes ................................................................ 4
1.3 Consignes de sécurité ........................................................................................ 4
1.4 Durée de vie / Garantie ..................................................................................... 5
2 Description générale du fonctionnement ............................................................. 6
2.1 Construction et fonctionnement ....................................................................... 6
2.2 Variantes de fixation - Soins à domicile et soins institutionnels ....................... 6
2.3 Démontage des barrières latérales existantes .................................................. 7
2.4 Montage des barrières latérales SR2 aux lits médicalisés à domicile ............... 8
2.5 Montage des barrières latérales SR2 aux lits institutionnels .......................... 10
2.6 Démontage des barrières latérales SR2 .......................................................... 11
2.7 Fonctionnement des barrières latérales SR2 .................................................. 11
2.8 Conditions de transport, de stockage et de fonctionnement ......................... 12
2.9 Élimination ...................................................................................................... 13
3 Nettoyage, entretien et désinfection ................................................................. 13
4 Inspections régulières et service après vente ..................................................... 13
3FR
1 Avant-propos et informations générales
Ces instructions de montage et d'utilisation décrivent le montage des barrières latérales
SR2 aux lits médicalisés définis de la société Hermann Bock GmbH ainsi que l'utilisation de
ces barrières. Veuillez lire entièrement ces instructions de montage pour éviter tout dom-
mage dû à un montage ou manipulation incorrects.
L'installation des barrières latérales SR2 ne doit être effectuée que par du personnel qua-
lifié et ne doit en aucun cas être réalisée par un utilisateur privé.
L'installation des barrières latérales SR2 est approuvée pour les lits de soins définis à
partir de la date de fabrication janvier 2016. Les préparations sur le lit de soins sont
spécifiées dans les instructions supplémentaires.
Ces instructions d'utilisation contiennent des consignes de sécurité. Toutes les per-
sonnes qui travaillent avec les lits doivent connaître le contenu de ce manuel d'instruc-
tions. Une utilisation non conforme peut entraîner des risques.
1.1 Référence aux instructions de montage et d'utilisation du lit médicalisé
Les instructions de montage et d'utilisation du lit médicalisé correspondant de la société
Hermann Bock doivent être respectées.
Avertissement Bock
Si vous avez reçu ces instructions de montage et d'utilisation, votre produit possède des équi-
pements supplémentaires qui ne sont pas décrits dans les instructions de montage et d'utili-
sation principales. Par conséquent, veuillez joindre ce manuel aux instructions de montage et
d'utilisation principales.
1.2 Définition des groupes de personnes
Personnel spécialisé
Le personnel spécialisé désigne les employés de l'exploitant, qui sont habilités à livrer,
monter, démonter et transporter le lit médicalisé en raison de leur formation ou de leur
instruction. Ces personnes ont été initiées, outre à l'utilisation, au montage et au démon-
tage du lit médicalisé, également aux consignes de son nettoyage et de sa désinfection.
1.3 Consignes de sécurité
L'utilisation conforme de tous les composants mobiles s'avère primordiale aussi bien pour
éviter les risques pour la personne requérant des soins que pour garantir la sécurité des
proches et/ou du personnel soignant. La condition préalable à cela est l'installation et
l’utilisation correctes des barrières latérales. Il est également essentiel de tenir compte de
4FR
la constitution physique individuelle du résident ainsi que du type et de l'étendue de son
handicap lors de l'utilisation des barrières latérales.
Ces recommandations sont d'autant plus importantes
– lorsque le patient ou le soignant peut être mis en danger par des ajustements
involontaires,
– lorsque les barrières latérales sont en position relevée et qu'il existe des
risques d'écrasement et de coincement,
– lorsque des enfants sans surveillance se trouvent dans la pièce où se trouve
le lit.
Les barrières latérales ne doivent être utilisées que par le personnel soignant ou les
proches formés ou en présence de personnes formées.
Lors du réglage des barrières latérales, il convient de veiller tout particulièrement à ce
qu'aucun membre ne se trouve dans la section de réglage des barrières latérales. Veuillez
noter que les consignes de sécurité des instructions de montage et d’utilisation principales
s'appliquent également.
L'utilisation de pièces incompatibles présente un risque de coincement.
1.4 Durée de vie / Garantie
Cette barrière de sécurité latérale a été conçue, étudiée et fabriquée pour fonctionner en
toute sécurité pendant une longue période. La durée de vie dépend des conditions et des
fréquences d'utilisation. Veuillez également prendre note des instructions de montage et
d'utilisation principales de votre lit médicalisé.
Attention : toute modification technique non autorisée du produit annule la garantie.
Ce produit n'est pas approuvé pour le marché nord-américain, en particulier les États-
Unis (USA). Le fabricant n'autorise pas la commercialisation et l'utilisation du lit médi-
calisé dans ces marchés, même par l’intermédiaire des tiers.
5FR
2 Description générale du fonctionnement
2.1 Construction et fonctionnement
Barrières latérales SR2
Toutes les variantes de barrières latérales servent de protection contre les chutes. Les
barrières latérales SR2 permettent en même temps une entrée et une sortie sûres et pra-
tiques. Grâce à un mécanisme de déclenchement simple, chacun des éléments debar-
rières latérales peut être placé en position haute ou basse.
2.2 Variantes de fixation - Soins à domicile et soins institutionnels
Support pour lits médicalisés à domicile Support pour lits médicalisés institutionnels
Convient aux lits médicalisés suivants: Convient aux lits médicalisés suivants:
domiflex 1 livorno bas
domiflex bas practico 25|80
domiflex bas classique practico 25|80 plus
domiflex 2 floorline 15|80
domiflex 2 wash
combiflex
belluno
practico economic
6FR
2.3 Démontage des barrières latérales existantes
Lors du démontage barrières latérales existantes, il faut suivre les étapes de montage in-
diquées dans les instructions de montage et d'utilisation principales dans l'ordre inverse.
La suite du démontage de la quincaillerie est expliquée ici.
Pour faciliter le démontage veuillez placer
le lit médicalisé dans la position la plus
haute.
Les deux barres doivent être démontées.
Les fourches d’appui doivent également
être retirés du rail C.
Desserrez la vis au bas du rail C, retirez les
fourches d'appui vers le bas et replacez le
raccord à vis au bas du rail C.
Le rail C reste donc sans les fourches d’ap-
pui et est préparé pour l'installation des
barrières latérales SR2.
7FR
2.4 Montage des barrières latérales SR2 aux lits médicalisés à domicile
Mettez le lit médicalisé dans la position la
plus haute pour faciliter le montage.
Placez les deux supports prévus pour les
lits à domicile, avec le plus grand trou vers
l'extérieur, sur le cadre longitudinal vers le
bout respective.
Connectez le support avec la vis
M8x40mm et le contre-écrou, en le vis-
sant légèrement.
Cette connexion doit rester décalable sur
le cadre longitudinal.
Insérez le boulon de fixation dans la bar-
rière latérale.
8Sie können auch lesen