Kat.Nr.: 14.1550.01 Sousmatic Sous-Vide Garer Sousmatic Sous-Vide Cooker Sousmatic Cuiseur Sous Vide Sousmatic Sous-Vide Koker Sousmatic Fornello ...
←
→
Transkription von Seiteninhalten
Wenn Ihr Browser die Seite nicht korrekt rendert, bitte, lesen Sie den Inhalt der Seite unten
Kat.Nr.: 14.1550.01
Sousmatic Sous-Vide Garer
Sousmatic Sous-Vide Cooker
Sousmatic Cuiseur Sous Vide
Sousmatic Sous-Vide Koker
Sousmatic Fornello per Cottura Sottovuoto
Sousmatic Cocedor Sous-Vide
Fig. 01

                          E

                  D

                      A

              B

                  C

          F

     2
Fig. 02
D
C
A
B
E
F G
H
K
M
L
I N O P Q
3Bedienungsanleitung
Sousmatic Sous-Vide Garer
Kat.-Nr. 14.1550.01
Vielen Dank, dass Sie sich für dieses Gerät aus dem Hause TFA entschieden haben.
Bevor Sie mit dem Gerät arbeiten
Lesen Sie sich bitte die Bedienungsanleitung genau durch.
So werden Sie mit Ihrem neuen Gerät vertraut, lernen alle Funktionen und Bestandteile kennen, erfahren wichtige
Details für die Inbetriebnahme und den Umgang mit dem Gerät und erhalten Tipps für den Störungsfall.
Durch die Beachtung der Bedienungsanleitung vermeiden Sie auch Beschädigungen des Gerätes und die
Gefährdung Ihrer gesetzlichen Mängelrechte durch Fehlgebrauch. Für Schäden, die aus Nichtbeachtung dieser
Bedienungsanleitung verursacht werden, übernehmen wir keine Haftung.
Beachten Sie besonders die Sicherheitshinweise!
Bewahren Sie diese Bedienungsanleitung gut auf!
Lieferumfang:
• Sousmatic Sous-Vide Garer
• Abnehmbare Edelstahl-Schutzhülle
• Abnehmbare Halterung
• Netzstecker
Einsatzbereich und alle Vorteile Ihres neuen Gerätes auf einen Blick:
Sous-Vide ist eine Garmethode, bei der Fleisch, Fisch oder Gemüse schonend im Wasserbad bei einer konstant
niedrigen Temperatur zubereitet werden, typischerweise bei 45 bis 85 Grad.
Die rohen Zutaten werden vorher in einem Vakuumbeutel oder einem geeigneten Gefrierbeutel vakuumiert und
versiegelt. Je nach Gusto können Kräuter und Gewürze hinzugegeben werden. So entweicht keine Flüssigkeit, alles wird
saftig, zart, aromatisch und perfekt gegart mit 100 Prozent Geling-Garantie.
Zu Ihrer Sicherheit:
• Hinweise zu Personen im Haushalt: Das Gerät kann von Kindern ab 8 Jahren und von Personen mit verringerten
physischen, sensorischen oder mentalen Fähigkeiten oder Mangel an Erfahrung und/oder Wissen benutzt werden,
wenn sie beaufsichtigt werden oder bezüglich des sicheren Gebrauchs des Gerätes unterwiesen wurden und die
daraus resultierenden Gefahren verstanden haben. Das Gerät ist kein Spielzeug. Das Säubern und die Wartung
des Geräts dürfen von Kindern nur unter Aufsicht durchgeführt werden. Kinder unter 3 Jahren sollten dem Gerät
fernbleiben oder durchgehend beaufsichtigt werden. Kinder zwischen 3 und 8 Jahren sollten das Gerät weder
anschließen noch bedienen, säubern oder warten. Kinder sollten beaufsichtigt werden, um sicherzustellen, dass
sie nicht mit dem Gerät spielen.
• Das Produkt ist ausschließlich für den oben beschriebenen Einsatzbereich geeignet. Verwenden Sie das Produkt
nicht anders, als in dieser Anleitung dargestellt wird.
• Das eigenmächtige Reparieren, Umbauen oder Verändern des Gerätes ist nicht gestattet.
• Das Gerät nur mit Original-Zubehörteilen, unter Aufsicht und mit reinem Leitungswasser betreiben.
• Da beim Sous-Vide-Garen mit niedrigen Temperaturen gearbeitet wird, ist Hygiene und schnelle Verarbeitung der
Produkte erforderlich. Unterschreiten Sie nicht die in Ihrem Rezept angegebenen Temperaturen und Garzeiten.
Zur Kontrolle der Kerntemperatur empfehlen wir unser Sous-Vide-Thermometer (TFA 14.1552.01).
4Vorsicht! Lebensgefahr durch Stromschlag!
• Öffnen Sie auf keinen Fall das Gehäuse des Gerätes. Es besteht die Gefahr eines Stromschlages. Das Gerät
darf niemals komplett in Wasser getaucht werden.
• Überprüfen Sie das Gerät und den Netzstecker vor der Inbetriebnahme und jeder Nutzung auf Mängel und
Beschädigungen, die die Funktionssicherheit des Gerätes beeinträchtigen könnten. Benutzen Sie das Gerät nicht,
wenn Gehäuse oder Netzstecker beschädigt sind.
• Schließen Sie das Gerät nur an eine vorschriftsmäßig installierte Steckdose mit einer Netzspannung von
220 - 240V~ an!
• Das Bedienelement und der Netzstecker dürfen nicht mit Wasser oder Feuchtigkeit in Kontakt kommen.
• Das Gerät nur bis zur Markierung (MAX) mit Wasser in Berührung kommen lassen.
• Ziehen Sie sofort den Netzstecker aus der Steckdose, wenn eine Störung auftritt, nach jedem Gebrauch und vor
der Reinigung.
• Verwenden Sie ausschließlich den mitgelieferten Netzstecker.
• Ziehen Sie den Netzstecker nicht am Kabel aus der Steckdose.
• Verlegen Sie das Netzkabel so, dass es nicht mit scharfkantigen oder heißen Gegenständen in Berührung kommt.
Vorsicht!
Verletzungsgefahr:
• Die Geräte-Oberflächen, das Wasser, der Behälter und das Gargut können bei und nach dem Betrieb heiß
sein, Verbrennungsgefahr! Daher nur mit geeigneten Schutzhandschuhen anfassen.
• Nicht die Metallteile, insbesondere den Tauchsieder und den Propeller berühren.
• Verwenden Sie ein geeignetes Gefäß, in dem das Gerät einen stabilen Stand hat, Kippgefahr!
• Immer mit der Schutzhülle betreiben.
! Wichtige Hinweise zur Produktsicherheit!
• Setzen Sie das Gerät keinen extremen Temperaturen, Vibrationen und Erschütterungen aus.
• Tauchen Sie nicht das komplette Gerät ins Wasser, sonst kann Feuchtigkeit in das Gerät eindringen und zu
Fehlfunktionen führen. Nicht in der Spülmaschine reinigen.
• Betreiben Sie das Gerät auf einer wasserunempfindlichen, wärmebeständigen, ebenen Fläche.
• Betreiben Sie das Gerät nicht auf heißen Oberflächen (z.B. Herdplatten).
• Verwenden Sie nur hochwertige Vakuumbeutel, die auch erhitzt werden dürfen.
Bestandteile
(siehe Seite 2 und 3)
Gehäuse
Fig.01-A: Anschluss für Netzstecker auf der Rückseite des Gerätes
Fig.01-B: Halterung auf der Rückseite des Gerätes
Fig.01-C: Schutzhülle
Fig.01-F: Kunststoffabdeckung
Display
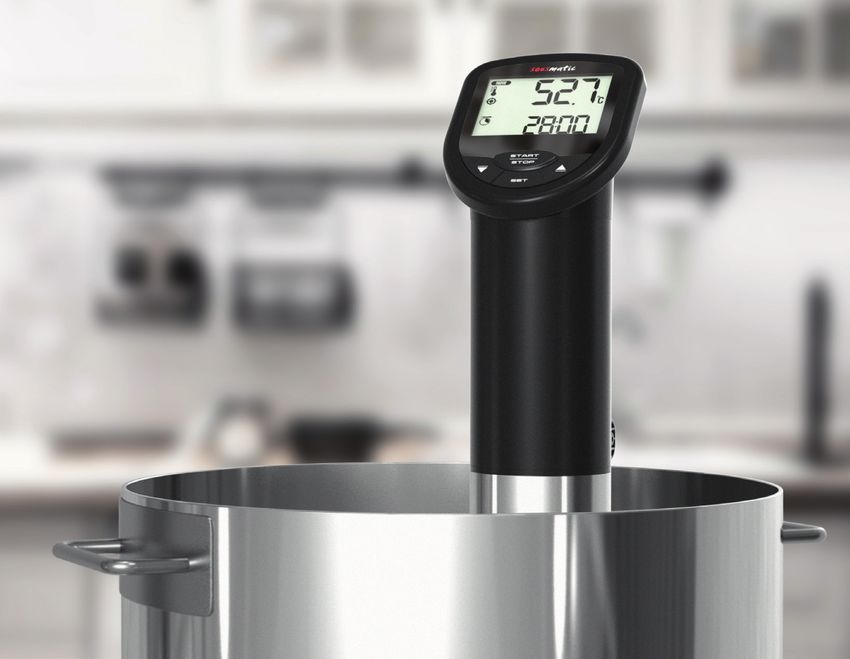
Fig.02-A: NOW = Indikator aktuelle Temperatur
Fig.02-B: Thermometer-Symbol = aktuelle Temperatur
Fig.02-C: Aktuelle Temperatur
Fig.02-D: Warnsymbol = niedriger Wasserstand
5Fig.02-E: Ziel-Symbol = Zieltemperatur genau erreicht
Fig.02-F: TARGET = Indikator Zieltemperatur
Fig.02-G: Rundumlaufendes Symbol = Gerät aktiviert
Fig.02-H: Timer-Symbol = Zeitdauer
Fig.02-I: Uhren-Symbol = Zeitverzögerung
Fig.02-K: Thermometer-Symbol = Zieltemperatur
Fig.02-L: Stopp-Symbol = Gerät schaltet sich aus
Fig.02-M: Zieltemperatur/ Zeitverzögerung/Kochdauer Std./ Min.
Tasten
Fig.01-D: Roter Ein- und Ausschalter auf der Rückseite des Gerätes
Fig.01-E: °C|°F Umschalter auf der Rückseite des Gerätes
Fig.02-N: q Taste
Fig.02-O: START/STOP Taste
Fig.02-P: TIMER Taste
Fig.02-Q: p Taste
Inbetriebnahme
Reinigen Sie das Gerät vor dem ersten Gebrauch äußerlich mit einem feuchten Lappen.
Stellen Sie einen Topf, einen Kunststoffbehälter oder ein anderes geeignetes hitzebeständiges Gefäß auf
eine ebene, stabile und temperaturbeständige Unterlage und befestigen Sie das Gerät mit dem Halter an der
Topfwand. Die abnehmbare Halterung verfügt über zwei Spannstufen, je nachdem in welche Aussparung diese
eingerastet wird.
Stecken Sie den Anschlussstecker in den Anschluss und schließen Sie das Gerät mit dem Netzstecker am
Stromnetz an. Wichtig! Stellen Sie sicher, dass Ihre Netzspannung nicht mehr als 240 V beträgt! Andere
Netzspannungen können zur Beschädigung des Gerätes führen.
Füllen Sie den Behälter mit lauwarmem Leitungswasser. Beachten Sie dabei die Minimum-Anzeige und die
Maximum-Anzeige auf der Vorderseite des Gerätes. Das Wasser sollte genau zwischen beiden Anzeigen stehen.
Legen Sie den vakuumierten Beutel mit dem Gargut ein. Achten Sie darauf, dass der Wasserstand
die MAX-Markierung nicht überschreitet. Die Beutel sollten immer vollständig mit Wasser bedeckt sein.
ACHTUNG!
Das Wasser verdampft durch das Erhitzen. Sinkt der Wasserstand unter die MIN-Markierung, ertönt
ein Dauersignalton, im Display werden das Stopp- und das Warnsymbol angezeigt und das Heiz-
element schaltet sich sofort aus. Füllen Sie in diesem Fall wieder Wasser nach und starten Sie das
Gerät erneut.
Stellen Sie den roten Schalter auf der Rückseite des Gerätes auf EIN.
Der rote Schalter leuchtet.
Alle Segmente werden kurz angezeigt.
Im Display erscheinen oben die Symbole NOW, ein Thermometer und die aktuelle
Temperatur, unten erscheinen die Symbole TARGET, ein Thermometer und 70,0°C (Voreinstellung) blinken.
Auswahl des Kochmodus
Einfaches Kochen
Stellen Sie mit der q oder p Taste die gewünschte Zieltemperatur ein.
Drücken Sie die START/STOP Taste, um den Kochprozess zu starten.
Das Gerät schaltet sich ein und ein rundumlaufendes Symbol erscheint in der Mitte des Displays. Das
Gerät beginnt, das Wasser zu zirkulieren und zu erhitzen.
Ist die eingestellte Temperatur genau erreicht, erscheint das Ziel-Symbol im Display.
6Kochen mit Zeitdauer
Drücken Sie die TIMER Taste. Das Timer-Symbol erscheint.
Das Thermometer-Symbol und 70,0°C (Voreinstellung) blinken. Stellen Sie mit der q oder p Taste die
gewünschte Zieltemperatur ein.
Drücken Sie die START/STOP Taste zur Bestätigung.
Das Timer-Symbol und 0:05 min (Voreinstellung) blinken. Stellen Sie mit der q oder p Taste in 5er-Schritten
die gewünschte Zeitdauer für den Kochprozess ein.
Drücken Sie die START/STOP Taste zur Bestätigung.
Drücken Sie die START/STOP Taste noch einmal, um den Kochprozess für die gewünschte Zeitdauer zu starten.
Das Gerät schaltet sich ein und ein rundumlaufendes Symbol erscheint in der Mitte des Displays. Der
Kochprozess beginnt.
Ist der Kochprozess beendet, ertönt ein Alarm und das Stopp-Symbol erscheint. Das Gerät schaltet das
Heizelement automatisch aus.
Kochzeitprogrammierung
Drücken und halten Sie die TIMER Taste für zwei Sekunden. Das Timer-Symbol und das Uhren-Symbol erscheinen.
Das Thermometer-Symbol und 70,0°C (Voreinstellung) blinken. Stellen Sie mit der q oder p Taste die
gewünschte Zieltemperatur ein.
Drücken Sie die START/STOP Taste zur Bestätigung.
Das Uhren-Symbol und 0:05 min (Voreinstellung) blinken. Stellen Sie mit der q oder p Taste in 5er-Schritten
die Zeitverzögerung ein, mit der der Kochprozess beginnen soll.
Drücken Sie die START/STOP Taste zur Bestätigung.
Das Timer-Symbol und 0:05 min (Voreinstellung) blinken. Stellen Sie mit der q oder p Taste in 5er-Schritten
die gewünschte Zeitdauer für den Kochprozess ein.
Drücken Sie die START/STOP Taste zur Bestätigung.
Drücken Sie die START/STOP Taste zur Aktivierung.
Das Uhren-Symbol und ein rundumlaufendes Symbol erscheinen und die Zeitanzeige zählt im Minutentakt
rückwärts bis zum Start.
Nach Ablauf der Zeit schaltet sich das Gerät automatisch ein und der Kochprozess beginnt.
Ist der Kochprozess beendet, ertönt ein Alarm und das Stopp-Symbol erscheint im Display. Das Gerät schaltet das
Heizelement automatisch aus.
Während des Kochprozesses
Fragen Sie mit der q oder p Taste die verbleibende Zeitverzögerung/Kochdauer und die Zieltemperatur ab.
Zum Anhalten und erneuten Starten drücken Sie die START/STOP-Taste.
Um den Kochprozess zu beenden und alle Einstellungen zu löschen, drücken und halten Sie die START/STOP-
Taste für 2 Sekunden.
Nach dem Kochprozess:
Entnehmen Sie vorsichtig das Gargut aus dem Wasser.
Schalten Sie das Gerät nach Gebrauch aus.
Nach dem Gebrauch den Netzstecker ziehen, das Gerät abkühlen lassen und reinigen.
Pflege und Wartung
Reinigen Sie das Gerät mit einem weichen, leicht feuchten Tuch. Keine Scheuer- oder Lösungsmittel verwenden!
Drehen Sie gegebenenfalls die Schutzhülle gegen den Uhrzeigersinn ab (siehe Markierung auf der Bodenplatte).
Zum Zusammenbauen nehmen Sie die Kunststoffabdeckung am unteren Ende ab. Drücken Sie den Spannhalter
auf. Setzen Sie die Edelstahlschutzhülle wieder auf. Die Aussparung auf der Schutzhülle muss an der Vertiefung
links unterhalb des Halters anliegen. Führen Sie dabei den Propeller vorsichtig durch die Öffnung. Verriegeln Sie
die Edelstahlschutzhülle im Uhrzeigersinn. Setzen Sie die Kunststoffabdeckung wieder auf.
Bewahren Sie das Gerät an einem trockenen Platz auf.
7 Überprüfen Sie das Gerät vor jeder Nutzung auf Kalkablagerungen.
Entkalken Sie das Gerät bei Bedarf wie unter Entkalken beschrieben.
Entkalken
Stellen Sie einen Behälter auf eine Unterlage und befestigen Sie das Gerät mit dem Halter an der Behälterwand.
Stecken Sie den Anschlussstecker in den Anschluss.
Füllen Sie den Behälter mit lauwarmem Leitungswasser. Das Wasser sollte genau zwischen der MIN und der MAX
Anzeige stehen.
Geben Sie Entkalker nach Anweisung dazu.
Stellen Sie den roten Schalter auf EIN.
Stellen Sie mit der q oder p Taste 70°C ein und drücken Sie die START/STOP Taste.
Schalten Sie das Gerät nach ca. 20 Minuten aus.
Ziehen Sie nach Gebrauch den Netzstecker und lassen Sie das Gerät abkühlen. Spülen Sie anschließend die
abnehmbaren Teile und den Tauchsieder mit kaltem Leitungswasser ab.
Problembehebung
Bitte beachten Sie, dass sich bei längerem Verwenden des Garers Ablagerungen (z.B. Kalk) am Heizstab und
den Sensoren bilden können. Unter Umständen kann dies eine Fehlfunktion auslösen. Um das zu verhindern,
empfehlen wir, während des Garprozesses dem Wasser etwas Zitronensäure oder Essig hinzuzufügen. So werden
Ablagerungen verhindert bzw. minimiert.
Das Gerät ist nicht zum Zubereiten, Erwärmen oder Warmhalten von Suppen, Soßen, Eintöpfen oder ähnlichen
Speisen geeignet. Das Gerät nur mit reinem Leitungswasser betreiben.
Entsorgung
Dieses Produkt wurde unter Verwendung hochwertiger Materialien und Bestandteile hergestellt, die recycelt und
wiederverwendet werden können.
Dieses Gerät ist entsprechend der EU-Richtlinie über die Entsorgung von Elektro- und Elektronik-Altgeräten
(WEEE) gekennzeichnet. Dieses Produkt darf nicht mit dem Hausmüll entsorgt werden. Der Nutzer ist
verpflichtet, das Altgerät zur umweltgerechten Entsorgung bei einer ausgewiesenen Annahmestelle für die
Entsorgung von Elektro- und Elektronikgeräten abzugeben.
Technische Daten
Temperaturbereich 40°C…95°C
Temperatur-Stabilität +/-0,1°C bei 60°C
Pumpleistung Ca. 11 l pro Minute
Wassermenge 25 Liter
Zirkulation der Wassermenge 360°
Betriebsspannung 220 – 240 V~ (EU)
Timer Bis zu 99 Std.
Wärmeleistung 1000 Watt
Spannungsversorgung Netzstecker 220 - 240 V~
Gehäusemaße 108 x 112 x 435 mm
Gewicht 1450 g (nur das Gerät)
TFA Dostmann GmbH & Co.KG, Zum Ottersberg 12, D-97877 Wertheim.
www.tfa-dostmann.de | www.sousmatic.de | info@tfa-dostmann.de
Diese Anleitung oder Auszüge daraus dürfen nur mit Zustimmung von TFA Dostmann veröffentlicht werden. Die
technischen Daten entsprechen dem Stand bei Drucklegung und können ohne vorherige Benachrichtigung geändert
werden. Die neuesten technischen Daten und Informationen zu Ihrem Produkt finden Sie unter Eingabe der Artikel-
Nummer auf unserer Homepage.
03/2017
8Instruction manual
Sousmatic Sous-Vide Cooker
Cat.-No. 14.1550.01
Thank you for choosing this device from TFA.
Before you use this product
Please make sure you read the instruction manual carefully.
This information will help you to familiarize yourself with your new device, to learn all of its functions and parts, to find
out important details about its first use and how to operate it and to get advice in the event of a malfunction.
Following and respecting the instructions in your manual will prevent damage to your instrument and loss of your
statutory rights arising from defects due to incorrect use. We shall not be liable for any damage occurring as a
result of non-following of these instructions.
Please take particular note of the safety advice!
Please keep this instruction manual safe for future reference.
Delivery contents
Sousmatic Sous-Vide Cooker
Removable stainless steel protective cover
Removable support
AC/DC power adaptor
Field of operation and all the benefits of your new device at a glance.
Sous vide is a food preparation method where meat, fish or vegetables are cooked gently
in a water bath at a constant low temperature, typically between 45 and 85 degrees celsius.
The raw ingredients are first vacuum packed and sealed in a vacuum sealer bag or a suitable freezer bag. The food can
be seasoned or have herbs added prior to cooking. This prevents moisture from escaping and everything comes out
succulent, tender, aromatic and perfectly cooked with a 100% guarantee of success.
For your safety:
Instructions for persons in the household: The appliance can be used by children from 8 years of age and
older, and by persons with limited physical, sensory or mental abilities, or with lack of experience or limited
knowledge, if they are supervised by a person who is responsible for their safety, or if they have been instructed
with regard to safe use of the appliance and have understood the dangers that can result from its use. The
appliance is not a toy. Children should only clean and maintain the appliance under supervision. Children under
the age of 3 should stay away from the appliance or they must be under constant supervision. Children between
3 and 8 years of age should neither connect nor operate the appliance, neither should they clean nor maintain
the appliance. Children should be supervised to ensure that they do not play with the appliance.
This product is exclusively intended for the range of application described above. The product should only be
used as described within these instructions.
Unauthorized repairs, alterations or changes to the product are prohibited.
Operate the device only with its genuine accessories, under supervision at all times and always use
clean tap water.
As vacuum cooking is processed at low temperatures, hygiene and quick processing of the food are essential. Do
not go below the temperatures and duration times as indicated in your recipe!
Use a sous-vide thermometer for the final control of the core temperature (e.g. TFA 14.1552.01).
9Caution!
Risk of electrocution!
Never open the appliance housing. This can result in electric shock. Never completely immerse the
appliance in water!
Before the first operation and before every use check the main body including the power cord thoroughly for any
defects, which may have adverse effects on the operational safety of the device. Do not use the device if the
housing or the power adapter are damaged.
Plug the device only into a socket installed according to safety regulations and with amains voltage
of 220 - 240V~!
The display device and the power adapter must not come into contact with water or moisture.
The device should only come into contact with water up to the MAX marking.
Always remove the plug from the wall socket in case of any malfunction, after each use and before cleaning.
Only use the supplied power adapter.
Do not pull the plug out of the socket by its cable.
Route the mains cable so it does not come into contact with sharp-edged or hot objects.
Caution!
Risk of injury:
The device surface, the water, the container and the cooked food can be hot during and after operation.
Risk of burn! Only touch with suitable protective gloves.
Do not touch the metal parts, in particular the immersion heater and the propeller.
Use a suitable container that guarantees a stable position of the device. Danger of tilting!
Always operate with the protective cover.
Important information on product safety!
Do not expose your device to extreme temperatures, vibrations or shocks.
Do not immerse the device completely in water. Water can penetrate and cause malfunction. Not suitable for
dishwasher.
Operate the device on a heat and water resistant flat surface.
Do not operate the device on hot surfaces (such as hotplates).
Use only high quality vacuum sealer bags suitable for heating.
Elements
(See page 2 and 3)
Housing
Fig.01-A: Socket for power adaptor at the back of instrument
Fig.01-B: Support at the back of instrument
Fig.01-C: Protective cover
Fig.01-F: Plastic cover
Display
Fig.02-A: NOW = current temperature icon
Fig.02-B: Thermometer symbol = current temperature
Fig.02-C: Current temperature
Fig.02-D: Warning symbol = low water level
Fig.02-E: Target symbol = exact target temperature is reached
Fig.02-F: TARGET = target temperature icon
Fig.02-G: Circular symbol = device activated
10Fig.02-H: Timer symbol = cooking time
Fig.02-I: Clock symbol = time delay
Fig.02-K: Thermometer symbol = target temperature
Fig.02-L: Stop symbol = device switches off
Fig.02-M: Target temperature/ delay / cooking time in hrs. / min.
Buttons
Fig.01-D: Red main power switch ON-OFF at the back of instrument
Fig.01-E: °C | °F switch at the back of instrument
Fig.02-N: q button
Fig.02-O: START/STOP button
Fig.02-P: TIMER button
Fig.02-Q: p button
Getting started
Clean the device outer surface with a soft damp cloth before the first use.
Place a cooking pot, a plastic or another suitable heat resistant container on a flat, stable and heat resistant
surface. Fasten the device support on the side of the pot or container. The removable bracket has two clamping
levels, depending on the gap which it is latched.
Insert the power adapter pin into the device jack and connect the plug to a wall socket. Important! Make sure
that your household voltage is no more than 240V! Otherwise your device may be damaged.
Fill the pot with lukewarm tap water. In this regard, pay attention to the Minimum and Maximum indicators on the
front of the appliance. The water level should be precisely between the two indicators.
Place the vacuum sealer bag containing the food into the device. Ensure that the water level does not go over the
MAX marking. Ensure that the bags are always surrounded by water.
Attention:
The water evaporates through the heating process. If the water level falls below the MIN marking, a permanent
alert will sound. The warning symbol and the stop symbol appear in the display and the heater will turn off
immediately. In this case add water and start the appliance once again.
Slide the red switch on the back of the instrument to the position „ON“.
The red switch lights up.
All segments will be displayed briefly.
The icon NOW, the thermometer symbol and the current temperature appear at the top part of the display; on the
bottom part appear the icon TARGET, the thermometer symbol and the temperature (70,0°C default) flash.
Select cooking mode
Simple cooking
Press the q or p button to set the desired target temperature.
Press the START/STOP button to start the cooking process.
The instrument turns on and a circular symbol will appear in the middle of the display. The water begins to
circulate and to heat.
When the exact target temperature is reached, the target symbol appears on the display.
Cooking with time duration
Press the TIMER button. The timer symbol appears on the display.
The thermometer symbol and 70,0°C (default) flash. Press the q or p button to set the desired target
temperature.
Press the START/STOP button to confirm.
11 The timer symbol and 0:05 min. (default) flash. Press the q or p button to set the desired time duration for the
cooking process in steps of 5 minutes each.
Press the START/STOP button to confirm.
Press the START/STOP button again to start the cooking process with the desired time duration.
The instrument turns on and the circular symbol appears in the middle of the display. The cooking process begins.
After the cooking is finished, an alarm sounds and the stop symbol appears. The device will turn off the heater
automatically.
Cooking time programming (with timer delay)
Press and hold the TIMER button for two seconds. The timer and the clock symbols appear.
The thermometer symbol and 70,0°C (default) flash. Press the q or p button to set the desired target
temperature.
Press the START/STOP button to confirm.
The clock symbol and 0:05 min. (default) flash. Press the q or p button to set the time delay for the cooking
process in steps of 5 minutes each.
Press the START/STOP button to confirm.
The timer symbol and 0:05 min. (default) flash. Press the q or p button to set the desired time duration for the
cooking process in steps of 5 minutes each.
Press the START/STOP button to confirm.
Press the START/STOP button again to activate the process.
The clock symbol and the circular symbol appear and the time display counts down the minutes.
After time has expired, the instrument will automatically switch on and the cooking process begins.
After the cooking process is finished, an alarm sounds and the stop symbol appears. The device will turn off the
heater automatically.
During the cooking process
Press the q or p button to check the remaining delay time/cooking time and target temperature.
You can stop and restart the cooking process with the START/STOP button.
Press and hold the START/STOP button for 2 seconds to finish the cooking process and reset all settings.
After finishing the cooking process
Take the cooked food carefully out of the water.
Turn off the instrument after use.
Pull the plug out of the socket, let the instrument cool down and clean it straight after.
Care and maintenance
Clean the device with a soft damp cloth. Do not use solvents or scouring agents. If necessary, turn the protective
cover counter-clockwise to remove it (see marking on the bottom).
For assembly, remove the plastic cover at the lower end. Press the support to lift it. Replace the stainless steel
cover. The gap on the protective cover must rest against the indentation left below the support. Carefully guide the
impeller through the opening. Lock the stainless steel protective cover clockwise. Replace the plastic cover.
Keep the device in a dry place.
Check the appliance for limescale deposits before each use.
If necessary, descale the applinace as described under descaling.
Descaling
Place a cooking pot on a surface and fasten the device support on the side of the pot.
Connect the plug to a wall socket.
Fill the pot with lukewarm tap water. The water level should be between the MIN and MAX markings.
Apply a descaler according to manufacturer.
12 Slide the red switch to the position „ON“.
Press the q or p button to set 70°C as target temperature and press the START/STOP button.
Switch off the instrument after 20 minutes.
Unplug the instrument and let it cool down. Then rinse the removal parts and the immersion heater
with cold tap water.
Troubleshooting
Please bear in mind that after the appliance is used for several times, deposits (such as limescale) may form on
the heater and the sensors and this may cause a malfunction. To prevent this, we recommend adding some citric
acid or vinegar to the water during the cooking process so such deposits are prevented or minimized.
The appliance is not suitable for preparing, reheating or keeping warm soups, sauces, stews or similar food.
Operate the device only with clean tap water.
Waste disposal
This product has been manufactured using high-grade materials and components which can be recycled and reused.
This product is labelled in accordance with the EU Waste Electrical and Electronic Equipment Directive
(WEEE).
Please do not dispose of this product with ordinary household waste. As a consumer, you are required
to take end-of-life devices to a designated collection point for the disposal of electrical and electronic
equipment, in order to ensure environmentally-compatible disposal.
Specifications
Temperature range 40°C…95°C
Temperature stability +/-0,1°C bei 60°C
Pump performance Approx. 11 l per minute
Water capacity 25 litre
Circulation 360°
Operating voltage 220 – 240V~ (EU)
Timer Up to 99 hrs.
Heat capacity 1000 Watt
Power consumption Power adapter 220 - 240V~
Housing dimension 108 x 112 x 435 mm
Weight 1450 g (device only)
TFA Dostmann GmbH & Co.KG, Zum Ottersberg 12, D-97877 Wertheim.
www.tfa-dostmann.de | www.sousmatic.de | info@tfa-dostmann.de
No part of this manual may be reproduced without written consent of TFA Dostmann. The technical data are correct at
the time of going to print and may change without prior notice.
The latest technical data and information about your product can be found by entering your product number on our
homepage.
03/2017
13Mode d’emploi
Sousmatic Cuiseur sous vide
N° de l’art. 14.1550.01
Nous vous remercions d’avoir choisi l’appareil de la Société TFA.
Avant d’utiliser votre appareil
Veuillez lire attentivement le mode d’emploi.
Vous vous familiariserez ainsi avec votre nouvel appareil, vous découvrirez toutes les fonctions et tous les éléments qui
le composent, vous noterez les détails importants relatifs à sa mise en service et vous lirez quelques conseils en cas
de dysfonctionnement.
En respectant ce mode d’emploi, vous éviterez d’endommager votre appareil et de perdre vos droits légaux en cas
de défaut si celui-ci résulte d’une utilisation non-conforme. Nous n’assumons aucune responsabilité pour des
dommages qui auraient été causés par le non-respect du présent mode d’emploi.
Suivez bien toutes les consignes de sécurité!
Conservez soigneusement le mode d’emploi!
Contenu de la livraison:
Sousmatic Cuiseur sous vide
Gaine de protection amovible en acier inoxydable
Fixation amovible
Adaptateur secteur
Aperçu du domaine d’utilisation et de tous les avantages de votre nouvel appareil:
La cuisson sous vide est une méthode permettant de cuire la viande, le poisson ou les légumes au bain marie, à
faible température constante, généralement entre 45 et 85 degrés. Les aliments à cuire sont préalablement mis
sous vide, dans un sac de conservation sous vide ou un sachet pour congélation adapté. Les aliments peuvent être
accompagnés d’herbes et d’épices. Le sachet hermétique permet aux aliments de conserver toute leur texture juteuse,
leur fondant, leurs arômes et assure une cuisson parfaite, avec 100 % de chances de réussite.
Pour votre sécurité:
Remarques relatives aux personnes vivant dans le foyer: Les enfants de plus de 8 ans et les personnes
dont les capacités physiques, sensorielles ou intellectuelles sont imitées ou dont l’expérience et/ ou les
connaissances sont insuffisantes, peuvent utiliser l’appareil sous surveillance ou après avoir été formés à une
utilisation sûre de l’appareil et aux dangers pouvant en résulter. L’appareil n’est pas un jouet. Le nettoyage et la
maintenance de l’appareil peuvent être exécutés par des clients, exclusivement sous surveillance. Les enfants
de moins de 3 ans doivent se tenir loin de l’appareil ou être surveillés en permanence. Les enfants âgés de 3
à 8 ans ne doivent ni brancher, ni utiliser, ni nettoyer ou entretenir l’appareil. Les enfants doivent être surveillés
afin de s’assurer qu’ils ne jouent pas avec l’appareil.
Le produit est destiné uniquement à l’utilisation décrite ci-dessus. N’utilisez jamais l’appareil à d’autres fins
que celles décrites dans le présent mode d’emploi.
Vous ne devez en aucun cas réparer, démonter ou modifier l’appareil par vous-même.
N’utilisez l’appareil qu’avec ses accessoires d’origine, sous surveillance et avec de l’eau du robinet pure.
La cuisson sous vide se faisant à basse température, l’hygiène et la cuisson rapide des aliments sont
essentielles. Les températures et heures de cuisson indiquées dans votre recette sont des limites inférieures à
ne pas dépasser!
Pour contrôler la température à cœur, nous recommandons d’utiliser un thermomètre
sous vide (TFA 14.1552.01)
14Attention! Danger de choc électrique!
Ne pas ouvrir le boîtier de l’appareil. Risque d’électrocution. L’appareil ne doit jamais être plongé dans
l’eau!
Avant la mise en service et toute utilisation, vérifiez soigneusement que l’appareil et l’adaptateur secteur ne
présentent aucun signe de détérioration qui pourrait avoir un effet néfaste sur la sécurité de fonctionnement de
l’appareil. N’utilisez pas l’appareil si le boîtier ou l’adaptateur secteur sont endommagés.
Branchez l’appareil uniquement sur une prise de courant réglementaire ayant une tension de
secteur de 220 - 240V~ !
L’élément de commande et l’adaptateur secteur ne doivent pas entrer en contact avec de l’eau ou de l’humidité.
Ne plongez l’appareil dans l’eau que jusqu’au marquage (MAX).
Retirez immédiatement la fiche de la prise en cas de défaut, après chaque usage ou avant le nettoyage.
Utilisez uniquement l’adaptateur secteur fourni.
Pour débrancher, tirez sur la fiche et non sur le cordon d’alimentation.
Placez le cordon d’alimentation de sorte qu’il n’entre pas en contact avec des objets tranchants ou brûlants.
Attention!
Danger de blessure:
Les surfaces de l’appareil, l’eau, la casserole et les aliments à cuire peuvent être brûlantes pendant et
après l’utilisation, danger de brûlure! Ne les saisissez-donc qu’avec des gants de cuisine adaptés.
Ne pas toucher les parties en métal, surtout le thermoplongeur et l’hélice.
Utilisez une casserole appropriée, permettant une position stable à l’appareil. Danger, l’appareil pourrait
autrement basculer!
Toujours utiliser avec la gaine de protection.
! Conseils importants de sécurité du produit!
Évitez d’exposer l’appareil à des températures extrêmes, à des vibrations ou à des chocs.
N’immergez pas l’appareil entièrement dans l’eau car de l’humidité pourrait y pénétrer et causer des
dysfonctionnements. Votre instrument ne peut pas être lavé au lave-vaisselle.
Utilisez l’appareil sur une surface plane, résistant à la chaleur et à l’humidité.
N’utilisez pas l’appareil sur des surfaces brûlantes (par ex. plaque de cuisson).
N’utilisez que des sacs sous vide de haute qualité résistant à la cuisson.
Composants
(voir page 2 et 3)
Boîtier
Fig.01-A: Prise pour l’adaptateur secteur au dos de l’appareil
Fig.01-B: Fixation au dos de l’appareil
Fig.01-C: Gaine de protection
Fig.01-F: Couvercle en plastique
Affichage
Fig.02-A: Icône NOW = Indicateur température actuelle
Fig.02-B: Symbole de thermomètre = Température actuelle
Fig.02-C: Température actuelle
Fig.02-D: Symbole d’avertissement = Niveau d’eau insuffisant
15Fig.02-E: Symbole de cible = Température souhaitée est atteinte
Fig.02-F: Icône TARGET = Indicateur température souhaitée
Fig.02-G: Symbole tournant = Appareil allumé
Fig.02-H: Symbole de minuteur = Durée de cuisson
Fig.02-I: Symbole d’horloge = Démarrage différé
Fig.02-K: Symbole de thermomètre = Température souhaitée
Fig.02-L: Symbole stop = L’appareil s’éteint
Fig.02-M: Température souhaitée/ démarrage différé / durée de cuisson en h / min.
Touches
Fig.01-D: Interrupteur rouge au dos de l’appareil
Fig.01-E: Interrupteur °C|°F au dos de l’appareil
Fig.02-N: Touche q
Fig.02-O: Touche START/STOP
Fig.02-P: Touche TIMER
Fig.02-Q: Touche p
Mise en service
Nettoyez les parties extérieures de l’appareil avant la première utilisation avec un chiffon humide.
Placez une casserole, un récipient en plastique ou un autre récipient résistant à la chaleur sur une surface plane,
stable et résistant à la chaleur et fixez l’appareil avec sa fixation sur le bord de la casserole. La fixation amovible
permet deux niveaux de serrage suivant l’encoche dans laquelle elle est clipsée.
Branchez le connecteur sur la prise de l’appareil et branchez-le au secteur avec l’adaptateur secteur. Important!
S’assurez-vous que la tension de réseau ne dépasse pas 240V~. Une autre tension de réseau pourrait
également endommager votre appareil.
Remplir la casserole d’eau du robinet tiède. Ce faisant, tenir compte du marquage Minimum et du marquage
Maximum sur la face avant de l’appareil. Le niveau d’eau doit se situer exactement entre les deux marquages.
Placez le sac de cuisson sous vide rempli des aliments à cuire dans l’eau. Veillez à ce que le niveau ne dépasse
pas le marquage MAX. Veillez à ce que les sachets soient toujours complètement recouverts d’eau.
Attention!
l’eau s’évapore en chauffant. Si le niveau d’eau descend en dessous du marquage MIN, un signal sonore retentit,
l’écran affiche le symbole stop et le symbole d’avertissement et e’élément chauffant s’arrête immédiatement.
Dans ce cas, rajouter de l‘eau et démarrer l’appareil.
Placez l’interrupteur au dos de l’appareil sur la position „marche“.
L’interrupteur rouge s’allume.
Tous les segments s’allument brièvement.
L’icône NOW, un symbole de thermomètre et la température actuelle apparaissent sur l’affichage supérieur. sur
e’affichage infétieur,l’icône TARGET, apparaît un symbole de thermomètre et 70,0°C (par défaut) clignotent.
Choix du mode de cuisson
Cuisson simple
Réglez la température souhaitée avec la touche q ou p.
Appuyez sur la touche START/STOP pour démarrer le processus de cuisson.
L’appareil s’allume et un symbole tournant apparaît au milieu sur l’écran. L‘appareil commence à
faire circuler l’eau et à la faire chauffer.
Lorsque la température souhaitée est atteinte exactement, le symbole de cible apparaît sur l’écran.
16Cuisson avec minuteur
Appuyez sur la touche TIMER. Le symbole de minuteur apparaît sur l‘écran.
Un symbole de thermomètre et 70,0°C (par défaut) clignotent. Réglez la température souhaitée avec
la touche q ou p.
Appuyez sur la touche START/STOP pour confirmer.
Le symbole de minuteur et 0:05 min. (par défaut) clignotent. Réglez avec la touche q ou p par écarts de 5 la
durée de cuisson souhaitée.
Appuyez sur la touche START/STOP pour confirmer.
Appuyez une deuxième fois sur la touche START/STOP pour démarrer le processus de cuisson pour la durée de
temps souhaitée
L’appareil s’allume et un symbole tournant apparaît au milieu sur l‘écran. Le processus de cuisson commence.
Lorsque le temps s’est écoulé, un signal sonore retentit et le symbole stop s’affiche. L’element chauffant s’arrête
automatiquement.
Programmation de l’horaire de cuisson
Appuyez sur la touche TIMER pendant deux secondes. Les symboles de minuteur et de l‘horloge apparaissent.
Le symbole de thermomètre et 70,0°C (par défaut) clignotent. Réglez la température souhaitée avec la touche
q ou p.
Appuyez sur la touche START/STOP pour confirmer.
Le symbole d’horloge et 0:05 min. (par défaut) clignotent. Réglez avec la touche q ou p par écarts de 5 le
temps de retard du démarrage de la cuisson.
Appuyez sur la touche START/STOP pour confirmer.
Le symbole de minuteur et 0:05 min. (par défaut) clignotent. Réglez avec la touche q ou p par écarts de 5 la
durée de cuisson souhaitée.
Appuyez sur la touche START/STOP pour confirmer.
Appuyez sur la touche START/STOP pour activer l‘appareil.
Le symbole d’horloge et un symbole tournant apparaissent et l’écran affiche le compte à rebours jusqu’au
démarrage de la cuisson.
Une fois cette durée écoulée, la cuisson démarre automatiquement. Le processus de cuisson commence.
Lorsque le temps de cuisson s’est écoulé, un signal sonore retentit et le symbole stop s’affiche. L’element
chauffant s’arrête automatiquement.
Pendant le processus de cuisson
Affichez le reste du temps de retard / temps de cuisson et la température souhaitée en appuyant sur la touche
q ou p.
Appuyez sur la touche START/STOP pour arrêter et redémarrer.
Pour interrompre le processus de cuisson et effacer tous les réglages, appuyez pendant 2 secondes sur la touche
START/STOP.
Après la cuisson:
Retirez délicatement le sac de cuisson de l’eau.
Eteignez votre appareil après chaque utilisation.
Débranchez le cordon d’alimentation après usage, laissez refroidir l’appareil et nettoyez-le.
Entretien et maintenance
Pour le nettoyage de votre appareil, utilisez un chiffon doux et humide. N’utilisez pas de solvants
ou d‘agents abrasifs! Dévissez la gaine de protection éventuellement dans le sens contraire des aiguilles d’une
montre (voir marquage sur la base de l’appareil).
17 Pour reconstruire l’appareil, retirez le couvercle de l’extrémité. Écartez le cintre. Replacez la gaine de protection
en inox. L’ouverture de la gaine de protection doit être placée sur le renfoncement à gauche en dessous du
cintre. Enfilez en même temps l’hélice avec précaution par l’ouverture. Verrouillez la gaine de protection en inox
dans le sens des aiguilles d’une montre. Replacez le couvercle en plastique.
Conservez votre appareil dans un endroit sec.
Vérifiez avant chaque utilisation que l’appareil n’est pas entartré.
Au besoin, détartrez l’appareil comme décrit au paragraphe « Détartrage »
Détartrage
Placez un récipient sur une surface plane et fixez l’appareil avec sa fixation sur le bord du récipient.
Branchez le connecteur au secteur avec l‘adaptateur.
Remplissez le récipient d’eau en veillant à ce que le niveau soit entre les marquages MIN et MAX.
Ajouter du produit détartrant suivant les indications du fabriquant.
Placez l’interrupteur rouge sur la position « marche ».
Réglez la température à 70°C avec la touche q ou p et appuyez sur la touche START/STOP.
Éteignez votre appareil après 20 minutes.
Débranchez le cordon d’alimentation après usage et laissez refroidir l’appareil. Rincez ensuite les parties
amovibles et le thermoplongeur à l’eau froide du robinet.
Dépannage
Lors d’utilisations prolongées ou régulières de l’appareil, du calcaire ou d’autres dépôts peuvent s’accumuler
sur l’élément de chauffage et les senseurs. Cela peut engendrer un dysfonctionnement de l’appareil. Afin d’éviter
cela, nous conseillons d’ajouter un peu d’acide citrique ou de vinaigre à l’eau pendant le processus de cuisson.
Vous éviterez ainsi les dépôts ou les éliminerez.
L’appareil n’est pas prévu pour préparer, réchauffer ou conserver au chaud soupes, sauces, potées ou plats
similaires. N’utilisez l’appareil qu’avec de l’eau pure du robinet.
18Traitement des déchets
Ce produit a été fabriqué avec des matériaux de haute qualité qui peuvent être recyclés et réutilisés.
Cet appareil est conforme aux normes de l’UE relatives au traitement des déchets électriques et
électroniques (WEEE).
L’appareil usagé ne doit pas être jeté dans les ordures ménagères. L’utilisateur s’engage, pour le respect
de l’environnement, à déposer l’appareil usagé dans un centre de traitement agréé pour les déchets
électriques et électroniques.
Caractéristiques techniques
Plage de température 40°C…95°C
Stabilité de température +/-0,1°C à 60°C
Puissance de la pompe Env. 11 litres par minute
Quantité d’eau 25 litres
Circulation de la quantité d’eau 360°
Tension d’alimentation 220 – 240 V~ EU
Minuteur Jusqu‘à 99 heures
Puissance calorifique 1000 Watt
Alimentation Adaptateur secteur 220 - 240 V~
Dimensions du boîtier 108 x 112 x 435 mm
Poids 1450 g (appareil seulement)
TFA Dostmann GmbH & Co.KG, Zum Ottersberg 12, D-97877 Wertheim.
www.tfa-dostmann.de | www.sousmatic.de | info@tfa-dostmann.de
La reproduction, même partielle du présent mode d‘emploi est strictement interdite sans l’accord explicite de TFA
Dostmann. Les spécifications techniques de ce produit ont été actualisées au moment de l’impression et peuvent être
modifiées, sans avis préalable.
Les dernières données techniques et des informations concernant votre produit peuvent être trouvées en entrant le
numéro de l‘article sur notre site.
03/2017
19Gebruiksaanwijzing
Sousmatic Sous-Vide Koker
Cat.-Nr. 14.1550.01
Hartelijk dank dat u voor dit apparaat van de firma TFA hebt gekozen.
Voordat u met het apparaat gaat werken,
leest u a.u.b. de gebruiksaanwijzing aandachtig door.
Zo raakt u vertrouwd met uw nieuw apparaat en leert u alle functies en onderdelen kennen, komt u belangrijke details
te weten met het oog op het in bedrijf stellen van het apparaat en de omgang ermee en krijgt u tips voor het geval
van een storing. Door rekening te houden met wat er in de handleiding staat, vermijdt u ook beschadigingen van het
product en riskeert u niet dat uw wettelijke rechten door verkeerd gebruik niet meer gelden. Voor schade die wordt
veroorzaakt doordat u geen rekening houdt met de handleiding aanvaarden wij geen aansprakelijkheid.
Volg in elk geval de veiligheidsinstructies op !
Deze gebruiksaanwijzing goed bewaren a.u.b.!
Levering:
Sousmatic Sous-Vide koker
Afneembare beschermkap uit roestvrij staal
Afneembare houder
Stroomadapter
Hoe u uw nieuw apparaat kunt gebruiken en alle voordelen ervan in één oogopslag:
Sous-vide is een gaarmethode waarbij het vlees, de vis of de groenten zorgvuldig worden bereid in een waterbad met
een constante, lage temperatuur, meestal tussen 45 en 85 graden.
De rauwe ingrediënten worden vooraf in een vacuümzak of in een geschikte diepvrieszak gevacumeerd en gesloten.
Naar smaak kunnen nog kruiden en specerijen worden toegevoegd. Op die manier kan er geen vloeistof ontsnappen,
blijft alles sappig en zacht en blijven de aroma’s behouden, een perfecte garing is verzekerd.
Voor uw veiligheid:
Instructies m.b.t. personen in het huishouden: Het apparaat kan door kinderen worden gebruikt die 8 jaar zijn
of door personen met gebrekkige fysieke, sensorische of geestelijke vaardigheden of gebrek aan ervaring en/
of kennis hebben, mits zij onder toezicht staan of instructies hebben gekregen aangaande het veilige gebruik
van dit apparaat en de hieruit resulterende gevaren begrepen hebben. Het apparaat is geen speelgoed. Het
schoonmaken en onderhouden van het apparaat mag uitsluitend onder toezicht worden uitgevoerd. Kinderen
onder 3 jaar moeten uit de buurt van het apparaat blijven of voortdurend onder toezicht staan. Kinderen tussen
3 en 8 jaar mogen het apparaat noch aansluiten, noch bedienen, noch schoonmaken of onderhouden. Kinderen
moeten onder toezicht staan om te waarborgen dat zij niet met het apparaat spelen.
Het product is uitsluitend geschikt voor de hierboven beschreven doeleinden. Gebruik het product niet anders
dan in deze handleiding is aangegeven.
Het eigenmachtig repareren, verbouwen of veranderen van het apparaat is niet toegestaan.
Als het apparaat wordt gebruikt moet er op worden gelet dat enkel oorspronkelijke bijbehorende hulpstukken
worden gebruikt, het apparaat te allen tijde onder toezicht is en dat de pot gevuld is met schoon kraanwater.
Aangezien vacuüm koken bij lage temperaturen wordt gedaan, zijn hygiëne en een snelle verwerking van het
voedsel van essentieel belang. Houd de in het recept aangegeven minimale temperaturen en garingstijden aan.
Voor de laatste controle van de interne temperatuur gebruikt u een sous-vide thermometer (TFA 14.1552.01).
20Voorzichtig! Levensgevaar door elektrocutie!
Open in geen geval de behuizing van het apparaat. Er bestaat gevaar van een stroomstoot. Het apparaat
mag nooit compleet in water gedompeld worden!
Voordat het apparaat wordt gebruikt moet zowel het apparaat inclusief de stroomadapter eerst zorgvuldig op
eventuele defecten worden gecontroleerd, die ongewenste effecten kunnen hebben op de gebruiksveiligheid
van het apparaat. Gebruik het apparaat niet wanneer de behuizing of de netvoeding beschadigd is.
Sluit het apparaat uitsluitend aan op een volgens de voorschriften geïnstalleerd stopcontact met een
netspanning van 220 - 240V~!
Het bedieningsorgaan en de netvoeding mag niet met water of vocht in aanraking komen.
Vul de pot maximaal tot aan de markering (MAX) met water.
Trek altijd direct de stekker uit het stopcontact in het geval van een storing, na elk gebruik en voor u het
apparaat reinigt.
Gebruik uitsluitend de bijbehorende stroomadapter.
Trek de stekker niet aan de kabel uit het stopcontact.
Leg het snoer zo neer dat het niet met scherpe of hete voorwerpen in aanraking komt.
Voorzichtig!
Kans op letsel:
De onderdelen van het apparaat, het water, de pan en het te garen product kunnen tijdens en na gebruik
heet zijn; let op verbrandingsgevaar! Pak daarom alleen met geschikte beschermende handschoenen vast.
Raak de metalen onderdelen, met name de dompelaar en propeller, niet aan.
Gebruik een geschikte schaal waarin het apparaat een stabiele stand heeft, kantelgevaar!
Het apparaat alleen gebruiken met de beschermkap.
! Belangrijke informatie voor de productveiligheid!
Stel het apparaat niet bloot aan extreme temperaturen, trillingen en schokken.
Dompel het apparaat niet compleet in water, anders kan er vocht binnendringen en dit tot functiestoringen
leiden. Niet geschikt voor de vaatwasser.
Gebruik het apparaat op een warmte- en vochtbestendig oppervlak.
Gebruik het apparaat niet op warme oppervlakken (zoals kookplaten).
Alleen hoogwaardige vacuüm zakken, geschikt voor het opwarmen, moeten gebruikt worden.
Onderdelen
(zie blz 2+3)
Behuizing
Fig.01-A: Adapter aansluiting aan de achterkant van het apparaat
Fig.01-B: Houder aan de achterkant van het apparaat
Fig.01-C: Beschermkap
Fig.01-F: Kunststofkap
Display
Fig.02-A: NOW = Indicator actuele temperatuur
Fig.02-B: Thermometersymbool = Actuele temperatuur
Fig.02-C: Momentane temperatuur
Fig.02-D: Waarschuwingssymbool = Te laag waterpeil
Fig.02-E: Doelsymbool = Ingestelde temperatuur bereikt
21Fig.02-F: TARGET = Indicator ingestelde temperatuur
Fig.02-G: Ronddraaiend symbool = Apparaat geactiveerd
Fig.02-H: Timersymbool = Kooktijd
Fig.02-I: Kloksymbool = Delay-tijd
Fig.02-K: Thermometersymbool = Ingestelde temperatuur
Fig.02-L: Stopsymbool = Apparaat schakelt zich uit
Fig.02-M: Ingestelde temperatuur/delay-tijd/kooktijd in uren/min.
Toetsen
Fig.01-D: ON/OFF schakelaar op de achterkant van het apparaat
Fig.01-E: °C|°F schakelaar op de achterkant van het apparaat
Fig.02-N: q toets
Fig.02-O: START/STOP toets
Fig.02-P: TIMER toets
Fig.02-Q: p toets
Inbedrijfstelling
Reinig het product voor het eerste gebruik met een vochtige doek.
Plaats een pan, een kunststofschaal of een andere geschikte hittebestendige bak op een vlakke, stabiele en
warmtebestendige ondergrond en bevestig het apparaat met de clip aan de wand van de pan. De afneembare
clip heeft twee standen, afhankelijk van de uitsparing waarin deze wordt vergrendeld.
Steek de netadapter in de daarvoor bestemde toegang en sluit het apparaat met de stekker in het stopcontact
aan. Belangrijk! Zorg ervoor dat de spanning van het stroomnet onder 240 V ligt! Andere netspanningen kunnen
het toestel beschadigen.
Vul de pan met lauw leidingwater. Let hierbij op de minimumindicatie en de maximumindicatie op de voorkant
van het apparaat. Het water moet precies tussen beide indicaties staan.
Leg de gevacumeerde zak met het te garen product in de pan. Let erop dat het waterniveau daardoor niet stijgt
tot boven de MAX-markering. Let op dat de zakken altijd omgeven zijn door water.
Let op!
Het water verdampt door het verwarmen. Als het waterniveau onder de MIN-markering daalt, klinkt er een
aanhoudende toon en verschijnt er op het display het stop- en waarschuwingssymbool en schakelt het
verwarmingselement zich direct uit. Vul in dit geval water bij en start het apparaat opnieuw.
Schuif de rode schakelaar op de instelling ON.
De rode schakelaar brandt.
Alle segmenten verschijnen kort.
NOW, het thermometersymbool en de actuele temperatuur verschijnen boven op het display, beneden verschijnen
TARGET, het thermometersymbool en 70,0°C (standaardinstelling) knippert.
Selectie van de kookmodus
Makkelijk koken
Met de q of p toets kunt u de gewenste temperatuur instellen.
Druk op de START/STOP-knop om het kookproces te starten.
Het apparaat schakelt zich in en in het midden van het display wordt een ronddraaiend pictogram weergegeven.
Het apparaat begint het water te circuleren en te verhitten.
Wanneer de ingestelde temperatuur is bereikt wordt in het display het doelpictogram weergegeven.
Koken met tijdinstelling
Druk op de TIMER toets. Het timersymbool verschijnt op het display.
Het thermometersymbool en 70,0°C (standaardinstelling) knipperen. Met de q of p toets kunt u de gewenste
22Sie können auch lesen