SX100
Speedbike

            DE

            EN

            ES

            FR

            IT

            NL
←
→
Transkription von Seiteninhalten
Wenn Ihr Browser die Seite nicht korrekt rendert, bitte, lesen Sie den Inhalt der Seite unten
SX100
Speedbike
DE
EN
ES
FR
IT
NL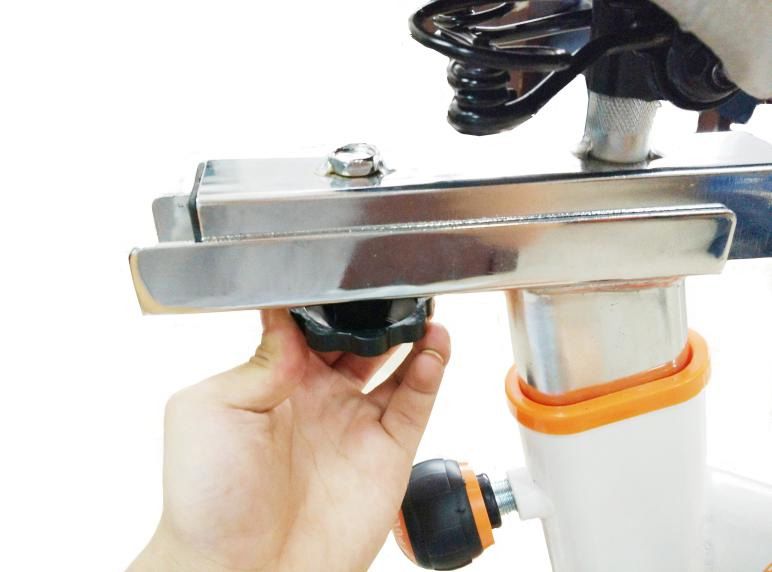
2
Sehr geehrter Kunde,

wir freuen uns, dass Sie sich für ein Gerät aus der SPORTSTECH Produktpalette entschieden haben.
SPORTSTECH Sportgeräte bieten Ihnen höchste Qualität und neueste Technologie.

Um die Leistungsfähigkeit des Gerätes voll nutzen zu können und viele Jahre Freude an Ihrem Gerät zu
haben, lesen Sie bitte vor der Inbetriebnahme und dem Beginn des Trainings dieses Benutzerhandbuch
sorgfältig durch und verwenden Sie das Gerät den Anweisungen entsprechend. Die Betriebssicherheit        DE
und die Funktion des Gerätes können nur dann gewährleistet werden, wenn die Sicherheitshinweise in
diesem Benutzerhandbuch beachtet werden. Wir übernehmen keine Haftung für Schäden, die durch
unsachgemäßen Gebrauch bzw. fehlerhafte Bedienung entstehen.

      i
                  Bitte stellen Sie sicher, dass alle Personen, die das Gerät verwenden, das Benutzer-
                  handbuch gelesen und verstanden haben.

Bewahren Sie das Benutzerhandbuch an einem sicheren Ort auf, um im
Bedarfsfall jederzeit darauf zurückgreifen zu können.

                                                                                Stand: 01.02.2021

                                                 3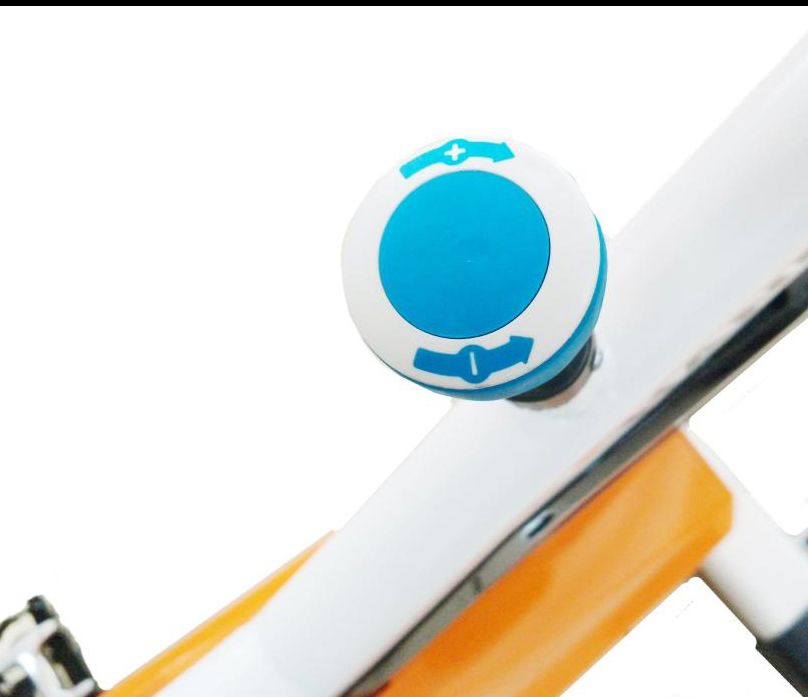
Unsere Video Tutorials für dich!
                   Aufbau, Benutzung, Abbau.
                        1. QR-Code scannen
                        2. Videos anschauen
                        3. Schnell und sicher starten

                                Link zu den Videos:
                   https://service.innovamaxx.de/sx100_video

            Uns gibt es auch auf Social Media!
   Hol dir die neuesten Produktinfos, Trainingsinhalte uvm. auf unserer:
            Instagram-Seite                              Facebook-Seite

https://www.instagram.com/sportstech.de       https://www.facebook.com/sportstech.de

                                          4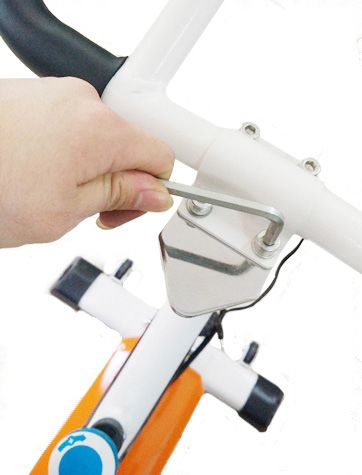
INHALT
1.   WICHTIGE SICHERHEITSHINWEISE............................................................................... 6
2.   EXPLOSIONSZEICHNUNG/ERSATZTEILLISTE.................................................................. 7
3.   AUFBAUANLEITUNG.................................................................................................... 8
4.   KONSOLEN-BEDIENUNG .......................................................................................... 12
5.   TRAININGSINFORMATIONEN...................................................................................... 13
6.   DEHNÜBUNGEN....................................................................................................... 14
7.   ENTSORGUNG......................................................................................................... 15   DE

                                                              5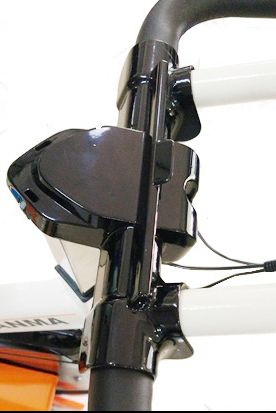
WICHTIGE SICHERHEITSHINWEISE

       !
                Diese allgemeinen Sicherheitsinformationen müssen unbedingt für die Benutzung dieses
                Produkts beachtet werden. Lesen Sie alle Hinweise, bevor Sie das Produkt in Benutzung
                nehmen.

1. Halten Sie Kinder und Haustiere zu allen Zeiten außer Reichweite des Speedbikes. Lassen Sie Kinder auf KEINEN
   FALL unbeaufsichtigt mit dem Gerät im selben Raum.
2. Erkrankte oder Menschen mit Behinderung sollten das Speedbike nur unter Aufsicht eines ausgebildeten
   Physiotherapeuten oder Arztes benutzen.
3. Sollten Sie Schwindel, Übelkeit, Schmerzen in der Brust oder andere abnormale Symptome verspüren, unterbrechen
   Sie sofort Ihr Training und SUCHEN SIE EINEN ARZT AUF.
4. Bevor Sie mit dem Training beginnen, entfernen Sie alle Gegenstände innerhalb eines Radius von 2 Metern.
   Platzieren Sie KEINE scharfen oder spitzen Gegenstände in der Nähe des Speedbikes.
5. Stellen Sie das Speedbike auf einer freien, ebenen Fläche auf, an der es weder feucht noch nass ist. Legen Sie eine
   Matte darunter, um das Sportgerät zu stabilisieren und den Boden vor Kratzern zu schützen.
6. Gebrauchen Sie das Speedbike ausschließlich für den vorgeschriebenen Zweck und wie in diesem Handbuch
   beschrieben. Verwenden Sie KEIN Zubehör, welches nicht ausdrücklich vom Hersteller empfohlen wurde.
7. Halten Sie sich beim Montieren des Sportgerätes genauestens an die hier enthaltene Aufbauanleitung.
8. Überprüfen Sie vor erstmaligem Gebrauch alle Bolzen und anderen Verbindungselemente und gehen Sie sicher, dass
   sich das Speedbike in einem ordnungsgemäßen Zustand befindet.
9. Führen Sie eine regelmäßige Routineinspektion Ihres Fitness-Geräts durch. Legen Sie dabei ein besonderes
   Augenmerk auf Verschleißteile und Teile, die sich möglicherweise beim Gebrauch lösen könnten, wie zum Beispiel
   Schrauben und Räder. Defekte Teile sollten sofort ersetzt werden. Nur so kann die Sicherheit bei ihrem Sportgerät
   gewährleistet werden. Sehen Sie bitte vom weiteren Gebrauch ab, bis eine ordnungsgemäße Reparatur durchgeführt
   wurde.
10. Besteht ein Funktionsmangel bei Ihrem Speedbike, darf dieses UNTER KEINEN UMSTÄNDEN betrieben werden.
11. Dieses Gerät darf immer nur von einer einzelnen Person benutzt werden.
12. Benutzen Sie keine Scheuermittel oder ätzende Reinigungsmittel zum Säubern des Geräts. Wischen Sie
    Schweißtropfen direkt nach dem Training mit einem weichem Tuch vom Gerät ab.
13. Tragen Sie immer geeignete Trainigskleidung für das Workout. Hierzu zählt auch geeignetes Schuhwerk, wie Lauf-
    oder Aerobic-Schuhe.
14. Vor dem Training sollten Sie sich immer mit Dehnübungen aufwärmen.
15. Die Drehmomentskraft des Gerätes nimmt mit steigender Geschwindigkeit zu und umgekehrt. Das Speedbike verfügt
    über einen Einstellknauf, über den Sie den Widerstand anpassen können.
 WARNUNG

           Konsultieren Sie einen Arzt, bevor Sie trainieren. Dieser Hinweis ist unbedingt für ältere oder
           gesundheitlich eingeschränkte Personen zu beachten. Lesen Sie alle Sicherheitshinweise dieser
           Anleitung sorgfältig, bevor Sie das Gerät benutzen. Wir übernehmen keine Verantwortung für
           Personen- oder Sachschäden, die durch den Gebrauch dieses Produkts entstehen.

                                                          6
EXPLOSIONSZEICHNUNG/ERSATZTEILLISTE

           Unter folgendem Link
    finden Sie die Explosionszeichnung
           und die Ersatzteilliste:
                                                    DE
   https://service.innovamaxx.de/sx100_spareparts

                        7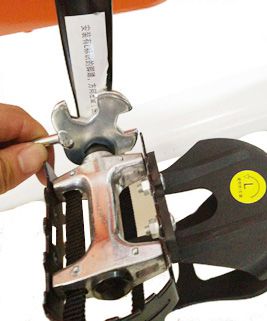
AUFBAUANLEITUNG

 BEACHTEN SIE:

 A.     Vor der Montage ist darauf zu achten, ausreichend Platz um die Aufbaustelle frei zu halten.
 B.     Nutzen Sie das im Lieferumfang enthaltene Werkzeug zur Montage.
 C.     Überprüfen Sie vor dem Aufbau alle benötigten Teile auf Vollständigkeit. Unter dem QR-Code/Link auf der
        vorherigen Seite finden Sie eine nummerierte Explosionszeichnung mit allen Einzelteilen, aus denen das
        Speedbike besteht.

                                         Alle Bauteile und vormontierten Teile
                                                     fest anziehen!

Montage-Anleitung:                                        1)

                                                          Montieren Sie den vorderen Standfuß an den
                                                          Rahmen. Hierzu verwenden Sie die flachen
                                                          Beilagscheiben Ø10 und Kuppelmuttern.
                                                          Schrauben Sie diese auf die Gewindebolzen
                                                          und ziehen Sie diese mit dem Schrauben-
                                                          schlüssel fest. Montieren Sie den hinteren
                                                          Standfuß auf dieselbe Weise.
         		                           		 Hinweis: Nehmen Sie eine Feinjustierung an den
         1                            1.2 schwarzen Gummifüßen vor, falls das Rad nicht wa-
                                          ckelfrei steht.

                                                          2)

                                                          Die Pedale sind mit "L" und "R" gekennzeich-
                                                          net. Tragen Sie 2 Tropfen der Schraubensi-
                                                          cherung auf den Gewindebolzen des rechten
                                                          Pedals auf und schrauben Sie dieses in die
                                                          rechte Gewindebohrung mithilfe des beiliegen-
                                                          den Schraubenschlüssels ein. Wiederholen Sie
                                                          diesen Schritt adäquat für das linke Pedal.

                                      2.2
                                                          Hinweis:
         2
                                                          Auch die Pedalhebel sind mit "R" und "L" gekennzeich-
                                                          net. Montieren Sie die Pedale und Pedalkörbe entspre-
                                                          chend, da sich diese sonst nach längerem Gebrauch
                                                          lösen können.

                                                      8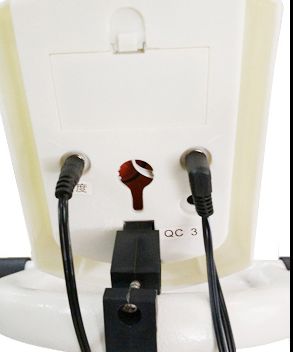
3)

                                     Lösen Sie den Kugelbolzen und passen Sie die
                                     Sattelhöhe an. Ziehen Sie den Kugelbolzen
                                     anschließend wieder fest.

              		                                                                           DE
               3

a)

Sie können den Sitz nach vorn/hinten in eine
geeignete Position entlang der Sattelschiene
verschieben. Dazu lösen Sie das Gewinderad
unterhalb und ziehen es anschließend wieder
fest.

                                                              3.a

                                    4)

                                    Schieben Sie die Armauflagen-Halterung in die recht-
                                    eckige Öffnung vorne am Rahmen und drehen Sie
                                    den Hebel-förmigen Sicherungsbolzen ein. Hiermit
                                    lässt sich auch die Lenkerhöhe einstellen.

                4

                                          9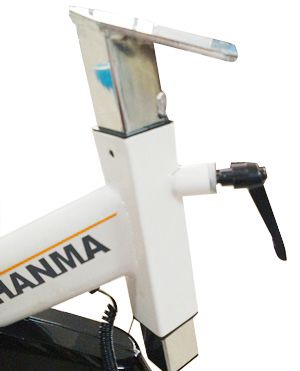
5)
Nun legen Sie die Armauflage mit den Löchern bündig
oben auf die Armauflagen-Halterung und schrauben
Sie diese mit Beilagscheiben und den Zylinderschrau-
ben unter Zuhilfenahme des Sechskantschlüssels fest.
5
6)
Bringen Sie nun die Armlehnen-Verkleidung wie im Bild
dargestellt an. Drücken Sie die Verkleidung sachte fest,
bis diese von selbst einrastet.
6
7)
Bringen Sie die Bedienkonsole an ihrem Steckplatz an
und schließen Sie die Kabel, wie im Bild zu sehen, an.
(Zweiädriges Kabel in der Rückansicht rechts. Das ei-
nädrige Kabel an den linken Steckplatz.)
7
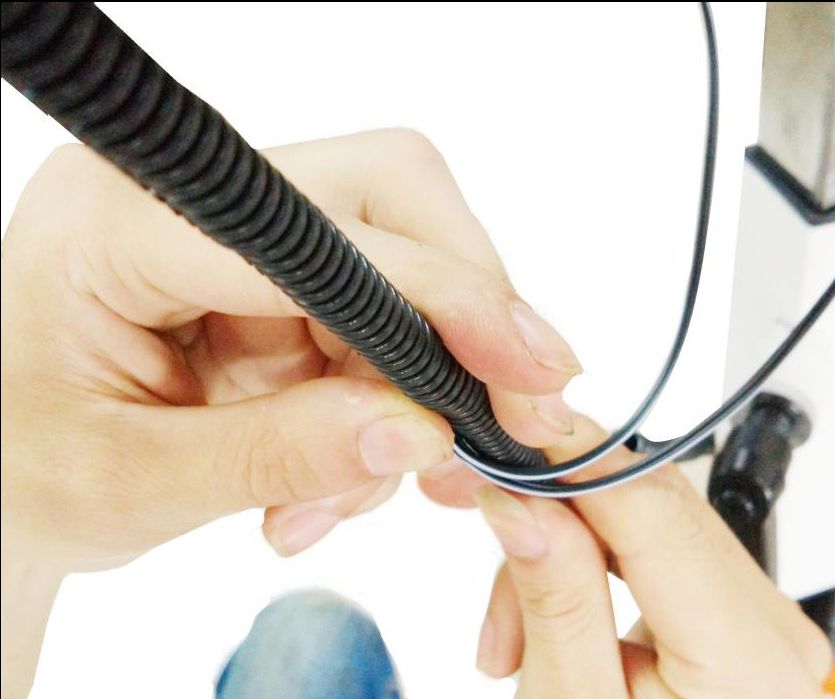
108)
Führen Sie die Kabel nun durch einen gemein-
samen Kabelschacht, um ein Verheddern auszu-
schließen.
DE
8
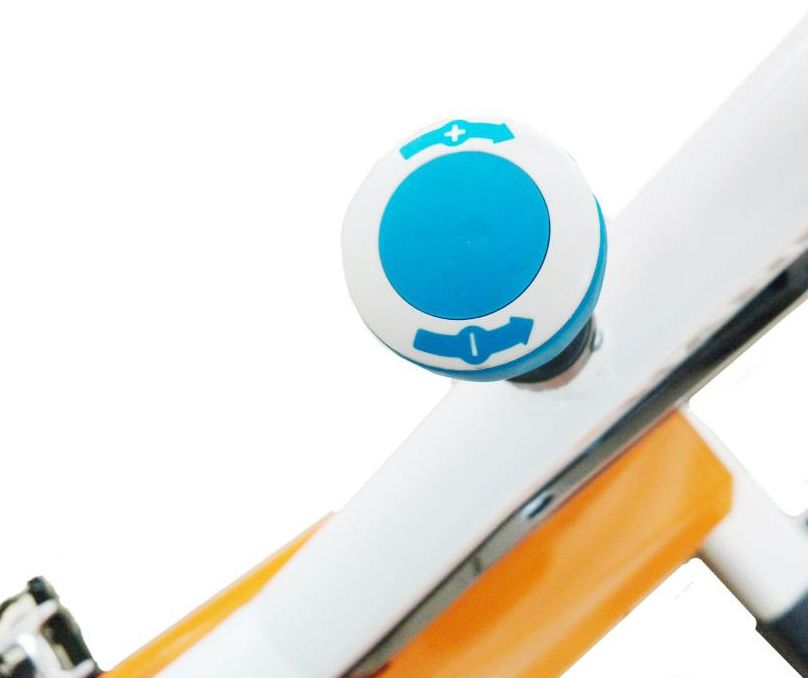
9)
Auf diesem Foto ist der Bremsknauf abgebildet.
Drehen Sie ihn im Uhrzeigersinn, erhöht sich der
Bremswiderstand. Tritt eine Notsituation ein,
drücken Sie fest auf den Bremsknauf, um das
Schwungrad unverzüglich zum Halt zu bringen
und Verletzungen zu vermeiden.
9
11KONSOLEN-BEDIENUNG
Time 00—99:59 Minuten: Sekunden
Speed 00—99.9 km/h
Distance 0.00—99.99 Km
Odometer 0.00—999.99 Km
Heart Rate 40—240BPM (Optional)
Calorie 0-999.9 kcal
MODE: Mit diesem Knopf wählen und legen Sie einen gewählten Trainingsmodus fest. Drücken Sie
ihn, um SCAN oder LOCK auszuwählen. Wenn Sie den SCAN-Modus abwählen möchten,
drücken Sie solange den MODE-Knopf, bis der Zeiger blinkend neben dem Trainings-
Modus Ihrer Wahl steht.
AUTO ON /OFF: Der Bildschirm schaltet sich automatisch an, sobald das Trainingsgerät benutzt wird. Der
Monitor schaltet sich nach ungefähr 4 Minuten automatisch aus, wenn in dieser Zeit kein
Knopf gedrückt wird und das Schwungrad stillsteht.
RESET: Das Modul kann auf den Ausgangszustand zurückgesetzt werden, indem Sie die Batterien
wechseln oder für 3 Sekunden den MODE-Knopf drücken.
SPEED: Drücken Sie den MODE-Knopf, bis der Zeiger auf SPEED steht. Die Konsole zeigt Ihnen
nun die aktuelle Geschwindigkeit an.
DISTANCE: Drücken Sie den MODE-Knopf, bis der Zeiger auf DIST steht. Die Konsole zeigt Ihnen nun
Ihre zurückgelegte Fahrtstrecke an.
TIME: Drücken Sie den MODE-Knopf, bis der Zeiger auf TIME steht. Nun wird Ihnen ein Timer
angezeigt, mit dem Sie Ihre Trainingszeit im Blick behalten.
CALORIES: Drücken Sie den MODE-Knopf, bis der Zeiger auf CAL steht. Es werden Ihnen nun die
Kalorien angezeigt, die Sie während des Trainings verbrennen.
ODOMETER: Drücken Sie den MODE-Knopf, bis der Zeiger auf ODOMETER steht. Nun können Sie Ihre
bisher insgesamt zurückgelegte Fahrtstrecke einsehen.
12TRAININGSINFORMATIONEN
Jedes Workout sollte aus folgenden drei Einheiten aufgebaut sein:
1. Einer 5-10 minütigen Aufwärmphase mit leichten Fitness-Übungen und Dehnen. Ein solides
Aufwärmprogramm steigert Ihren Puls, lässt Ihre Körpertemperatur steigen und bereitet den
Kreislauf für das eigentliche Training vor.
2. Einer Workout-Phase, in der Sie Ihren Puls 20-30 Minuten im Trainingspuls-Bereich halten.
Hinweis: Halten Sie Ihren Puls in den ersten Wochen Ihres Fitness-Programms nicht länger als 20
Minuten im Trainingspuls-Bereich.
3. In einer Erholungsphase, welche zwischen 5 und 10 Minuten dauern sollte, mindern Sie sukzessive
die Trainigsintensität und führen erneut Dehnübungen durch. Dadurch werden die Muskeln DE
entspannt und Sie beugen Problemen aufgrund der Trainingsbelastung vor.
Puls
200
180
160 Maximum
140 Zielbereich 85%
120
70%
100
Erholung
80
Alter
20 25 30 35 40 45 50 55 60 65 70 75
Regelmäßiges Workout
Um Ihre Kondition beizubehalten oder zu verbessen, sollten Sie mindestens 3 Mal in der Woche trainieren.
Zwischen den Trainingseinheiten sollten Sie mindestens einen Tag Pause einlegen. Nach einigen Monaten
regelmäßigen Trainings können Sie die Häufigkeit nach Wunsch auf bis zu 5 Trainingseinheiten in der Woche
steigern. Denken Sie daran: Der Schlüssel zum Erfolg ist ein regelmäßiges Workout, das Sie auch gerne
im Alltag absolvieren.
13DEHNÜBUNGEN
Vor jedem Training sollten Sie Ihre Muskeln mindestens 5-10 Minuten lang dehnen, um sie ausreichend
aufzuwärmen. Wiederholen Sie die nachfolgenden Dehnungsübungen daher fünf Mal. Das Dehnen vor
dem Training trägt zur Verbesserung der Flexibilität bei und verringert das Verletzungsrisiko.
1
1 MIT DEM KOPF ROLLEN
Drehen Sie den Kopf nach rechts für eine Sekunde, fühlen Sie die Streckung auf der linken Seite des
Nackens, dann drehen Sie den Kopf zurück für eine Sekunde, recken Sie Ihr Kinn nach oben und lassen
Ihren Mund geöffnet. Drehen Sie Ihren Kopf nach links für eine Sekunde, dann senken Sie Ihren Kopf auf
die Brust für eine Sekunde.
2
2 SCHULTERHEBEN
Heben Sie Ihre rechte Schulter zu Ihrem Ohr an für eine Sekunde. Danach die linke Schulter für eine
Sekunde anheben und dabei gleichzeitig die rechte Schulter ablassen.
3 SEITLICHES STRECKEN
Öffnen Sie Ihre Arme zur Seite und heben Sie diese an, bis sie über Ihrem Kopf sind. Strecken Sie Ihren
rechten Arm so weit wie möglich in Richtung Decke für eine Sekunde. Wiederholen Sie diese Aktion mit 3
dem linken Arm.
4 QUADRIZEPS-DEHNUNG
Mit einer Hand an der Wand abstützen, um das Gleichgewicht besser zu halten, nach hinten greifen und
den rechten Fuß nach oben ziehen. Die Ferse so nahe wie möglich an das Gesäß heranbringen. Halten Sie
diese Stellung für 15 Sekunden und wiederholen es mit dem linken Fuß. 4
5 INNENSCHENKEL-DEHNUNG
Setzen Sie sich hin, mit den Fußsohlen gegeneinander, Ihre Knie weisen nach außen. Die Füße so nahe wie 5
möglich an den Unterleib heranziehen. Drücken Sie die Knie behutsam auf den Boden. 15 Sekunden lang
halten.
6 ZEHEN BERÜHREN
Langsam von der Hüfte aus nach vorn beugen, Rücken und Schultern locker halten, während Sie sich
strecken, bis die Hände den Boden erreichen. So weit wie möglich strecken und 15 Sekunden lang halten.
6
7 ACHILLESSEHNEN-DEHNUNG
Strecken Sie Ihr rechtes Bein aus. Die Sohle des linken Fußes gegen die Innenseite des rechten 7
Oberschenkels stützen. So weit wie möglich in Richtung Ihrer Zehen strecken. 15 Sekunden lang halten.
Entspannen Sie sich und wiederholen Sie es mit dem linken Bein.
8 WADEN/ACHILLES-DEHNUNG
Lehnen Sie sich gegen eine Wand, mit dem linken Bein vor dem rechten und den Armen vorwärts
gerichtet. Halten Sie Ihr rechtes Bein gerade und den linken Fuß auf dem Boden, dann beugen Sie das 8
linke Bein und lehnen sich nach vorne, indem Sie Ihre Hüften zur Wand hin bewegen. Spannung halten und
dasselbe mit dem anderen Bein für 15 Sekunden wiederholen.
14ENTSORGUNG
Recyclingkreislauf
Verpackungsmaterialien können wieder dem Rohstoffkreislauf zugeführt werden. Entsorgen Sie die Verpackung gemäß den aktuellen
Bestimmungen. Informationen erhalten Sie bei den Rückgabe- und Sammelsystemen Ihrer Gemeinde.
Hinweise zum Elektro- und Elektronikgerätegesetz (ElektroG)
Wir weisen Besitzer von Elektro- und Elektronikaltgeräten darauf hin, dass Elektroaltgeräte gemäß den geltenden gesetzlichen Vorschriften, einer
vom Siedlungsabfall getrennten Erfassung zuzuführen sind. Das nachfolgend dargestellte und auf Elektro- und Elektronikaltgeräten aufgebrachte
Symbol einer durchgestrichenen Abfalltonne weist zusätzlich auf die Pflicht zur getrennten Erfassung hin:
DE
Nach dem ElektroG sind wir als Vertreiber von Elektrogeräten nach § 17 Abs. 2 ElektroG in Verbindung mit § 17 Abs. 1 ElektroG verpflichtet,
bestimmte Elektro- und Elektronikaltgeräte unentgeltlich zurückzunehmen. Dieser gesetzlichen Verpflichtung kommen wir über die DR Deutsche
Recycling Service GmbH/take-e-way GmbH nach. Daneben können Sie Elektroaltgeräte an den Sammelstellen der öffentlich-rechtlichen Entsor-
gungsträger abgeben. Sie leisten einen wichtigen Beitrag zur Wiederverwendung, zum Recycling und zur sonstigen Verwertung von Altgeräten,
dadurch dass sie Ihre Altgeräte einer getrennten Erfassung in den richtigen Sammelgruppen zuführen.
Für die Löschung personenbezogener Daten auf den zu entsorgenden Elektroaltgeräten sind Sie als Endnutzer vor der Abgabe selbst verantwort-
lich.
1516
Dear customer,

We are pleased you chose a device from the SPORTSTECH product range. With sports equipment from
SPORTSTECH you get the highest quality and latest technology.

In order to fully use the potential of your device and be able to enjoy it for many years, please read this
manual carefully before starting up and beginning of training, and use the device according to the instruc-
tions. The operational safety and function of the device can only be guaranteed if the safety instructions
in this user manual are observed. We shall not assume any liability for damages resulting from improper
use or incorrect operation.

                                                                                                              EN

      i
                   Please ensure that all persons using the device have read and understood the user
                   manual.

Keep the user manual in a safe place to be able to access it at any time
if needed.

                                                   17
Our video tutorials for you!
Assembly, use, disassembly.
1. Scan the QR code
2. Watch videos
3. Start fast and safely
Link to the videos:
https://service.innovamaxx.de/sx100_video
We are also on social media!
Get the latest product information, training content and much more on our:
Instagram-page Facebook-page
https://www.instagram.com/sportstech.de https://www.facebook.com/sportstech.de
18INDEX
1. IMPORTANT SAFETY NOTICE..................................................................................... 20
2. EXPLODED DRAWING/SPARE PARTS LIST................................................................... 21
3. ASSEMBLY INSTRUCTION.......................................................................................... 22
4. COMPUTER OPERATION............................................................................................ 26
5. EXERCISING INFORMATION........................................................................................ 27
6. STRETCHING EXCERCISE.......................................................................................... 28
7. DISPOSAL............................................................................................................... 29
EN
19IMPORTANT SAFETY NOTICE
This exercise machine is built for optimum safety. However, certain precautions apply
! whenever you operate a piece of exercise equipment. Be sure to read the entire
manual before you assemble or operate your machine. In particular, note the following
safety precautions:
1. Keep children and pets away from the Speed Bike at all times. DO NOT leave unattended children in the same room
with the machine.
2. Handicapped or disabled persons should not use the Speed Bike without the presence of a qualified health
professional or physician.
3. f the user experiences dizziness, nausea, chest pain, or any other abnormal symptoms, STOP the workout at once.
CONSULT A PHYSICIAN IMMEDIATELY.
4. Before beginning training, remove all within a radius of 2 meters from the machine. DO NOT place any sharp objects
around the Speed Bike.
5. Position the Speed Bike on a clear, level surface away from water and moisture. Place mat under the unit to help
keep the machine stable and to protect the floor.
6. Use the Speed Bike only for its intended use as described in this manual. DO NOT use any other accessories not
recommended by the manufacturer.
7. Assemble the machine exactly as the descriptions in the instruction manual.
8. Check all bolts and other connections before using the machine for the first time and ensure that the trainer is in the
safe condition.
9. Hold a routine inspection of the equipment. Pay special attention to components which are
the most susceptible to wear off, i.e. connecting points and wheels. The defective components should be replaced
immediately. The safety level of this equipment can only be maintained by doing so. Please don‘t use the Speed Bike
until it is repaired well.
10. NEVER operate the Speed Bike if it is not functioning properly.
11. This machine can be used for only one person’s training at a time.
12. Do not use abrasive cleaning articles to clean the machine. Remove drops of sweat from the machine immediately
after finishing training.
13. Always wear appropriate workout clothing when exercising. Running or aerobic shoes are also required.
14. Before exercising, always do stretching first
15. The power of the machine increases with increasing the speed, and the reverse. The machine is equipped with
adjustable knob, which can adjust the resistance.
Before beginning any exercise program, consult your physician. This is especially important
WARNING
for individuals over the age of 35 or persons with pre-existing health problems. Read all
instructions before using any fitness equipment. We assume no responsibility for personal injury
or property damage sustained by or through the use of this product.
20EXPLODED DRAWING/SPARE PARTS LIST
At the following link
you will find the exploded drawing
and the spare parts list:
https://service.innovamaxx.de/sx100_spareparts
EN
21ASSEMBLY INSTRUCTION
Preparation
A. Before assembling make sure that you will have enough space around the item.
B. Use the present tooling for assembling.
C. Before assembling please check whether all needed parts are available. Under the QR code / link on the
previous page you will find a numbered exploded drawing with all the individual parts that make up the speed
bike.
Firmly tighten all component parts
and pre-assembled parts!
Assembly instruction:
1)
Connect the front tube with the frame, and
install the plain washer Ø10, washer 10
to the bolts and put on the cover-shaped
screws. And use open spanner to fasten
them. Installation of back tube is the same.
Note: Please adjust the black feet strap to make it
balance if it is not stable.
1 1.2
2)
The feet straps are marked with L and R.
Please drop 2 red screw locking liquid in
R strap and fasten it with right threaded
hole by using our spanner. And drop 2 red
screw locking liquid in L strap and fasten it
with left threaded hole.
Note: L and R are marked in crank as well. Please
install them accordingly otherwise it will damage
the products. And please fasten the feet strap, or
2 2.2 it will fall down after long usage.
223)
Loose the brake and adjust the cushion to
appropriate height. And fasten the brake and
seats.
3
a)
You can adjust the cushion seat back and for
ward by loosing the plum-head bolts to a EN
comfortable situation. Then just lock it please.
3.a
4)
Take out the armrest fixed seats, put it through
the square-shaped tube then fasten them by using
locking screws and you can also adjust the height.
4
235)
Take out the armrest. Put it at the screw holes, stack
up the washer and cylinder screw to fasten them
with 6-side spanner.
5
6)
Put the cover and armrest together as photo. Please
press the cover gently and it will be automatically
fastened to the armrest.
6
7)
Fasten the electronic watch by fastening the slots
and connect the cables as photo. (Double wire with
right Pulse and single wire with left sensor.
7
248)
Please keep the messy cables inside the tube
for beauty.
8
EN
9)
See the brake head in the photo. Please
rotate the head clockwise, the resistance
of bike will increase. If there is emergency
occurred, please press the brake head and
the bike will stop immediately to avoid injury.
9
25COMPUTER OPERATION
Time 00—99:59 Minute: Second
Speed 00—99.9 km/h
Distance 0.00—99.99 Km
Odometer 0.00—999.99 Km
Heart Rate 40—240BPM (Optional)
Calorie 0-999.9Kcal
MODE: This key lets you select and lock on to a particular function which you want. Press to
Choose SCAN or LOCK, if you do not want the scan mode, press the MODE key until the
pointer is next to the “flashing” function which you want
AUTO ON /OFF: The monitor will switch on automatically when the exercise machine is in motion. The
monitor will turn off auto-matically when the speed has no signal input or no keys are
pressed for approximately 4 minutes.
RESET: The unit can be reset by either changing the battery or pressing the MODE key
for 3 seconds.
SPEED: Press MODE key until the pointer advances to SPEED. The Computer will display the
current speed.
DISTANCE: Press MODE key until the pointer advances to DIST. The Computer will display each trip
distance you have traveled.
TIME: Press MODE key until the pointer advances to TIME. The total working time will be
shown when starting exercise.
CALORIES: Press MODE key until the pointer advances to CAL. The Computer will display total
calories burns when starting to exercise.
ODOMETER: Press the MODE Key until the pointer advance to ODOMETER. The total accumulated
distance will be shown.
26EXERCISING INFORMATION
Each workout should include the following three parts:
1. A warm-up, consisting of 5 to 10 minutes of stretching and light exercise. A proper warm-up increases
your body temperature, heart rate, and circulation in preparation for exercise.
2. Training zone exercise, consisting of 20 to 30 minutes of exercising with your heart rate in your training
zone. (Note: During the first few weeks of your exercise program, do not keep your heart rate in your
training zone for longer than 20 minutes.)
3. A cool-down, with 5 to 10 minutes of stretching. This will increase the flexibility of your muscles and will
help to prevent post-exercise problems
Hear Rate
200
180
EN
160 Maximum
140 Target Zone 85%
120
70%
100
Cool Down
80
Age
20 25 30 35 40 45 50 55 60 65 70 75
Exercise Frequency
To maintain or improve your condition, plan three workouts each week, with at least one day of rest between
workouts. After a few months of regular exercise, you may complete up to five workouts each week, if desired.
Remember, the key to success is make exercise a regular and enjoyable part of your everyday life.
Before starting to exercise
27STRETCHING EXCERCISE
Before each workout you should stretch your muscles for at least 5-10 minutes to warm them up
sufficiently. Repeat the following stretching exercises five times. Stretching before training helps improve
flexibility and reduces the risk of injury.
1
1 HEAD ROLLS
Rotate your head to the right for one count, feeling the stretch up the left side of your neck, then rotate
your head back for one count, stretching your chin to the ceiling and letting your mouth open. Rotate your
head to the left for one count, then drop your head to your chest for one count.
2
2 SHOULDER LIFTS
Lift your right shoulder toward your ear for one count. Then lift your left shoulder up for one count as you
lower your right shoulder.
3 SIDE STRETCHES
Open your arms to the side and lift them until they are over your head. Reach your right arm as far toward
3
the ceiling as you can for one count. Repeat this action with your left arm.
4 QUADRICEPS STRETCH
With one hand against a wall for balance, reach behind you and pull your right foot up. Bring your heel as
close to your buttocks as possible. Hold for 15 counts and repeat with left foot.
4
5 INNER THIGH STRETCH
Sit with the soles of your feet together and your knees pointing outward. Pull your feet as close to your
groin as possible. Gently push your knees toward the floor. Hold for 15 counts. 5
6 TOE TOUCHES
Slowly bend forward from your waist, letting your back and shoulders relax as you stretch toward your toes.
Reach as far as you can and hold for 15 counts.
7 HAMSTRING STRETCHES
Extend your right leg. Rest the sole of your left foot against your right inner thigh. Stretch toward your toe as 6
far as possible. Hold for 15 counts. Relax and then repeat with left leg.
7
8 CALF / ACHILLES STRETCH
Lean against a wall with your left leg in front of the right and your arms forward. Keep your right leg straight
and the left foot on the floor; then bend the left leg and lean forward by moving your hips toward the wall.
Hold, then repeat on the other side for 15 counts.
8
28DISPOSAL
Recycling loop
Packaging material can be conveyed back to the raw material cycle. Dispose of packaging material in accordance with legal provisions.
Information can be retrieved from the return or collections systems of your community.
Notes on the Electrical and Electronic Equipment Act (ElektroG)
We would like to point out to owners of electrical and electronic equipment that, according to the applicable legal regulations, electrical devices
must be disposed of separately from municipal waste. The symbol of a crossed-out waste bin shown on the electrical and electronic equipment
shown below also indicates the obligation to dispose of the batteries separately:
According to the ElektroG, as distributors of electrical devices, we are obliged to take back certain old electrical and electronic equipment free of
charge in accordance with Section 17 (2) ElektroG and in conjunction with Section 17 (1) ElektroG. We comply with this legal obligation through
DR Deutsche Recycling Service GmbH / take-e-way GmbH. You can also hand in your electrical equipment at the designated collection points of
the public waste disposal authorities. By disposing of your old devices according to the legal requirements, you make an important contribution in
EN
the reuse and recycling of old devices.
As the end user, you are responsible for the deletion of all manner of personal data on electronic devices before handing the devices over for
disposal.
2930
Estimado cliente,

Nos complace que haya elegido un dispositivo de la línea de productos SPORTSTECH. Con el equipo
deportivo de SPORTSTECH usted obtiene la más alta calidad y la mejor tecnología.

Con el fin de usar todo el potencial de su dispositivo y para que pueda disfrutarlo durante muchos años,
por favor lea este manual cuidadosamente antes de comenzar a ejercitarse, y use el dispositivo de acuer-
do a las instrucciones. La seguridad y funcionamiento operativos del dispositivo solo puede garantizarse
si se tienen presentes las instrucciones de seguridad en este manual de usuario. Nosotros no asumimos
ninguna responsabilidad por daños resultantes del uso inadecuado o incorrecto del dispositivo.

     i
                 Por favor asegúrese de que todas las personas que usen el dispositivo hayan leído y
                 entendido este manual de usuario.

                                                                                                           ES
Mantenga el manual de usuario en un lugar seguro para poder acceder
a él cuando sea necesario.

                                                  31
Nuestros tutoriales en video para usted!
Montaje, Utilizar, Desmontaje.
1. Escanear el código QR
2. Ver vídeos
3. Comienza rápido y seguro
Enlace a los videos:
https://service.innovamaxx.de/sx100_video
¡También estamos en redes sociales!
Obtenga la última información sobre nuestros productos, entrenamientos y mucho
más aquí:
Instagram Facebook
https://www.instagram.com/sportstech.de https://www.facebook.com/sportstech.de
32CONTENIDOS
1. AVISO DE SEGURIDAD IMPORTANTE........................................................................... 34
2. DIBUJO DE EXPLOSIÓN/LISTA DE REPUESTOS............................................................ 35
3. INSTRUCCIONES DE ENSAMBLAJE............................................................................ 36
4. FUNCIONAMIENTO DEL ORDENADOR......................................................................... 40
5. INFORMACIÓN SOBRE EJERCICIOS............................................................................ 41
6. EJERCICIOS DE ESTIRAMIENTO................................................................................. 42
7. DESECHO................................................................................................................ 43
ES
33AVISO DE SEGURIDAD IMPORTANTE
!
Esta máquina para ejercicios está construida para ofrecer óptima seguridad. Sin
embargo, hay que aplicar ciertas precauciones siempre que opere el equipo de
ejercicio. Asegúrese de leer todo el manual antes de ensamblar u operar su máquina.
En particular, tenga en cuenta las siguientes precauciones de seguridad:
1. Mantenga a los niños y las mascotas lejos de la máquina siempre. No deje a los niños solos en la misma habitación
de la máquina.
2. Solo una persona a la vez debería usar la máquina.
3. En caso de que el usuario experimente mareos, náuseas, dolor en el pecho o cualquier otro síntoma anormal, pare el
entrenamiento de inmediato y consulte a un médico inmediatamente.
4. Coloque la máquina sobre una superficie limpia y plana. No use la máquina cerca del agua o al aire libre.
5. Mantenga las manos alejadas de todas las partes móviles.
6. Siempre use ropa de entrenamiento apropiada cuando entrene. No use batas u otras prendas que puedan quedar
atrapadas en la máquina. También se requieren zapatillas de correr o zapatos aeróbicos para usar la máquina.
7. Use la máquina solo según el uso previsto, como se describe en este manual. No use accesorios no recomendados
por el fabricante.
8. No deje ningún objeto afilado alrededor de la máquina.
9. Las personas discapacitada no deben usar la máquina sin la ayuda de una persona calificada o la presencia de un
médico.
10. Siempre haga ejercicios de estiramiento para calentar adecuadamente, antes de entrenar con la máquina.
11. No use nunca la máquina en caso de que no esté funcionando correctamente.
12. Se recomienda un supervisor durante el ejercicio.
13. Use siempre ropa adecuada para ejercitarse. El uso de calzado deportivo también es necesario.
14. Antes del ejercicio primero haga estiramiento muscular.
15. La potencia de la máquina aumenta al aumentar la velocidad y la marcha hacia atrás. La máquina está equipada con
una perilla ajustable, la cual puede ajustar la resistencia.
Antes de comenzar cualquier programa de ejercicios, consulte a su médico. Esto es
especialmente importante para personas mayores de 35 años o personas con problemas de
ATENCIÓN
salud preexistentes. Lea todas las instrucciones antes de usar cualquier equipo de ejercicios.
No asumimos ninguna responsabilidad por lesiones personales o daños a la propiedad sufridos
por o a través del uso de este producto.
34DIBUJO DE EXPLOSIÓN/LISTA DE REPUESTOS
En el siguiente enlace
encontrarás el dibujo de explosión
y la lista de repuestos:
https://service.innovamaxx.de/sx100_spareparts
ES
35INSTRUCCIONES DE ENSAMBLAJE
PRÉPARATION:
A. Antes del ensamblaje asegúrese de tener suficiente espacio alrededor del objeto.
B. Use las herramientas existentes para el ensamblaje.
C. Antes del ensamble por favor revise si todas las partes necesarias están disponible. Debajo del código
QR/enlace de la siguiente página se encuentra una señal de explosión numerada con todas las partes de
las que se compone una Speedbike.
Apriete todos los componentes
y piezas premontadas!
Instrucciones de ensamblaje:
1)
Conecte el tubo frontal con el marco, y coloque la
arandela plana 10, y la arandela 10 en los tornillos
y ponga las tuercas de cierre. Y use el la llave para
apretarlos. La instalación del tubo posterior se realiza
de la misma manera.
Nota: Por favor ajuste las correas negras de los pies
para balancearlas si no están estables.
1 1.2
2)
Las correas de los pies están marcadas con L y R.
Por favor utilice un poco de líquido de bloqueo en el
tornillo de fijación 2 de la correa R y apriételo con
el agujero roscado derecho usando nuestra llave. Y
utilice un poco de líquido de bloqueo en el tornillo
de fijación 2 de la correa L y apriételo con el agujero
roscado izquierdo.
Nota: L y R también están marcados en la biela. Por
favor colóquelos correctamente de otra forma dañará
las demás piezas. Y por favor apriete la correa del pie,
2 2.2 de lo contrario ésta se caerá tras un uso prologando.
36a)
Suelte el freno y ajuste el amortiguador a
la altura apropiada. Y apriete el freno y el
asiento.
3
b)
Puede ajustar el asiento hacia adelante y
hacia atrás aflojando los tornillos hacia un lugar
cómodo. Luego simplemente ajústelos.
ES
3.a
4).
Tome el soporte del apoyabrazos, ubíquelo dentro
del tubo cuadrado luego apriételo usando tornillos
de fijación y también podrá ajustar la altura.
4
375).
Tome el apoyabrazos. Póngalo en los agujeros de los
tornillos, use arandelas y tornillos cilíndricos para
apretarlo con la llave de 6 lados.
5
6).
Ponga la cubierta del apoyabrazos como se muestra
en la foto. Por favor presione la cubierta suavemente y
ésta se ajustará automáticamente al apoyabrazos.
6
7).
Apriete el reloj electrónico ajustando las ranuras y
conectado los cables como en la foto. (Cable doble a la
derecha para el pulso y cable sencillo a la izquierda para
el sensor.
7
388).
Por favor mantenga los cables dentro del tubo
para una mejor apariencia
8
ES
9).
Observe el mango del freno en la foto. Por
favor gire el mango en el sentido del reloj
para aumentar la resistencia de la bicicleta. Si
ocurre alguna emergencia, por favor presione
el mango del freno y la bicicleta se detendrá
inmediatamente para evitar lesiones.
9
39FUNCIONAMIENTO DEL ORDENADOR
Time 00—99:59 Minutos: Segundos
Speed 00—99.9 km/h
Distance 0.00—99.99 Km
Odometer 0.00—999.99 Km
Heart Rate 40—240BPM (Optional)
Calorie 0-999.9Kcal
MODE: Esta tecla le permite seleccionar y bloquear la función que desee. Presione SCAN o
LOCK para elegir, si no quiere el modo scan, presione la tecla MODE hasta que el pun-
tero esté al lado de la función “parpadeante” que desea.
AUTO ON /OFF: La pantalla se encenderá automáticamente cuando la máquina esté en movimiento. La
pantalla se apagará automáticamente cuando speed no tenga una señal de entrada o si
no presiona ninguna tecla en aprox. 4 minutos
RESET: La unidad se puede reiniciar ya sea cambiando la batería o presionando la tecla MODE
por 3 segundos.
SPEED: Presione la tecla MODE haste que el puntero avance hasta SPEED. El ordenador
distancia de cada viaje que haya realizado
DISTANCE: Presione la tecla MODE hasta que el puntero avance hasta DIST. El ordenador mostrará
la distancia de cada viaje que haya realizado.
TIME: Presione la tecla MODE hasta que el puntero avance hasta TIME. El tiempo total de
trabajo se mostrará cuando comience el ejercicio.
CALORIES: Presione la tecla MODE hasta que el puntero avance hasta CAL. El ordenador mostrará
las calorías totales quemadas al comenzar el ejercicio
ODOMETER: Presione la tecla MODE hasta que el puntero avance hasta ODOMETER. Se mostrará la
distancia total acumulada.
40INFORMACIÓN SOBRE EJERCICIOS
Cada ejercicio debe incluir las siguientes tres partes:
1. Calentamiento, que consiste de 5 a 10 minutos de estiramiento y ejercicio ligero. Un calentamiento
adecuado aumenta su temperatura corporal, su frecuencia cardiaca, y su circulación para prepararlo
para el ejercicio.
2. Ejercicio en la zona de entrenamiento, que consiste de 20 a 30 minutos de ejercicio con su frecuencia
cardiaca en su zona de entrenamiento. (Nota: Durante las primeras semanas de su programa de ejerci
cios, no mantenga su frecuencia cardiaca en su zona de entrenamiento por más de 20 minutos.)
3. Enfriamiento, con 5 a 10 minutos de estiramiento. Esto aumentará la flexibilidad de sus músculos y le
ayudará a prevenir problemas después del ejercicio.
Pulso
200
180
160 Máximo
140 Area Objetivo 85%
ES
120
70%
100
Descanso
80
Edad
20 25 30 35 40 45 50 55 60 65 70 75
Frecuencia del ejercicio
Para conservar o mejorar su condición, planifique res ejercicios cada semana, con al menos un día de descanso
entre ejercicios. Después de unos meses de ejercicio constante, puede completar hasta cinco ejercicios cada
semana si así lo desea. Recuerde, la clave para el éxito es hacer del ejercicio una parte habitual y agradable de
su vida cotidiana. Antes de comenzar el ejercicio
41EJERCICIOS DE ESTIRAMIENTO
Antes de cada entrenamiento debes estirar tus músculos durante al menos 5-10 minutos para calentarlos
lo suficiente. Repita los siguientes ejercicios de estiramiento cinco veces. El estiramiento antes del
entrenamiento ayuda a mejorar la flexibilidad y reduce el riesgo de lesiones.
1
1 GIROS CON LA CABEZA
Gire su cabeza hacia la derecha por un segundo, sienta como se estira el lado izquierdo de su cuello,
luego gire su cabeza hacia tras por un segundo, estirando su barbilla hacia el techo y dejando su boca
abierta. Gire su cabeza hacia la izquierda por un segundo, luego deje caer su cabeza hacia su pecho por
un segundo.
2
2 LEVANTAMIENTO DE HOMBROS
Levante su hombro hacia su oreja por un segundo. Luego levante su hombro izquierdo por un segundo a
medida que baja su hombro derecho.
3 ESTIRAMIENTOS LATERALES
Abra sus brazos hacia un lado y levántelos hasta que estén sobre su cabeza. Alcance su brazo derecho
hacia el techo tanto como pueda durante un segundo. Repita esta acción con su brazo izquierdo. 3
4 ESTIRAMIENTO DE CUÁDRICEPS
Con una mano hacia la pared para equilibrarse, mueva su otra mano hacia atrás y levante su pie derecho.
Lleve su talón lo más cerca posible de sus glúteos. Aguante durante 15 segundos y repita con el pie
izquierdo.
4
5 ESTIRAMIENTO DEL MUSLO INTERIOR
Siéntese con las suelas de sus pies juntas y sus rodillas apuntando hacia afuera. Empuje sus pies hacia
su ingle tan cerca como sea posible. Empuje sus rodillas suavemente hacia el suelo. Aguante durante 15 5
segundos.
6 DEDOS DE LOS PIES
Inclínese lentamente hacia su cintura , dejando su espalda y brazos relajados a medida que se estira hacia
los dedos de sus pies. Llegue los más lejos que pueda y aguante durante 15 segundos.
7 ESTIRAMIENTO DE TENDONES 6
Extienda su pierna derecha. Descanse la suela de su pie izquierdo hacia su muslo interior derecho. Estírese
hacia los dedos de su pie derecho tanto como pueda. Aguante durante 15 segundos. Relaje y repita con 7
la pierna izquierda.
8 ESTIRAMIENTO DE PANTORILLA/TENDÓN DE AQUILES
Apóyese hacia una pared con su pierna izquierda frente a la derecha y con sus brazos hacia adelante.
Mantenga su pierna derecha recta y el pie izquierdo sobe el suelo; luego doble la pierna izquierda y
apóyese hacia adelante moviendo su cadera hacia la pared. Aguante, luego repita con el otro lado durante 8
15 segundos.
42DESECHO
Reciclaje loop
El material de empaque puede trasladarse de nuevo al ciclo de materias primas. Deshágase del material de empaque de acuerdo a las
normativas legales. Puede encontrar información en los sistemas de recolección de su comunidad.
Notas sobre la Ley sobre aparatos eléctricos y electrónicos (ElektroG)
Quisiéramos señalar a los propietarios de aparatos eléctricos y electrónicos viejos que éstos deben desecarse por separado de los residuos mu-
nicipales de conformidad con las normas legales aplicables. El símbolo de un cubo de basura con ruedas tachado, que se muestra a continuación
y que se coloca en los RAEE, indica además la obligación de su recogida por separado:
Según la normativa vigente, nosotros, como distribuidores de aparatos eléctricos, estamos obligados a retirar gratuitamente determinados resi-
duos de aparatos eléctricos y electrónicos de acuerdo con el artículo 17, apartado 2, de la ley alemana sobre aparatos eléctricos y electrónicos
en relación con el artículo 17, apartado 1, de la ley alemana sobre aparatos eléctricos y electrónicos. Cumplimos con esta obligación legal a tra-
vés de la empresa DR Deutsche Recycling Service GmbH/take-e-way GmbH. También se puede entregar el aparato eléctrico viejo en los puntos
de recogida designados por las autoridades locales de eliminación de residuos. Contribuye de manera importante a la reutilización, el reciclado y
otras formas de recuperación de los aparatos usados, enviándolos a una recogida selectiva en los grupos de recogida correctos.
Como usuario final, usted es responsable de eliminar los datos personales de los residuos de aparatos eléctricos y electrónicos antes de su
entrega.
ES
4344
MANUEL
                                   FRANÇAIS
Cher client,

Nous sommes ravis que vous ayez choisi un appareil de la gamme de produits SPORTSTECH. Avec les
équipements sportifs de SPORTSTECH, vous obtenez la plus haute qualité et la meilleure technologie.

Afin d'utiliser pleinement le potentiel de votre appareil et de pouvoir l'apprécier pendant de nombreuses
années, lisez attentivement ce manuel avant l'utilisation et le début de votre entraînement et utilisez l'ap-
pareil conformément aux instructions. La sécurité et le fonctionnement opérationnelles de l'appareil ne
peuvent être garanties que si les les consignes de sécurité contenues dans ce manuel d'utilisation sont
respectées. Nous n'assumons aucune responsabilité pour les dommages résultant d'une mauvaise utili-
sation ou d'un fonctionnement incorrect.

     i
                  Veuillez vous assurer que toutes les personnes qui utilisent l'appareil ont lu et compris
                  le manuel d'utilisateur.

Gardez le manuel d'utilisateur dans un endroit sûr pour y avoir accès à
tout moment si nécessaire.
                                                                                                                FR

                                                    45
Nos tutoriels vidéo pour vous!
Montage, utilisation, démontage.
1. Scannez le code QR
2. Regarder les vidéos
3. Démarrez rapidement et en toute sécurité
Lien vers les vidéos:
https://service.innovamaxx.de/sx100_video
Vous pouvez aussi nous trouver sur les réseaux sociaux!
Retrouve les dernières informations sur les produits, le contenu des entraînements et
bien plus encore sur notre:
la page Instagram la page Facebook
https://www.instagram.com/sportstech.de https://www.facebook.com/sportstech.de
46CONTENU
1. AVIS DE SÉCURITÉ IMPORTANT................................................................................. 48
2. DESSIN ÉCLATÉ/LISTE DES PIÈCES DE RECHANGE...................................................... 49
3. INSTALLATION......................................................................................................... 50
4. OPÉRATION DE L'ORDINATEUR.................................................................................. 54
5. INFORMATIONS EXERCICE......................................................................................... 55
6. EXERCICE D'ÉTIREMENT........................................................................................... 56
7. MISE AU REBUT....................................................................................................... 57
FR
47AVIS DE SÉCURITÉ IMPORTANT
!
Cette machine d'exercice est construite pour une sécurité optimale. Cependant,
certaines précautions s'appliquent chaque fois que vous utilisez un appareil
d'exercice. Assurez-vous de lire le manuel en entier avant d'assembler ou d'utiliser
votre machine. En particulier, notez les précautions de sécurité suivantes.
1. Gardez toujours les enfants et les animaux domestiques à l'écart de la machine. Ne laissez pas les enfants sans
surveillance dans la même pièce que la machine.
2. Une seule personne à la fois devrait utiliser la machine.
3. Si l'utilisateur ressent des vertiges, des nausées, des douleurs thoraciques ou tout autre symptôme anormal, arrêtez
immédiatement l'entraînement et consultez un médecin.
4. Positionnez la machine sur une surface claire et plane. N'utilisez pas la machine près de l'eau ou à l'extérieur.
5. Gardez les mains à l'écart de toutes les pièces mobiles.
6. Toujours porter des vêtements d'entraînement appropriés lors de l'exercice. Ne portez pas de peignoirs ou d'autres
vêtements qui pourraient se coincer dans la machine. Des chaussures de course ou de sport sont également
nécessaires lors de l'utilisation de la machine.
7. Utilisez la machine uniquement pour l'utilisation prévue décrite dans ce manuel. N'utilisez pas d'accessoires non
recommandés par le fabricant.
8. Ne placez aucun objet pointu autour de la machine.
9. Une personne handicapée ne doit pas utiliser la machine sans la présence d'une personne qualifiée ou d'un médecin.
10. Avant d'utiliser la machine pour faire de l'exercice, faites toujours des étirements.
11. N'utilisez jamais la machine si elle ne fonctionne pas correctement.
12. Un observateur est recommandé pendant les exercices.
13. Toujours porter des vêtements appropriés pendant l‘entrainement. Chaussures de course ou d‘aérobic sont également
nécessaires.
14. Avant d’exercer, toujours faire des étirements au préalable.
15. La puissance de l‘appareil augmente avec la vitesse et vice versa. La machine est équipée avec un bouton de réglage,
qui permet ajuster la résistance.
ATTENTION
Avant de commencer un programme d'exercice, consultez votre médecin. Ceci est
particulièrement important pour les personnes de plus de 35 ans ou les personnes ayant des
problèmes de santé préexistants. Lisez toutes les instructions avant d'utiliser un appareil de
fitness. Nous n'assumons aucune responsabilité pour les blessures ou les dommages matériels
subis par ou à travers l'utilisation de ce produit.
48DESSIN ÉCLATÉ/LISTE DES PIÈCES DE RECHANGE
A l‘adresse suivante
vous trouverez le dessin éclaté
et la liste des pièces de rechange :
https://service.innovamaxx.de/sx100_spareparts
FR
49INSTALLATION
PRÉPARATION:
A. Avant l’assemblage, assurez-vous que vous aurez assez d'espace autour de l'article.
B. Utilisez l’outillage présent pour l'assemblage.
C. Avant d'assembler veuillez vérifier si toutes les pièces nécessaires sont disponibles. Sous le
QR Code/Lien de la page précédente, vous trouverez une vue éclatée et numérotée de toutes les pièces
composant le Speedbike.
Serrez fermement tous les composants et
les pièces préassemblées !
Instruction d’assemblage: 1)
Connectez le tube avant avec le cadre, et in-
stallez la rondelle plate 10, la rondelle 10 sur
les boulons et mettez les sur les vis en forme
de couvercle. Utilisez une clé ouverte pour
les fixer. L’installation du tube arrière se fait
de la même manière.
Remarque: Veuillez régler la sangle de pieds
1 1.2 noirs pour rendre l'équilibre si elle n’est pas
stable
2)
Les sangles de pied sont marqués avec L
et R. Veuillez déposer 2 liquides rouges de
blocage de vis dans la courroie R et fixez la
avec un trou fileté droit en utilisant notre clé.
Et déposez 2 liquides rouges de verrouillage
de vis dans la sangle L et fixez la avec le
trou gauche fileté.
Note: L et R sont marqués sur la manivelle aussi. Veuil-
lez l’installer correctement sinon les produits seront
2 2.2 endommagés. Et veuillez attacher la sangle pied pour
éviter qu’elle ne tombe après une longue utilisation.
50a)
Desserrez le frein et réglez le coussin à la hauteur
appropriée. Fixez le frein et les sièges.
3
b)
Vous pouvez régler le siège du coussin en ar-
rière et en avant en desserrant les boulons à
tête-prune à une situation confortable. Ensuite,
il suffit de verrouiller s'il vous plaît.
3.a
FR
4).
Retirez les accoudoirs des sièges fixes, mettez-les à
travers le tube en forme de carré, puis fixez les à
l'aide des vis de blocage et vous pouvez également
ajuster la hauteur.
4
515).
Retirez l'accoudoir. Mettez le au niveau des trous de
vis, empilez la rondelle et le vis du cylindre pour les
fixer avec une clé 6 côtés.
5
6).
Mettez le couvercle et l'accoudoir comme sur la photo.
Veuillez appuyez doucement sur le couvercle et il sera
automatiquement fixé à l'accoudoir.
6
7).
Fixez la montre électronique en fixant les fentes et
connectez les câbles comme sur la photo. (Double fil
avec Pulse à droite et un seul fil avec capteur gauche.
7
528).
Veuillez garder les câbles encombrés à
l'intérieur du tube.
8
9).
Regardez la tête du frein sur la photo.
Veuillez faire tourner la tête vers la droite, la
résistance du vélo augmentera. Si une urgence
FR
se produit, Veuillez appuyer sur la tête du frein
et le vélo s'arrêtera immédiatement pour éviter
toute blessure.
9
53OPÉRATION DE L'ORDINATEUR
Time 00—99:59 Minute: Seconde
Speed 00—99.9 km/h
Distance 0.00—99.99 Km
Odometer 0.00—999.99 Km
Heart Rate 40—240BPM (Optional)
Calorie 0-999.9Kcal
MODE: Cette touche vous permet de sélectionner et de verrouiller une fonction particulière
que vous voulez. Appuyez pour choisir SCAN ou LOCK,si vous ne voulez pas le mode
SCAN, appuyez sur la touche MODE jusqu'à ce que le pointeur soit à côté de la fonction
"clignotante" que vous voulez.
AUTO ON /OFF: Le moniteur se met en marche automatiquement lorsque la machine d'exercice est en
mouvement. Le moniteur se met automatiquement hors tension lorsque la vitesse n'a pas
d'entrée de signal ou lorsqu’on appuit sur aucune touche pour environ 4 minutes
RESET: L'unité peut être réinitialisé soit en changeant la batterie ou en appuyant sur la touche
MODE pendant 3 secondes.
SPEED: Appuyez sur la touche MODE jusqu'à ce que le pointeur avance vers SPEED.
L'ordinateur affichera la vitesse actuelle.
DISTANCE: Appuyez sur la touche MODE jusqu'à ce que le pointeur passe à DIST. L'ordinateur
affichera chaque distance de voyage que vous avez voyagé.
TIME: Appuyez sur la touche MODE jusqu'à ce que le pointeur passe vers TIME. Le temps
d’entraînement total sera affiché lors du démarrage de l'exercice.
CALORIES: Appuyez sur la touche Mode jusqu'à ce que le pointeur avance vers CAL.
L'ordinateur affichera le nombre total calories brûlées lors du démarrage de l'exercice.
ODOMETER: Appuyez sur la touche MODE jusqu'à ce que le pointeur avance vers ODOMETER. La
distance totale cumulée sera affichée.
54Sie können auch lesen