Gebrauchs- und Pflegeanleitung für Dutch Oven Vario User Manual and Care Instructions for Dutch Oven Vario Notice d'utilisation et d'entretien ...
←
→
Transkription von Seiteninhalten
Wenn Ihr Browser die Seite nicht korrekt rendert, bitte, lesen Sie den Inhalt der Seite unten
Gebrauchs- und Pflegeanleitung
für Dutch Oven Vario

User Manual and Care Instructions for Dutch Oven Vario

Notice d‘utilisation et d‘entretien pour
Marmite en fonte Vario
Art.-Nr. 25425
Gebrauchs- und Pflegeanleitung für Dutch Oven Vario Sehr geehrter RÖSLE-Kunde, vielen Dank, dass Sie sich für den hochwertigen Dutch Oven aus dem Hause RÖSLE entschieden haben. Eine gute Wahl und eine Entscheidung für ein langlebiges Qualitäts produkt. Damit Sie über viele Jahre Freude haben, lesen Sie bitte die folgenden Produktinforma tionen, Hinweise zur optimalen Handhabung und Pflege sowie Sicherheitsempfehlungen und bewahren Sie die Bedienungsanleitung an einem geschützten Ort auf, damit Sie die Details jederzeit nachlesen können. PRODUKTBESCHREIBUNG Der RÖSLE Dutch Oven Vario kann vielseitig fürs Kochen, Braten und Backen unmittelbar im Feuer, auf der Kochstelle, im Backofen, auf dem Grillrost oder auf jeder anderen Hitzequelle genutzt werden. – Auch ideal als Partytopf durch sein großes Fassungsvermögen einsetzbar. – Geeignet für folgende Herdarten: Elektro Keramik Gas Induktion Backofen Grill
WICHTIGE SICHERHEITSHINWEISE
Bitte beachten Sie die nachfolgend aufgeführten Hinweise, um jegliche Sicherheits
risiken auszuschließen und Beschädigungen am Produkt zu vermeiden. Lesen Sie
bitte alle Sicherheitshinweise aufmerksam und vollständig durch. Alle Vorgaben sind
unverändert einzubehalten.
VORSICHT:
Die gusseisernen Handgriffe, Deckelknopf sowie Tragebügel
können bei Verwendung sehr heiß werden.
VORSICHT:
Den Dutch Oven niemals direkt in offene Flammen, sondern
auf Glut stellen.
VORSICHT:
Beim Öffnen des Deckels kann heißer Dampf austreten.
Aufgeheizten Gusstopf, Deckel und Tragebügel immer mit hitze
beständigen und geeigneten Handschuhen anfassen.
• Stellen Sie den Dutch Oven immer langsam auf das Kochfeld und ziehen Sie
diesen nicht über das Kochfeld. Es kann zu tiefen Kratzern in der Oberfläche der
Kochstelle kommen.
• Bei Verwendung auf dem Grill sind die Sicherheitshinweise des Grill-Herstellers zu
beachten.
• Den Dutch Oven nicht auf dem Seitentisch oder Seitenkocher des Grills stellen oder
verwenden. Der Topf samt Inhalt ist zu schwer!
• Stellen Sie sicher, dass der Deckelknopf stets gut angezogen ist und ziehen Sie
diesen ggf. nach.
• Vergewissern Sie sich, dass der Tragebügel richtig eingehängt ist, bevor Sie ihn an
heben.
• Sollte der Topfbügel zum Aufhängen benutzt werden, vergewissern Sie sich über die
Maximalbelastung der verwendeten Aufhängevorrichtung.
• Um die Emaillebeschichtung nicht zu beschädigen, nur Küchenhelfer aus
Holz, Kunststoff oder Silikon verwenden. Nicht mit spitzen oder scharfkantigen
Gegenständen rühren.
• Darauf achten, dass die Flüssigkeiten aus den Speisen nie vollständig verdampfen.
So wird ein Anbrennen der Lebensmittel und eine Beschädigung des Kochgeschirrs
oder der Heizquelle verhindert.
• Lassen Sie den Topf nie unbeaufsichtigt und halten Sie Kinder und Haustiere vom
heißen Topf fern.
• Den heißen Topf immer auf eine hitzebeständige Unterlage stellen. Nie direkt auf
einen kalten Untergrund abstellen, um Rissbildungen zu vermeiden.
• Den Dutch Oven nicht fallen lassen oder anschlagen, da Gusseisen ein sprödes
Material ist, das zerbrechen kann oder Risse bekommt.
• Den heißen Topf niemals mit kaltem Wasser abschrecken. Der Topf könnte bersten!
• Falls es zu einem Fettbrand kommen sollte, diesen niemals mit Wasser oder
wasserhaltigen Flüssigkeiten löschen! Bitte verwenden Sie eine Löschdecke oder
den Deckel des Kochgeschirrs.EINBRENNEN UND VORBEHANDELN VOR DEM ERSTEN GEBRAUCH
• Topf und Deckel mit warmem Wasser, etwas Spülmittel und einem weichen
Spülschwamm oder einer Geschirrspülbürste reinigen. Anschließend klarspülen.
• Gründlich abtrocknen.
• Gesamten Topf- und Deckeloberfläche innen und außen mit neutralem hitzebeständigem
Speiseöl oder Pflanzenfett einreiben – kein Olivenöl verwenden!
• Den Topf und den Deckel separat in einen vorgeheizten Backofen bei 180°C für
2 Stunden stellen.
3 Rauchentwicklung! Für ausreichend Frischluftaustausch sorgen.
• Sie können diesen Vorgang auch auf einem Holzkohle- oder Gasgrill durchführen.
• Den Dutch Oven langsam abkühlen lassen.
• Nach dem vollständigen Abkühlen, den Topf nochmals komplett mit neutralem hitze
beständigem Speiseöl oder Pflanzenfett einreiben.
• Überschüssiges Fett mit einem Bauwolltuch abreiben.
• Nun ist der Topf gebrauchsfertig.
KOCHEN, BRATEN UND BACKEN
Einsatz im Holzkohle- und Gasgrill
• RÖSLE Vario-Grillsystem einlegen / alternativ Grillroste einlegen.
• Anschließend den Grill ohne Dutch Oven ca. 15 Minuten, entsprechend der
Anweisungen in der Bedienungsanleitung des RÖSLE Grills, auf die gewünschte
Temperatur vorheizen.
• Grillgut in den Dutch Oven geben und den Deckel aufsetzen.
• Dutch Oven in das Vario-Grillrostsystem einsetzen / alternativ den Topf auf das Grillrost
stellen und entsprechend nach dem Rezept bis zur gewünschten Garstufe zubereiten.
Einsatz an der Feuerstelle
Bei Anwendung mit Kohle-Briketts benötigen Sie viel Geduld und Übung. Die
Temperaturreglung des Dutch Ovens erfolgt über die abgeschätzte Menge an Kohle-
Briketts unterhalb des Topfs und auf dem Deckel. Mit zunehmender Erfahrung gelingt die
Regulierung über die Menge und Positionierung der Kohle-Briketts immer besser – es gilt
viel ausprobieren!
• Bringen Sie qualitativ hochwertige Briketts mit einem Anzündkamin oder in einer
Feuerstelle zum Glühen.
• Briketts kreisförmig auf einer feuerfesten Unterlage anordnen.
• Dutch Oven mit Grillgut auf einem Gestell abstellen oder hängen Sie diesen an einem
Dreibein knapp über die glühende Kohle. Achten Sie darauf das der Dutch Oven einen
stabilen Stand hat.
• Dutch Oven Deckel aufsetzen und Kohle-Briketts mit einer Zange schachbrettartig
ausbreiten.
• Drehen Sie den Topf regelmäßig eine viertel Umdrehung, damit eine gleichmäßige
Temperaturverteilung stattfindet.
• Rezept bis zur gewünschten Garstufe zubereiten.Sie sollten den Dutch Oven nicht direkt auf die Glut stellen. Hierbei kommt
es zu punktuellen Hitzespots, die ein ungleichmäßiges Garergebnis oder
Anbrennen zur Folge haben. Um dies zu verhindern, können beispielsweise
drei Pflastersteine oder Ähnliches zwischen die Briketts gesetzt werden, auf
dem Sie den Dutch Oven darauf abstellen können, sodass zwischen den
Briketts und Topfunterseite Luft zirkulieren kann.
Eine sehr gute Eigenschaft des Dutch Ovens ist die hohe Wärmespeiche
rung. Grade am Anfang tendieren Einsteiger dazu, zu viel Briketts unterhalb
des Topfbodens anzuordnen. Tasten Sie sich hier langsam heran.
Die Patina wird im Gebrauch des Dutch Oven immer dunkler und mit
dem Alter schwarz. Dies ist kein Grund zur Sorge. Anfänglich sollten noch
keine säurereichen Speisen im Topf zubereitet werden. Dadurch wird die
noch frische Patina aufgelöst. Diese Art von Speisen sollten erst zubereitet
werden, wenn die Patina richtig ausgebildet und ausgehärtet ist.
Temperaturtabelle
Folgend finden Sie eine grobe Übersicht der Temperaturen im Dutch Oven bei einer
bestimmten Anzahl an Briketts:
Temperatur ~ 175 °C ~ 190 °C ~ 240 °C
Anzahl der Briketts 25 30 40
Unten / Oben 10 / 15 12 / 18 16 / 24
REINIGUNG, PFLEGE UND AUFBEWAHRUNG
Wie reinige ich den RÖSLE Dutch Oven
• Dieses Kochgeschirr ist nicht spülmaschinengeeignet.
• Dutch Oven vor dem Reinigen immer abkühlen lassen. Niemals das heiße
Kochgeschirr in kaltes Wasser tauchen, da ein thermischer Schock die Emaille und
den Guss beschädigen könnte.
• Angebrannte Speisereste in heißem Wasser einweichen und schonend alle
Oberflächen reinigen. Verwenden Sie dabei keine Stahlwolle, Stahlbürste oder
Scheuermittel. Hierbei würden Sie die Emaille und die durch das Einbrennen
gebildete Patina abtragen.
• Spülen Sie den Dutch Oven gründlich mit klarem Wasser aus.
• Nach dem Reinigen immer gründlich abtrocknen und Dutch Oven niemals feucht
aufbewahren.Hinweis zur Pflege
• Nach der Reinigung den Topf komplett mit einer kleinen Menge neutralem
hitzebeständigem Speiseöl oder Pflanzenfett einreiben.
• Überschüssiges Fett mit einem Bauwolltuch abreiben.
• Zum Schutz gegen Feuchtigkeit im Topfinneren ein Tuch zwischen Deckel und Topf
klemmen.
ERNEUTES EINBRENNEN
Nach häufigem Garen säuerlicher Speisen, nach mechanischer Beschädigung
der Emaille oder nach Abtragen der Patina, kann der Dutch Oven etwas trocken
und stumpf aussehen. In diesem Fall sollte der Dutch Oven erneut eingebrannt
werden. Dadurch werden das Anbrennen und die Rostbildung deutlich minimiert.
• Folgen Sie dem Schritt „Wie reinige ich den RÖSLE Dutch Oven“.
• Gesamte Topf- und Deckeloberfläche innen und außen mit neutralem hitzebeständigem
Speiseöl oder Pflanzenfett einreiben – kein Olivenöl verwenden!
• Den Topf und den Deckel separat in einen vorgeheizten Backofen bei 180°C für
2 Stunden stellen.
3 Rauchentwicklung! Für ausreichend Frischluftaustausch sorgen.
• Sie können diesen Vorgang auch auf einem Holzkohle- oder Gasgrill durchführen.
• Den Dutch Oven langsam abkühlen lassen.
• Nach dem vollständigen Abkühlen, den Topf nochmals komplett mit neutralem
hitzebeständigem Speiseöl oder Pflanzenfett einreiben.
• Überschüssiges Fett mit einem Bauwolltuch abreiben.
ALLGEMEINE HINWEISE UND GEWÄHRLEISTUNG
Für Schäden am Dutch Oven und Zubehör wird keine Haftung übernommen, die
auf folgende Ursachen zurückgehen:
• auf nicht bestimmungsgemäßen Gebrauch.
• auf ungeeignete, unsachgemäße oder nachlässige Behandlung.
• auf Nichtbefolgen dieser Bedienungsanleitung.
• auf nicht sachgemäß durchgeführte Reparaturen.
• auf den Einbau von nicht der Originalausführung entsprechenden Ersatzteilen
und Zubehör.
• bei Missbrauch.
Auf diesen Artikel erhalten Sie die gesetzliche Gewährleistung von 2 Jahren.
Die Gewährleistung beginnt mit dem Datum des Kaufbeleges.
Bitte bewahren Sie diesen zum Nachweis sorgfältig auf.
Es wird nur für Schäden gehaftet welche auf vorsätzlichem oder grob fahrlässigem
Handeln des gesetzlichen Vertreters unserer Gesellschaft beruht.Bei Fragen oder Reklamationen wenden Sie sich bitte an Ihren Fachhandel. Bewahren Sie diese Gebrauchsanweisung zum Nachschlagen auf. SERVICE UND KONTAKT Für Fragen, Anregungen und Reklamationen ist unsere persönliche Kundenbetreuung von Montag bis Freitag zwischen 8 – 18 Uhr für Sie erreichbar. E-Mail: produktanfrage@roesle.de Telefon: 08342 912-270 Telefax: 08342 912-190 Wir wünschen Ihnen viel Spaß und Freude mit Ihrem neuen RÖSLE Kochgeschirr. Ihr RÖSLE Team aus Marktoberdorf Weitere Informationen zu unseren Produkten und Anregungen rund ums Kochen unter www.roesle.com
User Manual and Care Instructions
for Dutch Oven Vario

Dear RÖSLE customer,
Thank you for purchasing the RÖSLE high-quality Dutch Oven. You have made a good
choice and an investment in quality and durability.
To ensure that your Dutch Oven brings you pleasure for many years to come, please read
the following product information, the instructions on optimum care and handling and the
safety recommendations, and keep the user manual in a safe place so that you can refer
to it at any time.

PRODUCT DESCRIPTION
The versatile RÖSLE Dutch Oven Vario can be used for cooking, roasting and baking and
can be placed directly into an open-fire stove, on the hob, in the oven, on the barbecue grill
grate or any other heat source.
– Also ideal for use as a party pot thanks to its large capacity. –

Suitable for the following types of cooker:

Electric   Ceramic   Gas   Induction   Oven   Barbecue grill
IMPORTANT SAFETY INSTRUCTIONS
Please pay attention to the following instructions in order to avoid any safety risks
or damage to the product. Please read all safety instructions carefully and in full.
All instructions and guidelines must be observed without modification.

             CAUTION:
                      The cast iron grips, lid knob and carry handle can
                      become extremely hot during use.
             CAUTION:
                      Never place the Dutch Oven directly into or onto a naked
                      flame – always place it onto or over embers only.
             CAUTION:
                      When opening the lid, hot steam may escape.

             Never touch the hot pot, lid or carry handle without wearing suitable
             heatproof oven gloves.

•   Always place the Dutch Oven slowly and carefully onto the hob and never drag it
    across the hob. This can cause deep scratches in the hob surface.
•   When using on a barbecue/grill, follow the barbecue/grill manufacturer‘s safety
    instructions.
•   Do not place or use the Dutch Oven on the barbecue grill side table or side burner.
    The pot plus its contents are heavy!
•   Make sure that the lid knob is always tightened correctly and retighten if necessary.
•   Ensure that the carry handle is inserted correctly before lifting the pot.
•   If the pot carry handle is used to hang the Dutch Oven, make sure that the
    maximum load of the hanging device is not exceeded.
•   To avoid damaging the enamelling, use kitchen aids made of wood, plastic or
    silicone only. Do not stir using pointed or sharp objects.
•   Ensure that the liquids never completely evaporate from the food. This prevents the
    food from burning and damaging the cookware or the heat source.
•   Never leave the pot unattended and keep children and pets away from the pot when
    hot.
•   Always place the pot on a heat-resistant base. Never place the pot directly onto a
    cold base, to prevent the formation of cracks.
•   Do not drop or hit the Dutch Oven, as cast iron is a brittle material which can crack
    or shatter.
•   Never chill the hot pot with cold water. The pot could crack or shatter!
•   Never use water or liquids containing water to extinguish a fire caused by fat! Please
    use a fire blanket or the lid of the cookware.
CURING AND SEASONING BEFORE USE
• Wash the pot and the lid in warm water with a little washing-up liquid and a soft dish
sponge or washing-up brush. Then rinse with clean water.
• Dry thoroughly.
• Rub a neutral, high smoke-point cooking oil or vegetable fat all over the surface of the
pot and lid, inside and out – never use olive oil!
• Place the pot and the lid separately in a preheated oven for 2 hours at 180 °C.
3 Smoke emission! Ensure that there is sufficient circulation of fresh air.
• You can also do this on a charcoal or gas-fired barbecue.
• Allow the Dutch Oven to cool off slowly.
• Once the pot has cooled off completely, rub the entire surface once again with a neutral,
high smoke-point cooking oil or vegetable fat.
• Wipe off any excess grease using a cotton cloth.
• Now the pot is ready to use.
COOKING, FRYING AND BAKING
Use on charcoal and gas-fired barbecues
• Insert the Rösle Vario barbecue grill system/an alternative barbecue grill grate
• Then preheat the barbecue grill to the desired temperature for approximately 15 minutes
without the Dutch Oven according to the instructions in the RÖSLE Grill user manual.
• Place the food to be grilled into the Dutch Oven, then put on the lid.
• Place the Dutch Oven into the Vario barbecue grill system/or place the pot onto the
barbecue grate and cook to the desired doneness according to the recipe.
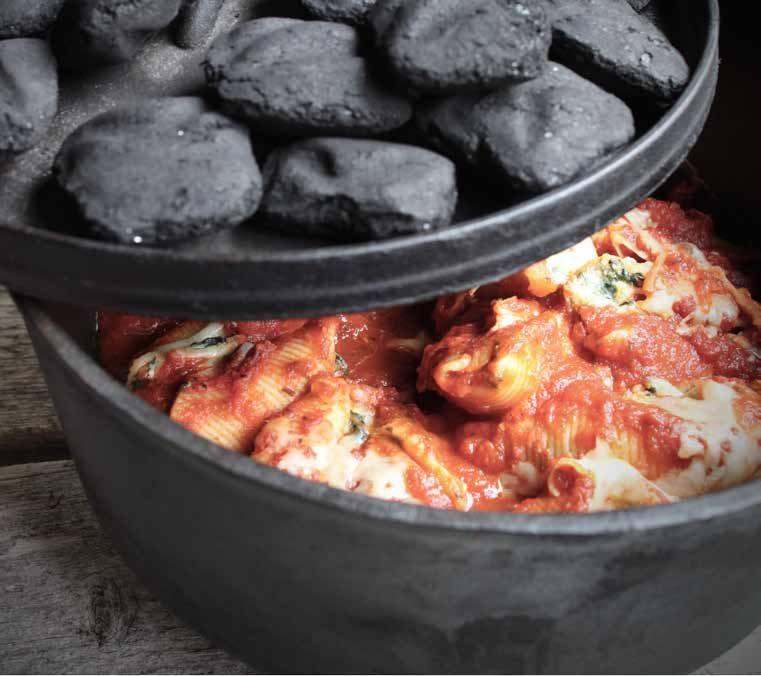
Use on an open-fire stove
You will need plenty of patience and practice to use the Dutch Oven with charcoal
briquettes. The temperature of the Dutch Oven is controlled by the estimated amount
of charcoal briquettes underneath the pot and on the lid. Regulating the temperature
using the quantity and position of the charcoal briquettes becomes easier with experience –
practice makes perfect!
• Light high-quality briquettes in a chimney starter or an open-fire stove.
• Position the briquettes in a circular shape on a fireproof base.
• Place the Dutch Oven containing the food to be grilled onto a grate, or hang it just
above the embers on a tripod stand. Make sure that the Dutch Oven is on a stable
base or stand.
• Put the lid on the Dutch Oven and use tongs to spread out the charcoal briquettes
in an evenly-spaced checkerboad pattern.
• Turn the pot by one-quarter of a revolution regularly to ensure an even temperature
distribution.
• Cook the recipe to the desired doneness.Do not place the Dutch Oven directly onto the embers. This is due to
the random heat spots, which will cause an uneven cooking result or
burning. To prevent this from happening, three paving stones or similar
can be inserted between the briquettes, onto which you can place the
Dutch Oven, enabling air to circulate between the briquettes and the
underside of the pot.
One excellent property of the Dutch Oven is its high heat storage ability.
Complete novices usually tend to place too many briquettes under the base
of the pot. Proceed with caution here.
The patina becomes darker the more the Dutch Oven is used and turns
black with age. This is not a cause for concern. Highly acidic dishes should
not be cooked in the pot initially. Acidic foods will remove the still fresh
patina. These dishes should only be prepared in the pot once the patina has
developed and hardened correctly.
Temperature table
Below you will find a rough overview of the temperatures in the Dutch Oven with a
specific number of briquettes:
Temperature ~ 175 °C / 347 °F ~ 190 °C / 374 °F ~ 240 °C / 464 °F
Number of briquettes 25 30 40
Below / Above 10 / 15 12 / 18 16 / 24
CLEANING, CARE AND STORAGE
How to clean the RÖSLE Dutch Oven
• This cookware is not dishwasher-safe.
• Always allow the Dutch Oven to cool off before cleaning. Never immerse the hot
cookware in cold water, as a thermal shock could crack the enamel and damage the
cast iron.
• Soak burned-on food residue in hot water and clean all surfaces gently. Never use
steel wool, steel brushes, abrasive cleaners or scouring agents. These products
would remove the enamel and the patina formed by curing.
• Rinse out the Dutch Oven thoroughly with clean water.
• After cleaning, always dry the Dutch Oven thoroughly and never store when wet or
damp.Care instructions
• After cleaning the pot, rub the entire surface with a small amount of neutral high
smoke-point cooking oil or vegetable fat.
• Wipe off any excess grease using a cotton cloth.
• To prevent moisture inside the pot, place a cloth between the pot and the lid.
RESEASONING
After frequently cooking acidic meals, mechanical damage to the enamelling,
or once the patina has worn off, the Dutch Oven can take on a somewhat dull
and tarnished appearance. If this is case, the Dutch Oven should be reseasoned.
This greatly minimises burning and the formation of rust.
• Follow the instructions for cleaning the Dutch Oven.
• Rub a neutral, high smoke-point cooking oil or vegetable fat all over the surface of the
pot and lid, inside and out – never use olive oil!
• Place the pot and the lid separately in a preheated oven for 2 hours at 180°C.
3 Smoke emission! Ensure that there is sufficient circulation of fresh air
• You can also do this on a charcoal or gas-fired barbecue.
• Allow the Dutch Oven to cool off slowly.
• Once the pot has cooled off completely, rub the entire surface once again with a neutral,
high smoke-point cooking oil or vegetable fat.
• Wipe off any excess grease using a cotton cloth.
GENERAL INFORMATION AND WARRANTY
We accept no liability for damage to the Dutch Oven and its accessories which
is caused by the following:
• incorrect use.
• inappropriate, improper or negligent handling.
• failure to follow this instruction manual.
• improper repairs.
• installation of non-original spare parts and accessories.
• misuse.
This article is covered by the statutory warranty of 2 years.
The warranty period commences from the date shown on the receipt.
Please keep your receipt in a safe place for proof of warranty.
Liability is limited to damage resulting from deliberate or grossly negligent
actions on the part of the legal representative of our company.
For questions or complaints, please contact your specialised dealer.
Keep this instruction manual for future reference.SERVICE AND CONTACT For questions, suggestions or complaints, please contact our personal customer service department from Mondays to Fridays from 8 am to 6 pm. E-Mail: produktanfrage@roesle.de Phone: +49 8342 912-270 Fax: +49 8342 912-190 We hope you enjoy your new RÖSLE product! Your RÖSLE team from Marktoberdorf For more information on our products and all kinds of cooking-related ideas visit www.roesle.com
Notice d‘utilisation et d‘entretien pour
Marmite en fonte Vario

Très cher client RÖSLE,
Nous vous remercions d‘avoir choisi la marmite en fonte de haute qualité de la maison
RÖSLE. Vous avez ainsi fait un choix judicieux et opté pour un produit de qualité durable.
Afin d‘en profiter pendant de nombreuses années, veuillez lire les informations sur le
produit, les consignes pour une manipulation et un entretien optimaux, ainsi que les
recommandations de sécurité qui suivent, et conserver la notice d‘utilisation dans un lieu
sûr afin de pouvoir consulter à nouveau ces informations à tout moment.

DESCRIPTION DU PRODUIT
La marmite en fonte Vario RÖSLE peut être utilisée de multiples manières pour cuire, rôtir
et mijoter directement dans un feu, sur une cuisinière, au four, sur un grill ou toute autre
source de chaleur.
– Idéale également comme marmite de fête grâce à sa grande contenance. –

Compatible avec les types de feux suivants :

Électrique Céramique   Gaz   Induction   Four   Grill
CONSIGNES DE SÉCURITÉ IMPORTANTES
Veuillez respecter les consignes détaillées ci-après afin d‘éviter tout risque et toute
détérioration du produit. Veuillez lire attentivement toutes les consignes de sécurité
dans leur intégralité. Toutes les prescriptions doivent être respectées sans aucun écart.

             ATTENTION :	Les poignées, le bouton du couvercle et le manche en fonte
                          peuvent devenir très chauds durant l‘utilisation.
             ATTENTION :	Ne jamais placer directement la marmite en fonte dans des
                          flammes ouvertes, mais sur des braises.
             ATTENTION :	Lors de l‘ouverture du couvercle, de la vapeur bouillante
                          peut s‘échapper.

             Saisissez toujours la gamelle en fonte, le couvercle et le manche chauds
             avec des gants appropriés résistant à la chaleur.

•   Déposez toujours lentement la marmite en fonte sur le plan de cuisson et ne la tirez
    pas sur les plaques. Cela pourrait provoquer de profondes rayures sur la surface du
    plan de cuisson.
•   En cas d‘utilisation sur un grill, veuillez respecter les consignes de sécurité du
    fabricant du grill.
•   Ne jamais poser ou utiliser la marmite en fonte sur la desserte ou le réchaud
    situé(e) à côté du grill. La marmite et son contenu pèsent lourd !
•   Assurez-vous que le bouton du couvercle est correctement serré et resserrez-le en
    cas de besoin.
•   Assurez-vous que le manche est correctement accroché avant de le soulever.
•   Si le manche de la marmite doit être utilisé pour la suspendre, assurez-vous de la
    capacité de charge maximale du dispositif de suspension employé.
•   Utilisez exclusivement des ustensiles de cuisine en bois, en plastique ou en silicone
    afin de ne pas endommager l‘émail. Ne pas mélanger avec des objets pointus ou
    coupants.
•   Veillez à ce que les liquides contenus dans les plats ne s‘évaporent jamais
    intégralement. Ainsi, les aliments n‘attachent pas et cela évite une détérioration du
    plat de cuisson ou de la source de chaleur.
•   Ne laissez jamais la marmite sans surveillance et maintenez les enfants et les
    animaux domestiques éloignés de la marmite chaude.
•   Posez toujours la marmite chaude sur un support résistant à la chaleur. Ne la posez
    jamais sur un support froid afin d‘éviter la formation de fissures.
•   Ne pas laisser tomber ni cogner la marmite en fonte car il s‘agit d‘un matériau
    fragile qui peut casser ou se fissure.
•   Ne jamais faire refroidir la marmite chaude avec de l‘eau froide. La marmite
    pourrait exploser !
•   En cas de feu de graisse, ne jamais l‘éteindre avec de l‘eau ou des fluides aqueux !
    Veuillez utiliser une couverture d‘extinction ou le couvercle de la marmite.
CULOTTAGE ET TRAITEMENT PRÉALABLE AVANT LA PREMIÈRE UTILISATION
• Nettoyez la marmite et le couvercle avec de l‘eau chaude, un peu de produit vaisselle
et une éponge de cuisine douce ou une brosse à vaisselle. Rincez ensuite à l‘eau claire.
• Séchez parfaitement.
• Enduisez l‘intégralité de la surface intérieure et extérieure de la marmite et du couvercle
avec de l‘huile alimentaire ou de la graisse végétale neutre résistant à la chaleur :
ne pas utiliser d‘huile d‘olive !
• Placez la marmite et le couvercle séparément dans un four préchauffé à 180 °C pendant
2 heures.
3 Développement de fumée ! Assurez un renouvellement d‘air frais suffisant.
• Vous pouvez également réaliser cette opération sur un grill à charbon ou à gaz.
• Laissez la marmite en fonte refroidir lentement.
• Après refroidissement complet, enduisez une nouvelle fois la marmite entièrement
d‘huile alimentaire ou de graisse végétale neutre résistant à la chaleur.
• Essuyez la graisse en excès avec un torchon en coton.
• La marmite est maintenant prête à l‘emploi.
MIJOTER, RÔTIR ET CUIRE
Utilisation sur un grill à charbon ou à gaz
• Installez le système de grill Vario de Rösle / ou positionnez des grilles
• Ensuite, préchauffez le grill sans la marmite en fonte pendant environ 15 minutes à
la température souhaitée, conformément aux consignes de la notice d‘utilisation du
grill RÖSLE.
• Placez les aliments à griller dans la marmite en fonte et posez le couvercle
• Positionnez la marmite en fonte dans le système de grill Vario / ou placez la marmite sur
la grille et préparez jusqu‘au niveau de cuisson souhaité conformément à la recette.
Utilisation dans un foyer
En cas d‘utilisation de briquettes de charbon, il vous faudra beaucoup de patience et de
pratique. Le réglage de la température de la marmite en fonte est assuré par la quantité de
briquettes de charbon estimée placée sous la marmite et sur le couvercle. En acquérant de
l‘expérience, la régulation à partir de la quantité et du positionnement des briquettes de
charbon s‘améliore : il faut donc essayer encore et encore !
• Faites rougir des briquettes de qualité supérieure avec une cheminée d‘allumage ou
dans un foyer.
• Disposez les briquettes en cercle sur un support réfractaire.
• Déposez la marmite en fonte contenant les aliments à griller sur un support ou
suspendez-la à un trépied juste au-dessus des braises. Assurez-vous que la marmite en
fonte est parfaitement stable.
• Installez le couvercle sur la marmite en fonte et étalez les briquettes de charbon en
quinconce à l‘aide d‘une pince.
• Tournez régulièrement la marmite d‘un quart de tour afin de répartir régulièrement la
température.
• Préparez la recette jusqu‘au niveau de cuisson souhaité.Vous ne devez jamais placer la marmite en fonte directement sur les
braises. Cela entraîne des points chauds ponctuels qui sont à l‘origine d‘un
résultat de cuisson irrégulier ou d‘un attachement des aliments.
Afin d‘éviter cela, il est possible de disposer, par exemple, trois pavés ou
autres entre les briquettes, sur lesquels placer à son tour la marmite en
fonte de manière à ce que de l‘air puisse circuler entre les briquettes et le
fond de la marmite.
L‘accumulation de chaleur importante est une excellente propriété de la
marmite en fonte. Au début notamment, les novices ont tendance à disposer
trop de briquettes sous le fond de la marmite. Dans ce cadre, procédez
donc par tâtonnement.
La patine devient de plus en plus foncée au fil de l‘utilisation de la marmite
en fonte, puis noire avec l‘âge. Cela ne doit pas vous inquiéter. Au début,
aucun aliment très acide ne doit être préparé dans la marmite. Cela
détacherait la patine encore fraîche. Ce type d‘aliments ne doit être préparé
que lorsque la patine est correctement formée et durcie.
Tableau des températures
Vous trouverez ci-après une vue d’ensemble grossière des températures dans la marmite
en fonte pour un nombre défini de briquettes :
Températures ~ 175 °C ~ 190 °C ~ 240 °C
Nombre de briquettes 25 30 40
Bas / Haut 10 / 15 12 / 18 16 / 24
NETTOYAGE, ENTRETIEN ET RANGEMENT
Comment nettoyer la marmite en fonte RÖSLE
• Ce récipient de cuisson n’est pas lavable en machine.
• Toujours laisser la marmite en fonte refroidir avant de la nettoyer. Ne jamais plonger
le récipient de cuisson chaud dans l’eau froide, car un choc thermique pourrait
endommager l’émail et la fonte.
• Faites ramollir les résidus alimentaires ayant attaché dans l’eau chaude et nettoyez
toutes les surfaces délicatement. Dans ce cadre, n’utilisez pas de laine d’acier, de
brosse métallique ou d’abrasifs. Vous élimineriez ainsi l’émail et la patine formée
par le culottage.
• Rincez abondamment la marmite en fonte à l’eau claire.
• Après le nettoyage, séchez toujours parfaitement la marmite en fonte et ne la rangez
jamais humide.Remarque relative à l’entretien
• Après le nettoyage, enduisez toujours la marmite intégralement avec une petite quantité
d’huile alimentaire ou de graisse végétale neutre résistant à la chaleur.
• Essuyez la graisse en excès avec un torchon en coton.
• Coincez un torchon entre le couvercle et la marmite afin de protéger l’intérieur de
l’humidité.
RENOUVELLEMENT DU CULOTTAGE
Après une cuisson fréquente d’aliments acides, après une détérioration
mécanique de l’émail ou après un retrait de la patine, la marmite en fonte peut
avoir l’air un peu sèche et mate. Dans ce cas, la marmite doit être culottée une
nouvelle fois. Cela réduira nettement l’attachement des aliments et la formation
de rouille.
• Effectuez l’étape de nettoyage de la marmite en fonte
• Enduisez l’intégralité de la surface intérieure et extérieure de la marmite et du couvercle
avec de l’huile alimentaire ou de la graisse végétale neutre résistant à la chaleur :
ne pas utiliser d‘huile d‘olive !
• Placez la marmite et le couvercle séparément dans un four préchauffé à 180 °C pendant
2 heures.
3 Développement de fumée ! Assurez un renouvellement d’air frais suffisant
• Vous pouvez également réaliser cette opération sur un grill à charbon ou à gaz.
• Laissez la marmite en fonte refroidir lentement.
• Après refroidissement complet, enduisez une nouvelle fois la marmite entièrement
d’huile alimentaire ou de graisse végétale neutre résistant à la chaleur.
• Essuyez la graisse en excès avec un torchon en coton.
CONSIGNES GÉNÉRALES ET GARANTIE
Aucune responsabilité ne pourra être engagée pour les dommages causés à la marmite en
fonte et aux accessoires si ces dommages sont occasionnés par :
• un usage non conforme.
• un traitement inapproprié, incorrect ou négligent.
• un non-respect de la présente notice d’utilisation.
• des réparations non conformes.
• un montage de pièces de rechange et d’accessoires ne correspondant pas à l’exécution
d’origine.
• une utilisation abusive.
Vous bénéficiez d’une garantie légale de 2 ans sur cet article.
La garantie commence à partir de la date d’achat figurant sur le ticket de caisse.Veuillez le conserver précieusement comme justificatif. Nous ne sommes responsables que des dommages commis intentionnellement ou par négligence grave du représentant légal de notre société. Pour toute question ou réclamation, veuillez-vous adresser à votre revendeur spécialisé. Conservez cette notice d’utilisation en vue d’une utilisation ultérieure. S.A.V. ET CONTACT Pour toute question, suggestion et réclamation, notre assistance clientèle personnalisée est joignable du lundi au vendredi de 8 heures à 18 heures. E-Mail: produktanfrage@roesle.de Téléphone : +49 8342 912-270 Telefax: +49 8342 912-190 Nous vous souhaitons une entière satisfaction et beaucoup de plaisir avec votre nouvel ustensile de cuisine RÖSLE. L’équipe RÖSLE de Marktoberdorf Plus d’informations sur nos produits et suggestions en matière de cuisine sur www.roesle.com
RÖSLE GmbH & Co. KG
Johann-Georg-Fendt-Straße 38
87616 Marktoberdorf
Deutschland
                               02/2019

Tel. +49 8342 912 0
Fax +49 8342 912-190
www.roesle.com
Sie können auch lesen