Installati onsanleitung Installati on Instructi ons Instructi ons d'installati on Instrucciones de instalacion Istruzioni d'installazione ...
←
→
Transkription von Seiteninhalten
Wenn Ihr Browser die Seite nicht korrekt rendert, bitte, lesen Sie den Inhalt der Seite unten
Installationsanleitung
                                 Seite 3

Installation Instructions
                                Page 17

Instructions d‘installation
                                Page 31

Instrucciones de instalacion
                               Página 45

Istruzioni d‘installazione
                               Pagina 59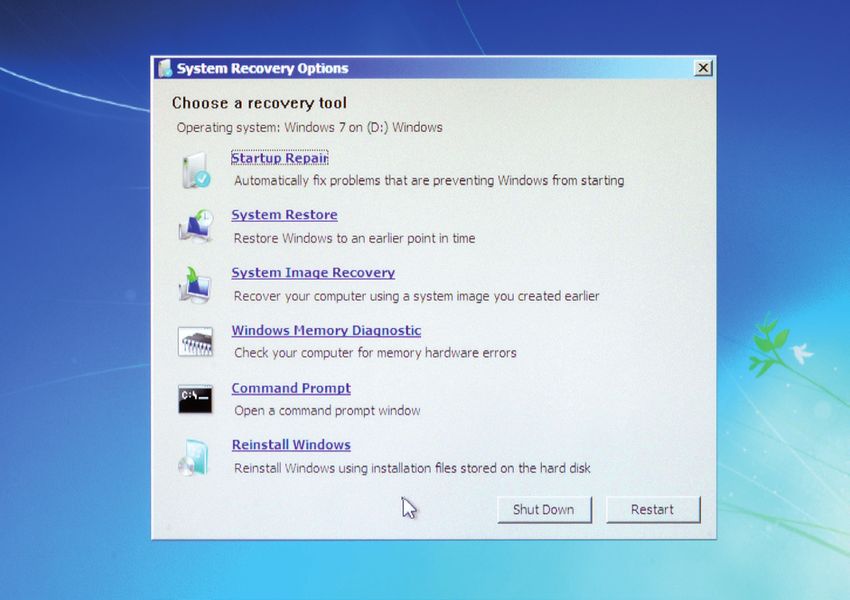
DE

Installationsanleitung
      Stand: Januar 2017

                                3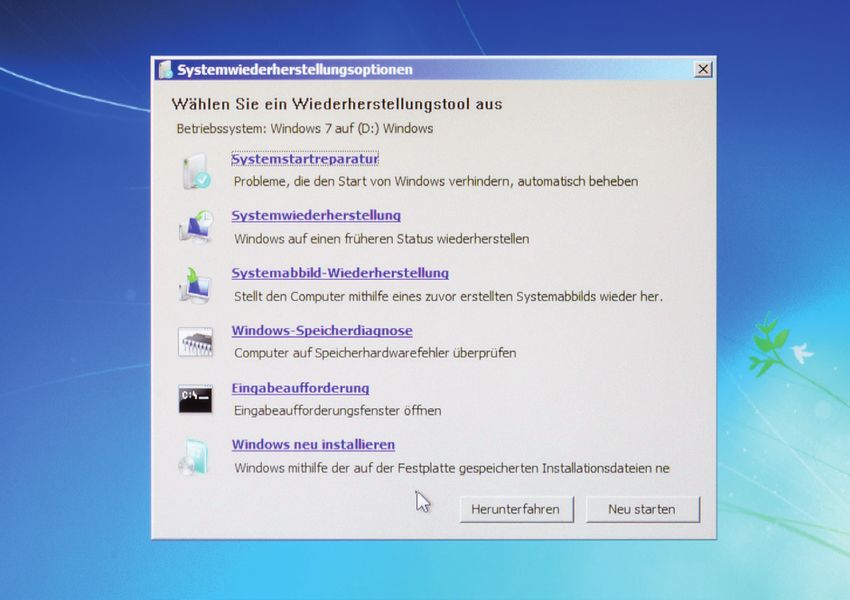
DE                                                                                                                                                                                            DE

Wir gratulieren Ihnen zum Kauf eines PC-Systems von CSL!                                                 Sicherheitshinweise
    Mit diesem System haben Sie sich für ein Produkt entschieden, das nach modernsten techni-            Bitte beachten Sie die folgenden Vorsichtsmaßnahmen, um Ihre eigene Sicherheit und die
    schen Standards gefertigt wurde und Ihnen, wie wir hoffen, lange Freude bereiten wird.               Betriebssicherheit des PCs zu gewährleisten:

    Bitte lesen Sie die Hinweise in dieser Anleitung sorgfältig durch.
                                                                                                            Wenn der PC längere Zeit nicht benutzt wird, schalten Sie diesen aus.

Hinweise zum richtigen Aufbau Ihres PCs                                                                     Benutzen Sie den PC nicht während eines Gewitters, um das Risiko eines Stromschlages
                                                                                                            zu vermeiden.
    Bitte bewahren Sie diese Anleitung griffbereit in der Nähe Ihres PCs auf. Auch bei einer Ver-
    äußerung des PCs sollten die Anleitung und die Treiber-CDs dem neuen Besitzer übergeben                 Stecken Sie keine Gegenstände in die Öffnungen des Gehäuses.
    werden.
                                                                                                            Lassen Sie keine Flüssigkeit an oder in den PC gelangen.
Betriebssicherheit
                                                                                                            Reinigen Sie den PC mit einem weichen, leicht mit Wasser befeuchteten Tuch. Verwen-
    Wenden Sie sich bitte an unseren Kundendienst, wenn Kabel angeschmort oder beschädigt                   den Sie keine flüssigen Reinigungsmittel. Diese können eventuell entflammbare Stoffe
    sind. Betreiben Sie den PC niemals mit einem defekten Kabel! Ein Kabel kann auf keinen Fall             enthalten.
    repariert werden.
                                                                                                            Stellen Sie den PC nicht in der Nähe von Heizgeräten und anderen Wärmequellen auf,
                                                                                                            und blockieren Sie die Belüftungsöffnungen nicht.
Lieferumfang

    Sollte trotz unserer Qualitätskontrolle Ihre Lieferung einmal nicht vollständig sein, kontaktieren      Stellen Sie den PC nicht in einem Schrank, Regal oder Ähnlichem auf.
    Sie uns bitte schnellstmöglich, spätestens innerhalb von 14 Tagen.
                                                                                                            Benutzen Sie den PC nicht, wenn Gehäuseteile entfernt wurden.

PC verkabeln                                                                                                Statische Elektrizität kann die empfindlichen Komponenten des PCs beschädigen. Um
                                                                                                            dies zu vermeiden, muss die statische Elektrizität aus Ihrem Körper abgeleitet werden,
    Verlegen Sie die Kabel so, dass man nicht darauf treten oder darüber stolpern kann, und stellen
                                                                                                            bevor Sie Bauteile im System berühren. Berühren Sie dazu eine nicht lackierte Metallflä-
    Sie keine Gegenstände auf die Kabel. Bitte verkabeln Sie Ihren PC im ausgeschalteten Zustand.
                                                                                                            che am Gehäuse.
    Nur einige Geräte können im eingeschalteten Zustand verkabelt werden, zum Beispiel USB- und
    Firewire (IEEE1394)-Geräte.

    Bitte beachten Sie hierfür die Anleitung der Peripheriegeräte.

Bei Fragen                                                                                               Pflegehinweise
    Wenn Sie Fragen zur Inbetriebnahme des Computers haben, kontaktieren Sie bitte unsere                   Bitte beachten Sie, dass der PC innen verstauben kann, was zu Störungen im Betrieb
    telefonische Hotline unter 0511 - 76 900 200 oder schreiben Sie uns eine E-Mail an:                     führen kann.
    shop@csl-computer.com
                                                                                                            Wir empfehlen, etwa 1× jährlich das Innere des Computers von Staub zu befreien.
                                                                                                            Bei Fragen wenden Sie sich bitte an unsere telefonische Hotline unter 0511 - 76 900 200.

4                                                                                                                                                                                                      5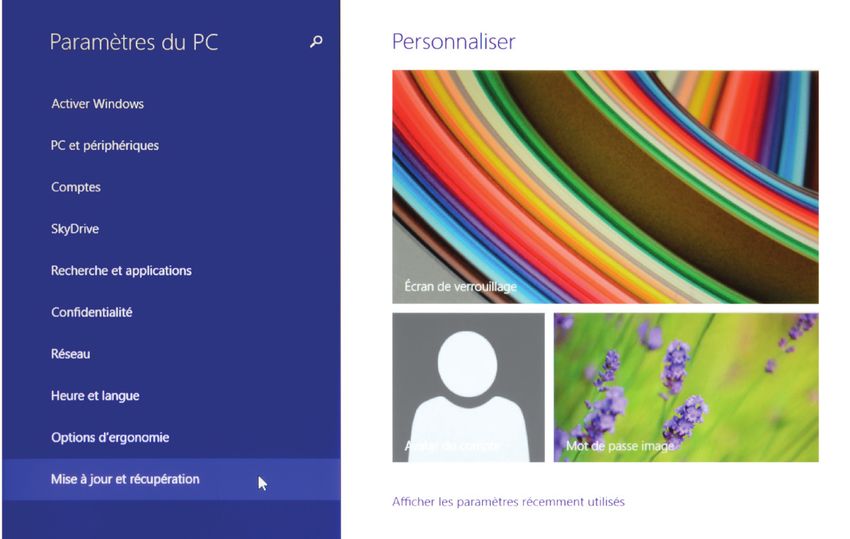
DE DE
(1) und (2) Tastatur- und Maus-Anschluss
Wenn Sie über eine Tastatur oder Maus mit PS/2-Stecker verfügen, stecken Sie diese in den mit (1) Symbolische Darstellung
der Rückseite des
gekennzeichneten Anschluss. Sollten Sie eine USB-Tastatur oder USB-Maus besitzen, nutzen Sie bitte
Computer-Gehäuses
einen der mit (2) gekennzeichneten USB-Anschlüsse.
(3) USB 3.0
Die blauen USB-Anschlüsse (3) besitzen die USB 3.0 Spezifikation und sind für den Datentransfer
mit SuperSpeed geeignet. Wir empfehlen, diese Anschlüsse für Peripheriegeräte, wie z.B. externe
Festplatten oder Laufwerke, zu nutzen. USB 2.0 und USB 1.1 Geräte können ebenfalls an den USB 3.0
Anschlüssen betrieben werden.
(4), (5) und (6) Monitor
Das Kabel des Monitors wird entweder in die blaue VGA-Buchse (6), an den weißen DVI-Ausgang (5)
oder (wenn von Monitor und Grafikkarte unterstützt) an den HDMI-Ausgang angeschlossen.
Bitte beachten Sie, wenn Sie zur Onboard-Grafik (4a/5a/6a) eine zusätzliche Grafikkarte (4b/5b/6b)
haben, dass am PC nur diese Anschlüsse (4b/5b/6b) funktionieren.
Bitte beachten Sie, dass sowohl das VGA- als auch das DVI-Kabel nur in einer Richtung in die Buchse
Ihres PCs passen. Vergewissern Sie sich daher, dass Sie das Kabel nicht um 180° verdreht haben.
Anschließend drehen Sie die Schrauben am Stecker handfest.
(7) LAN bzw. Netzwerk für z.B. DSL
Schließen Sie Ihr Netzwerk (RJ45)-Kabel (das vom Router, Hub oder DSL-Modem kommt) an diese
Buchse (7) an, so dass es mit einem leisen Knacken einrastet.
(8) Boxen/Kopfhörer/Mikrofon
Der grüne Anschluss (8) ist der Ausgang für Boxen bzw. Kopfhörer. Rosa (8) ist (normalerweise) der
Mikrofon-Eingang, blau (8) der Eingang für andere Audiogeräte.
Die Belegung der rosa bzw. blauen Buchse kann aber oft über die Treibersoftware umgestellt werden,
um z.B. eine 5.1 Surround Verkabelung zu ermöglichen. Beachten Sie hierzu die Hinweise im Main-
board-Handbuch.
Symbolische Darstellung
(9) Stromversorgung der Vorderseite des
Computer-Gehäuses
Die Steckdose muss sich in der Nähe des PCs befinden und leicht erreichbar sein. Betreiben Sie den
PC nur an geerdeten Steckdosen des Haushaltsstroms. Sollten Sie Verlängerungskabel einsetzen,
achten Sie darauf, dass diese den VDE-GS-Anforderungen entsprechen.
Schließen Sie den Strom erst an, nachdem Sie alle Peripheriegeräte (Ausnahme: USB- und Firewire-
Geräte wie umseitig beschrieben) angeschlossen haben.
(10) Hauptschalter
Nach ordnungsgemäßem Anschluss schalten Sie zur Inbetriebnahme zunächst den Hauptschalter (10)
auf der Rückseite ein.
(11) Power
Danach starten Sie den Rechner mit dem großen runden Schalter auf der Vorderseite des PCs.
(12) Reset-Taste
Falls Ihr PC einmal „einfrieren“ sollte, können Sie ihn durch einen Druck auf die Reset-Taste neu
starten.
(13) CardReader
Unterstützte Formate: SD, SDHC, MicroSD, xD, CF I/II, MicroDrive, MS, MS Duo, M2, MMC, USB 2.0
(optional USB 3.0).
6 7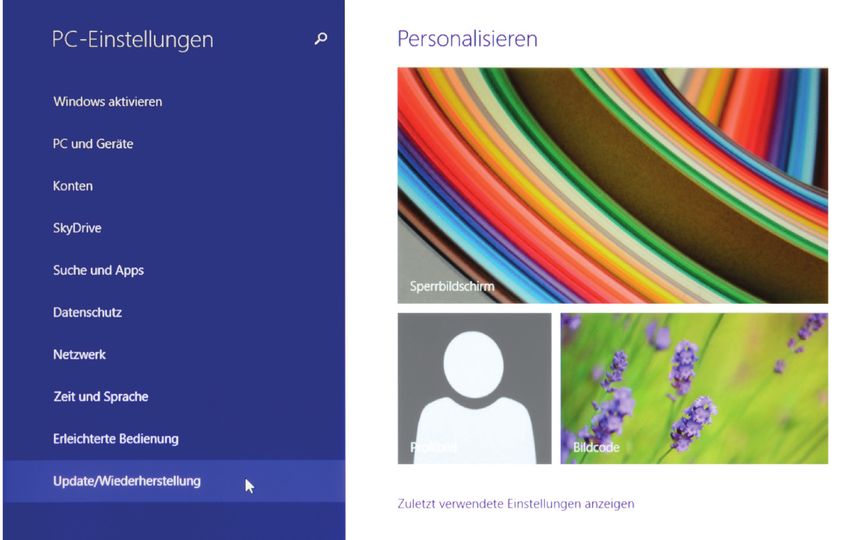
DE                                                                                                                                                                                           DE

Hinweise für die Installation und Wiederherstellung von Windows®

Sprachauswahl                                                                                         Allgemeine Hinweise für die Installation von Windows® Betriebssystemen
    Der Bildschirm für die Sprachauswahl ist der erste, den Sie beim Start Ihres neuen PCs mit vor-    Bitte installieren Sie nur Vollversionen von Windows® 7, Windows 8.1 oder Windows 10.
    installiertem Windows® 7, Windows 8.1 oder Windows 10 angezeigt bekommen.                          Recovery-Versionen von anderen PC-Systemen funktionieren nicht.
    Bitte wählen Sie hier Ihre gewünschte Sprache für den Aktivierungsprozess aus. Eine Änderung       Eine CD mit Treibern für Windows® 7, Windows 8.1 und Windows 10 liegt Ihrem CSL-PC bei.
    dieser Auswahl kann erst wieder nach abgeschlossener Aktivierung vorgenommen werden.               Bei 32Bit Windows-Versionen werden nur maximal 3 GB Arbeitsspeicher erkannt und genutzt.
                                                                                                       Bei Systemen mit 4 GB oder mehr Arbeitsspeicher empfehlen wir 64Bit Windowsversionen.
    Sprachauswahl unter                                                                                Haben Sie einen PC mit Betriebssystem erworben, so ist dieses bereits vorinstalliert. In diesem
    Windows 7                                                                                          Fall starten Sie bitte einfach Ihren Computer und folgen Sie den Anweisungen auf Ihrem Bild-
                                                                                                       schirm.

                                                                                                      Aktivierung von Windows®
                                                                                                       Um Ihr Betriebssystem uneingeschränkt nutzen zu können, muss eine Aktivierung bei
                                                                                                       Microsoft® erfolgen. Die Aufforderung zur Eingabe des Produktschlüssels („Product Key“) er-
                                                                                                       folgt im Normalfall bei der ersten Inbetriebnahme des PC-Systems. Den Produktschlüssel für
                                                                                                       Ihr Betriebssystem finden Sie auf dem Echtheitszertifikat, das auf der Seitenwand oder Rücksei-
                                                                                                       te Ihres Gehäuses angebracht ist. Geben Sie diesen Produktschlüssel bitte bei der Aktivierung
                                                                                                       ein.
                                                                                                       Falls Sie Windows 8.1 oder Windows 10 zusammen mit Ihrem PC erworben haben, besteht die
                                                                                                       Möglichkeit, dass sich kein Echtheitszertifikat an der Seiten- oder Rückwand befindet.
                                                                                                       In diesem Fall handelt es sich um eine Windows-Version mit automatischer Aktivierung. Der
                                                                                                       Produktschlüssel ist hierbei in Ihrem System integriert und es erfolgt keine Eingabeaufforde-
    Sprachauswahl unter                                                                                rung. Die Aktivierung erfolgt direkt bei einer bestehenden Internetverbindung oder per kos-
    Windows 8.1 und                                                                                    tenloser Telefon-Hotline. Folgen Sie hierzu bitte einfach den Anweisungen zur Produktaktivie-
    Windows 10                                                                                         rung auf Ihrem Bildschirm.

                                                                                                                          Echtheitszertifikat mit dem Produktschlüssel („Product Key“)

                                                                                                       Bitte beachten: Bei einem PC-System ohne Echtheitszertifikat (mit automatischer Aktivierung)
                                                                                                       kann es gegebenenfalls zu Problemen mit der erneuten Aktivierung ihres System nach einem
                                                                                                       Wechsel der Hauptplatine („Mainboard“) kommen. Von einem selbstständigen Wechsel raten
                                                                                                       wir deshalb ab.
                                                                                                       Wenden Sie sich bitte stattdessen per E-Mail oder Telefon direkt an unsere Kundenbetreuung.
8                                                                                                                                                                                                        9
DE                                                                                                                                                                                          DE

Wiederherstellen des Auslieferungszustands                                                             Windows 8.1
                                                                                                       Aus dem laufenden Betriebssystem heraus:
     Windows® 7
                                                                                                          Gehen Sie am rechten Bildschirmrand auf die Charms Bar.
     Um Ihr System wieder in den Auslieferungszustand zu bringen, führen Sie bitte folgende Schrit-
     te durch:                                                                                            Klicken Sie auf „Einstellungen“ und dann „PC-Einstellungen ändern“.
                                                                                                          Klicken Sie auf „Update/Wiederherstellung“ und anschließend auf „Wiederherstellung“.
        Halten Sie beim Starten des Rechners die F3-Taste gedrückt, bis auf dem Bildschirm der
        Schriftzug „Windows lädt Dateien…“ erscheint.

        Bestätigen Sie die Daten im ersten Fenster.

        Geben Sie im zweiten Fenster Ihren verwendeten Benutzernamen und das dazugehörige
        Passwort ein.

        Im dritten Fenster stehen Ihnen diverse Wiederherstellungsoptionen zur Verfügung. Für
        die Neuinstallation von Windows® 7 wählen Sie den letzten Punkt des Menüs „Windows
        neu installieren“.

     Das System wird neu installiert und befindet sich danach wieder im ursprünglichen Ausliefe-
     rungszustand. Nach der Installation haben Sie die Möglichkeit, eine zuvor erstellte Datensiche-
     rung wieder auf das System einzuspielen.
     Folgen Sie hierzu einfach den auf Ihrem Bildschirm angezeigten Schritten.

                                                                                                          Wählen Sie „Alles entfernen und Windows neu installieren“ aus und folgen Sie den
                                                                                                          weiteren Anweisungen.

10                                                                                                                                                                                               11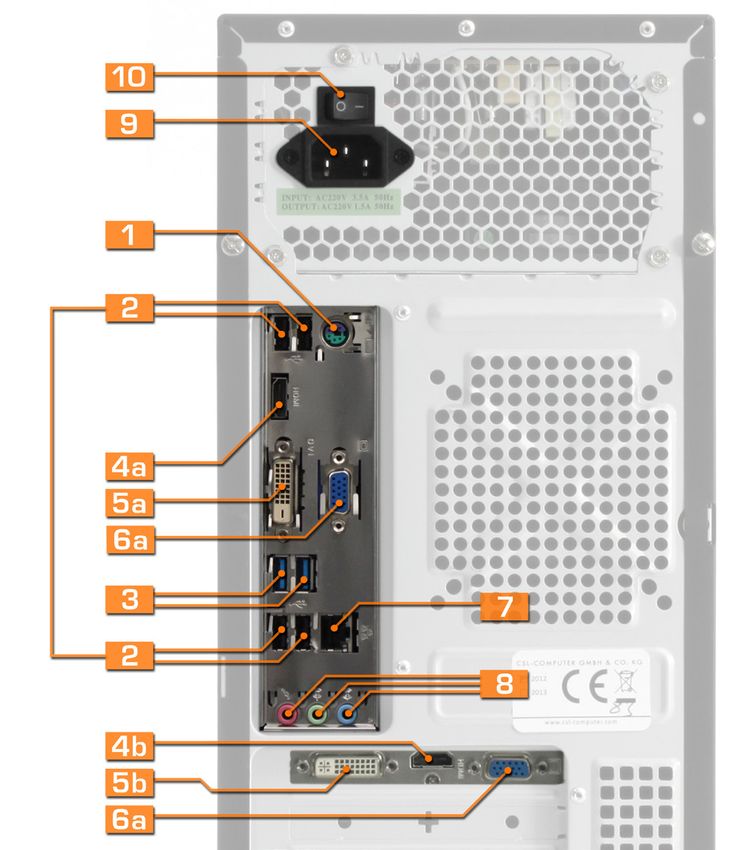
DE                                                                                                                                                                                                 DE

                                                                                                       Windows 10
     Falls ein eigenständiger Start von Windows 8.1 nicht mehr möglich ist, wird automatisch           Aus dem laufenden Betriebssystem heraus:
     eine Systemreparatur durchgeführt. Schlägt der Systemstart wiederholt fehl, öffnet sich das
     Wiederherstellungsmenü:                                                                              Gehen Sie auf das Startmenü und klicken Sie auf „Einstellungen“ oder drücken Sie alterna-
                                                                                                          tiv die Tastenkombination Windows + i
        Wählen Sie „Erweiterte Optionen“.
                                                                                                          Wählen Sie „Update und
        Klicken Sie unter „Option auswählen“ auf „Problembehandlung“.                                     Sicherheit“ und klicken Sie
                                                                                                          anschließend auf „Wieder-
                                                                                                          herstellung“.

        Wählen Sie anschließend „Originaleinstellung wiederherstellen“.                                   Unter dem Menüpunkt
                                                                                                          „Diesen PC zurücksetzen“,
                                                                                                          starten Sie mit „Los geht’s“.

                                                                                                          Anschließend haben Sie die Wahl zwischen zwei Optionen:

                                                                                                          -   „Eigene Dateien beibehalten“ löscht alle Systemeinstellungen und installierten Apps, behält
                                                                                                              jedoch Ihre persönlichen Daten bei.
     Das System wird neu installiert und befindet sich danach wieder im ursprünglichen Ausliefe-          -   „Alles entfernen“ löscht sowohl die Systemeinstellungen, installierten Apps sowie Ihre per-
     rungszustand. Nach der Installation haben Sie die Möglichkeit, eine zuvor erstellte Datensiche-          sönlichen Dateien und setzt den PC auf die Originaleinstellungen zurück.
     rung wieder auf das System einzuspielen.
12                                                                                                                                                                                                      13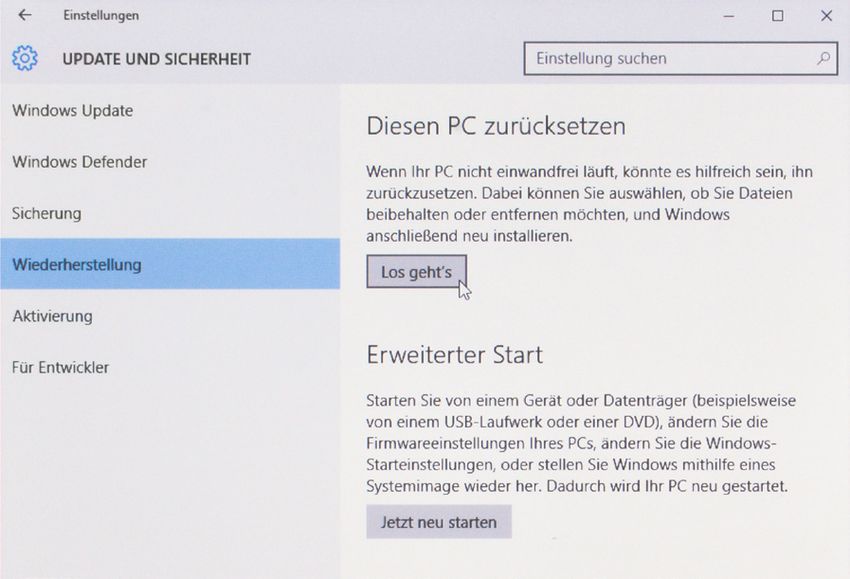
DE                                                                                                                                                                                              DE

     Falls ein eigenständiger Start von Windows 10 nicht mehr möglich ist, wird automatisch eine
     Systemreparatur durchgeführt. Schlägt der Systemstart wiederholt fehl, öffnen sich die erwei-
     terten Startoptionen:                                                                           Sicherheit, Internetschutz und Anti-Virus
        Wählen Sie unter „Option auswählen“ „Problembehandlung“ aus.                                  Sobald Sie mit dem Internet verbunden sind, .ist der Schutz vor PC-Viren und anderen Bedrohun-
                                                                                                      gen Ihres Computers unabdingbar.
                                                                                                      Wenn Sie sich für die Trial-Version von BullGuard entscheiden, sind Sie 90 Tage rundum geschützt.
                                                                                                      BullGuard Internet Security wurde für die tägliche Anwendung entwickelt und bietet ein über-
                                                                                                      sichtliches, einfach zu bedienendes Design für Ihren PC-Schutz! Deshalb lassen sich weltweit
                                                                                                      über 20 Millionen Nutzer im Netz von BullGuard schützen.

                                                                                                      Was bekommen Sie?
                                                                                                          Einen umfassenden, preisgekrönten Internetschutz, um sicher im Internet zu surfen

                                                                                                          Regelmäßige Sicherheitsupdates – ohne Performanceverlust.

                                                                                                          Unterbrechungsfreie Spielerlebnisse

                                                                                                          PC Tune-up, das für einen effizienten, flüssigen Betrieb Ihres Systems sorgt
        Wählen Sie anschließend „Diesen PC zurücksetzen“.
                                                                                                          Software-Support rund um die Uhr an jedem Tag

                                                                                                      Ihr PC ist mit BullGuard Internet Security vorinstalliert, inklusive einer 3-monatigen Lizenz für
                                                                                                      bis zu 3 PC-Systeme.

                                                                                                      Wie aktiviere ich BullGuard?
                                                                                                       1. Sobald Sie Ihren PC einschalten, werden Sie in gebeten sich zu registrieren, um BullGuard zu
                                                                                                          aktivieren.
                                                                                                       2. Geben Sie bei der Registrierung Ihre E-Mail Adresse an und wählen Sie ein Passwort für Ihren
                                                                                                          BullGuard-Account. Es sind keine weiteren persönlichen Angaben erforderlich.
                                                                                                       3. Um BullGuard auf bis zu zwei weiteren PC-Systemen zu installieren, laden Sie das Installa-
                                                                                                          tionsprogramm auf www.bullguard.com herunter. Starten Sie das Programm für die Installa-
                                                                                                          tion und klicken Sie anschließend auf die Login-Schaltfläche im Registrierungsdialog, um sich
                                                                                                          mit Ihrem existierenden Account anzumelden.
     Jetzt haben Sie die wieder die Möglichkeit, wie oben beschrieben zwischen den Optionen
     „Eigene Dateien beibehalten“ und „Alles entfernen“ zu wählen.
                                                                                                      Brauchen Sie Hilfe?
                                                                                                          Unser Support-Team ist 24/7 live für Sie erreichbar unter: www.bullguard.com/support
                                                                                                          oder senden Sie uns eine E-Mail an: msupport@bullguard.com

14                                                                                                                                                                                                  15
DE                                                                                                                                                              EN

Entsorgung
     Wollen Sie Ihr Gerät entsorgen, bringen Sie es zur Sammelstelle Ihres kommunalen Ent-
     sorgungsträgers (z. B. Wertstoffhof).
     Nach dem Elektro− und Elektronikgerätegesetz sind Besitzer von Altgeräten gesetzlich
     verpflichtet, alte Elektro− und Elektronikgeräte einer getrennten Abfallerfassung zuzu-
     führen.
     Das Symbol bedeutet, dass Sie das Gerät auf keinen Fall in den Hausmüll werfen dürfen!
     Verpackungsmaterialien entsorgen Sie entsprechend der lokalen Vorschriften.

Hinweis zur Batterieentsorgung
     Batterien dürfen nicht über den normalen Hausmüll entsorgt werden. Als Endverbrau-
     cher sind Sie gesetzlich zur Rückgabe beziehungsweise ordnungsgemäßen Entsorgung
     gebrauchter Batterien verpflichtet.

     Sie können die Batterien nach Gebrauch in der Verkaufsstelle oder in deren unmittel-
     baren Nähe unentgeltlich zurückgeben (z.B. bei den Sammelstellen im Handel oder bei
     kommunalen Sammelstellen). Sie können auch unentgeltlich die gebrauchten Batterien
     bei uns abgeben oder per Post an uns zurücksenden.

     Die zu entsorgenden Batterien, welche Schadstoffe enthalten, sind mit einem der bei-
     den nachstehenden Zeichen, bestehend aus einer durchgestrichenen Mülltonne und
     dem chemischen Symbol des für die Einstufung als schadstoffhaltig ausschlaggebenden
     Schwermetalls, versehen.

     Die Zeichen haben folgende Bedeutung:

          Pb = Batterie/Akku enthält Blei
                                                                                                                                   Installation Instructions
          Cd = Batterie/Akku enthält Cadmium
          Hg = Batterie/Akku enthält Quecksilber
                                                                                                                                           As of: January 2017
     Die Hinweise finden Sie auch in den Begleitpapieren der Sendungen.

                                                                    WEEE Richtlinie: 2012/19/EU

                                                                    WEEE Register-Nr: DE 94495668

     Hiermit erklärt die Firma CSL Computer GmbH & Co. KG, dass sich das Gerät in Übereinstimmung mit den grundlegenden
     Anforderungen und den übrigen einschlägigen Bestimmungen der Richtlinie 1999/5/EG befindet.
     Eine vollständige Konformitätserklärung erhalten Sie unter: CSL Computer GmbH & Co. KG, Sokelantstr. 33-35, 30165 Hannover.

                              CSL Computer GmbH & Co. KG • Sokelantstr. 33-35 • D 30165 Hannover
                                                  www.csl-computer.com
16                                                                                                                                                                17
DE
 EN                                                                                                                                                                                               DE
                                                                                                                                                                                                  EN

Congratulations on purchasing a PC from CSL!                                                           Safety information
     You have chosen a product designed to the latest technical standards and we hope it provides      Please read through the following information in order to guarantee your own safety and the
     you with long-term satisfaction.                                                                  operational safety of your PC:

     Please read carefully through the information in this guide.
                                                                                                          Turn off the PC if it is not going to be used for a longer period of time.

How to set up your PC                                                                                     Do not use the PC during a thunderstorm to avoid risk of excess voltage and electric
                                                                                                          shock.
     Please store these instructions in a safe place near your PC. Even if you transfer the PC to
     someone else, the instructions and CD with the drivers should be given to the new owner.             Do not place any objects into the vents of the casing.

                                                                                                          Do not place liquids near or inside the PC.
Operational safety

     Please contact our customer service if the power cord is damaged. Do not use the PC with a           Clean the PC only when it is turned off and use a soft, slightly damp cloth.
     damaged cable! The cable cannot be repaired.                                                         Use water only and do not use cleaning detergents as these may contain flammable
                                                                                                          substances.

Scope of delivery                                                                                         Do not place the PC near heaters or other warm objects.
                                                                                                          Ensure that the air vents are never blocked.
     Although every care is taken during quality control, in case of an incorrect or incomplete
     delivery please contact us as soon as possible and no later than 14 days after purchase.
                                                                                                          Do not place the PC in a cupboard, on a shelf or similar.

Connecting the PC                                                                                         Do not use the PC if any parts of the casing have been removed.

     Place the cables so that they will not be trodden on or tripped over. Do not place any items on      Static electricity may damage delicate components in the PC. To avoid this, make sure
     top of the cables. Please only connect your PC whilst it is turned off.                              that no static electricity remains on you before touching any system components.
     Only certain devices can be plugged in while the computer is turned on, such as USB and              Please touch a non-enamelled part like the casing prior to any works on the PC.
     Firewire (IEEE1394) devices.

     Please familiarise yourself with the instructions for these peripheral devices.

Help
                                                                                                       Care instructions
     For any questions regarding the installation of your computer, please contact our hotline by
     telephone on +49 511 - 76 900 212 or email us at: shop@csl-computer.com                              Please note that dust can accumulate inside the PC which can lead to faults in operation.
                                                                                                          We recommend clearing the computer‘s interior of dust approximately once a year.
                                                                                                          If you have any questions, please contact our telephone hotline on +49 511 - 76 900 212.

18                                                                                                                                                                                                    19
DE
EN EN
(1) and (2) Keyboard and mouse connection
If you have a keyboard or mouse with a PS/2 plug, connect this into the port marked (1). If you are Diagram of the reverse
of the PC casing
using a USB keyboard or USB mouse, please use one of the USB ports marked (2).
(3) USB 3.0
The blue USB ports (3) are designed to USB 3.0 specifications and are suitable for SuperSpeed data
transfer. We recommend using these ports for peripheral devices, such as external hard drives or disc
drives. USB 2.0 and USB 1.1 devices can also be used in the USB 3.0 ports.
(4), (5) and (6) Monitor
The monitor cable is connected to either the blue VGA socket (6), to the white DVI output (5) or (if
supported by the monitor and graphic card) to the HDMI output.
Please note that dedicated graphic cards (4b/5b/6b), installed in addition to onboard graphics
(4a/5a/6a) can only be used in ports (4b/5b/6b).
Please ensure that the correct end of the VGA and DVI cables is plugged directly into the PC socket.
Make sure that the cables are not inserted the opposite way round. Finally, tighten the screws on the
socket by hand.
(7) LAN and network for DSL, for example
Plug your network (RJ45) cable (which comes out of your router, hub or DSL modem) into this
socket (7). Make sure that the connector has clicked into place.
(8) Speakers/headphones/microphone
The green port (8) is the output for speakers or headphones. Pink (8) is (normally) the microphone
input, and blue (8) is the input for other audio devices.
The pink and blue sockets can often be configured using driver software to create a 5.1 surround
sound layout, for example. Consult the information in the motherboard manual.
(9) Power supply Diagram of the front
of the PC casing
Set the PC up near a plug socket. Only power the PC from an earthed household wall socket. If you
are using an extension cable, please ensure that this conforms to VDE-GS standards.
Only switch on the power supply once all peripheral devices have been plugged into the PC (with the
exception of USB and Firewire devices as described overleaf).
(10) Main switch
After connecting the PC properly, turn on the main switch (10) at the back of the PC.
(11) Power
Start up the PC by pressing the large round switch on the front of the PC.
(12) Reset button
If your PC “crashes”, you can press the reset button to restart the PC.
(13) CardReader
Supported formats: SD, SDHC, MicroSD, xD, CF I/II, MicroDrive, MS, MS Duo, M2, MMC, USB 2.0
(optional USB 3.0).
20 21DE
EN DE
EN
Information for installing and re-installing Windows®
Language selection General information for installing Windows® operating systems
The language selection screen is the first screen that is displayed when starting your new PC Please only install the full version of Windows® 7, Windows 8.1 or Windows 10.
with preinstalled Windows® 7, Windows 8.1 or Windows 10. Recovery versions of other PC systems will not function.
Please select your desired language for the activation process here. This selection can be chan- Your PC includes a CD with all drivers for Windows® 7, Windows 8.1 and Windows 10.
ged again only after completing the activation. For 32-Bit Windows versions a maximum of 3 GB memory is required.
We recommend 64-bit Windows versions for systems with memory of 4 GB or more.
Language selection for
Windows 7 Activating Windows®
You will be required to activate your operating system with Microsoft® in order to use all of the
functions on your PC. You will be requested to enter your product key, usually the first time
you use the PC. You can find the product key for your operating system on the Certificate of
Authenticity, which is attached to the side or reverse of the casing. Please enter this product
key for activation.
If you purchased Windows 8.1 or Windows 10 together with your PC, there may not be a
Certificate of Authenticity on the side or reverse of the casing.
In this instance, Windows version will be automatically activated.
The product key is integrated into the system and does not require you to enter it.
Activation takes place directly once connected to the internet or via a free telephone hotline.
Please follow the information on your screen to complete the product activation.
Language selection for
Windows 8.1 and
Windows 10
Certificate of Authenticity (“Product Key”)
Please note: PCs without a Certificate of Authenticity (with automatic activation) may incur
problems when reactivating the system after changing the motherboard. We therefore advise
you not to change this yourself.
Please contact our customer services directly via email or telephone.
22 23DE
EN DE
EN
Restoring the factory settings Windows 8.1
Whilst the operating system is running:
Windows® 7
Click on the right edge of the screen on the “Charms Bar”.
In order to restore your system to its original factory settings please follow the steps below:
Click on “Settings” and then “Change PC settings”.
When booting up your PC, hold down the F3 key until your screen displays the heading Click on “Update and recovery” and then click on “recovery”.
“Windows is loading files”.
Confirm the details in the first window.
In the second window, enter your user name and password.
The third window displays various restore options. To reinstall Windows® 7 please select
the last item on the menu “Reinstall Windows”.
The system will be reinstalled and returned to its original factory settings.
After installation you have the option of installing any backed-up data.
To do this, simply follow the steps shown on your screen.
Select “Remove everything and reinstall Windows” and follow the on-screen instructions.
24 25DE
EN DE
EN
Windows 10
If you are unable to manually start Windows 8.1, a system reboot will happen automatically. From the existing operating system:
If the system cannot boot up successfully, the recovery menu will open:
Go to the start menu and click on „Settings“ or alternatively press the keyboard shortcut
Select “Advanced options”. Windows + i
Under the menu “Choose an option” click on “Troubleshoot”. Select “Update & security“
and then click on “Recovery“.
Select “Reset your PC”.
In the menu option “Reset
this PC“, start with
“Get started“.
You now can select between 2 options:
- “Keep my files“ deletes all the system settings and installed apps but keeps your personal
The system will be reinstalled and returned to its original factory settings. data.
After the installation you have the option of installing any backed-up data. - “Remove everything“ deletes the system settings, installed apps as well as your personal
files and resets the PC to the factory settings.
26 27DE
EN DE
EN
If Windows 10 cannot be started independently, then a system repair is automatically carried
out. If the system start-up fails repeatedly, then the advanced start-up options are opened:
Select “Choose an option“ under “Troubleshoot“. Security, Internet Protection and Anti-Virus
Once you are connected to the internet it is vitally important that your computer is comprehen-
sively protected from viruses and all other online threats.
If you selected the BullGuard Internet Security Trial, then you are fully protected for 90 days.
BullGuard Internet Security is built exclusively for the everyday user, putting safety, simplicity
and an easy-to-use design first. That’s why 20 million users worldwide have travelled the web
safely with BullGuard.
What do you get?
Complete, award-winning Internet Security to surf the web in full safety
Constant security software updates - no loss of computer performance
Play games with no interruptions
Then select “Reset this PC“. PC Tune-up that keeps your PC running smoothly and efficiently
24/7 support
Your system is preinstalled with BullGuard Internet Security 3 month license for up to 3PC’s
included.
How to activate?
1. When you start your PC you will be prompted to register in order to activate BullGuard.
2. To register your software please insert your email address and choose a password for
your BullGuard account. No other personal information is required.
3. Installing BullGuard on additional computers. To install BullGuard on up to 2 additional ma-
chines, go to www.bullguard.com to download and install BullGuard Internet Security.
Once the application is installed click the “Log in to BullGuard” button in the registration
dialogue, and log in with your existing account.
Now again you have the possibility to choose between the options “Keep my files“ and “Remove
everything“ as described above.
Need help?
Chat live with our support team 24/7 at: www.bullguard.com/support
or email us at: support@bullguard.com
28 29DE
EN FR
Disposal
If you wish to dispose of your PC, take it to your local authority waste management
services (e.g. recycling centre).
Pursuant to the Electrical and Electronic Equipment Act, owners of old equipment are le-
gally obliged to dispose of old electrical and electronic items in a separate waste disposal.
This symbol means that you must not dispose of the equipment together with household
waste! Dispose of packaging in accordance with local authority regulations.
Battery disposal
Batteries must not be disposed of as normal household waste. As an end consumer, you
are legally required to return or correctly dispose of used batteries.
After use, you can return the batteries to their place of purchase or its immediate vicinity
free of charge (e.g. at the retailer‘s collection points or at communal collection points).
You can also hand the used batteries over to us free of charge or send them to us by post.
The batteries requiring disposal, which contain harmful substances, are marked with one
of the following labels, consisting of a crossed-out dustbin and the chemical symbol of
the heavy metal that led the battery to be classified as harmful.
The labels have the following meanings:
Pb = Battery contains lead
Cd = Battery contains cadmium
Instructions d’installation
Hg = Battery contains mercury
The information can also be found in the consignment‘s accompanying documents.
État : janvier 2017
WEEE guideline: 2012/19/EU
WEEE register number: DE 94495668
CSL Computer GmbH & Co. KG herewith declares that this product conforms to the principle requirements and other relevant
stipulations.
The complete Declaration of Conformity can be obtained from: CSL Computer GmbH & Co. KG, Sokelantstr. 33-35, 30165 Hannover.
CSL Computer GmbH & Co. KG • Sokelantstr. 33-35 • D 30165 Hannover
www.csl-computer.com
30 31DE
FR DE
FR
Félicitations pour l’achat d’un ordinateur de CSL ! Consignes de sécurité
Avec ce système, vous avez choisi un produit qui a été conçu selon les dernières normes tech- Nous vous prions de respecter les précautions suivantes pour votre propre sécurité et pour
niques et nous sommes certains que vous alliez l’apprécier très longtemps. garantir la fiabilité de l’ordinateur :
Veuillez lire attentivement les instructions de ce mode d’emploi. Si vous n’utilisez pas l’ordinateur pendant une longue période, éteignez-le.
N’utilisez pas votre ordinateur en cas d’orage afin d’éviter le risque de dommages, de
Instructions pour l’assemblage correct de votre ordinateur
surtension et de tout choc électrique.
Veuillez conserver ce mode d’emploi à portée de main près de votre ordinateur. Si vous vendiez
cet ordinateur, veuillez remettre le mode d’emploi ainsi que le CD avec les pilotes au nouveau N’insérez pas des objets dans les orifices du boîtier.
propriétaire.
Ne versez pas de liquides dans ou sur votre ordinateur.
Consignes de sécurité
Nettoyez l’ordinateur uniquement lorsqu’il est éteint avec un chiffon doux imbibé d’eau.
Si un câble est endommagé, adressez-vous à notre service après-vente. Utilisez seulement de l’eau et en aucun cas des nettoyants liquides, ils pourraient
Ne démarrez jamais votre ordinateur avec un câble défectueux ! Un câble peut en aucun cas contenir des substances inflammables.
être réparé. Veuillez remplacer le câble défectueux par un nouveau câble.
Ne placez pas l’ordinateur à proximité de radiateurs et de sources de chaleur.
Assurez-vous que les orifices de ventilation ne soient pas bloqués.
Volume de livraison
Si en dépit de notre contrôle de qualité, la livraison ne fût pas complète, veuillez nous contacter Ne placez pas l’ordinateur dans une armoire, une étagère ou similaire.
dès que possible, mais au plus tard dans les 14 jours suivant la réception du produit.
N’utilisez pas votre ordinateur si une partie du boîtier a été retirée.
Le câblage de votre ordinateur L’électricité statique peut endommager les composants délicats de votre ordinateur.
Pour éviter ce phénomène, l’électricité statique de votre corps doit être déchargée avant
Veuillez placer les câbles de sorte que vous ne marchiez ou trébuchiez pas dessus.
que vous touchiez les composants du système. Pour ce faire, touchez toute surface
Ne placez pas d’objets sur les câbles. Câblez votre ordinateur uniquement hors tension.
métallique non peinte du boîtier.
Seuls certains périphériques peuvent être raccordés sous tension, par exemple, les dispositifs
USB et Firewire (IEEE1394).
En ce faisant, suivez les instructions des fabricants de ces périphériques.
Entretien
Si vous avez des questions
Veuillez noter que de la poussière peut pénétrer à l’intérieur de votre PC, ce qui peut
Pour de plus amples renseignements sur la mise en service de votre ordinateur, veuillez contac- entraîner des perturbations du fonctionnement. Nous vous recommandons de nettoyer
ter notre service après-vente par téléphone au +49 511 - 76 900 211 (non-surtaxé, tarif selon l’intérieur du boîtier environ 1 x par an.
votre opérateur) ou envoyez-nous un e-mail à : shop@csl-computer.com
Si vous avez des questions, veuillez contacter notre service après-vente par téléphone au
+49 511 - 76 900 211 (non-surtaxé, tarif selon votre opérateur).
32 33DE
FR FR
Ports (1) et (2) du clavier et de la souris
Si vous disposez d’un clavier ou d’une souris avec un connecteur PS/2, branchez-le dans le port (1). Représentation symbo-
lique de l’arrière du
Si vous avez un clavier USB ou une souris USB, utilisez l’un des ports USB (2).
boîtier de l’ordinateur
(3) USB 3.0
Les ports USB bleus (3) ont la spécification USB 3.0 et sont appropriés pour le transfert de données
avec SuperSpeed.
Nous vous recommandons d’utiliser ces ports pour les périphériques, par exemple les disques durs
ou lecteurs externes. Les dispositifs USB 2.0 et USB 1.1 peuvent être également connectés aux ports
USB 3.0.
(4), (5) et (6) écran
Le câble du moniteur est soit branché dans la prise bleue VGA (6), à la sortie blanche DVI (5), soit à la
sortie HDMI (si elle est compatible pour le moniteur et la carte graphique).
Si vous possédez outre la carte graphique embarquée (4a/5a/6a) une carte graphique supplémen-
taire (4b/5b/6b), le PC prend en charge seulement les connexions (4b/5b/6b).
Les câbles VGA et DVI peuvent être branchés que dans un seul sens dans la prise de votre PC.
Assurez-vous que vous n’avez pas tourné les câbles de 180 degrés. Ensuite, fixez la prise en la vissant
à la main.
(7) LAN et/ou réseau (p.ex. DSL)
Connectez votre câble réseau (RJ45) (qui vient du routeur, du HUB ou du modem DSL) sur la prise (7).
Assurez-vous que le connecteur s’enclenche avec un léger clic.
(8) Haut-parleurs/casque/microphone
La prise verte (8) est la sortie pour les haut-parleurs ou écouteurs. La prise rose (8) désigne (généra-
lement) l’entrée microphone, la prise bleue (8) celle d’autres appareils audio.
L’affectation de la prise rose ou bleue peut souvent être commutée par le pilote, par exemple pour
permettre un câblage Surround 5.1. Pour ce faire, référez-vous aux instructions contenues dans le Représentation symbo-
manuel de la carte mère. lique la façade du
boîtier de l’ordinateur
(9) Alimentation
La prise doit être située près de l’ordinateur et facilement accessible. Utilisez l’ordinateur
uniquement sur des prises mises à la terre du secteur domestique. Si vous utilisez des rallonges,
assurez-vous qu’elles sont soient conformes aux exigences de sécurité VDE-GS. Branchez l’ordinateur
au secteur seulement après avoir branché tous les périphériques (sauf les périphériques USB et
Firewire comme décrit au verso).
(10) Interrupteur principal
Lorsque votre ordinateur est correctement branché, enclenchez l’interrupteur d’alimentation (10) à
l’arrière du boîtier.
(11) Mise en service
Démarrez l’ordinateur avec le grand bouton rond sur la façade de l’ordinateur.
(12) Bouton de réinitialisation
Si votre PC devrait « geler », vous pouvez le redémarrer en appuyant sur le bouton de réinitialisation.
(13) CardReader
Formats pris en charge : SD, SDHC, MicroSD, xD, CF I/II, MicroDrive, MS, MS Duo, M2, MMC, USB 2.0
(en option USB 3.0).
34 35DE
FR DE
FR
Instructions pour l’installation et la récupération de Windows®
Sélection de langue Instructions générales pour l’installation des systèmes d’exploitation Windows®
L‘écran pour la sélection de la langue est le premier qui est affiché lors du démarrage de votre Veuillez installer uniquement les versions complètes Windows® 7, Windows 8.1 ou Windows
nouvel ordinateur avec Windows® 7, Windows 8.1 ou Windows 10 pré-installé. 10. Les versions de récupération d’autres systèmes ne sont pas compatibles.
Veuillez sélectionner la langue désirée pour la procédure d‘activation. Une modification de Un CD avec tous les pilotes pour Windows® 7, Windows 8.1 et Windows 10 est joint à votre
cette sélection ne peut être effectuée qu‘une fois l‘activation terminée. CSL-PC.
Lors de versions 32 bits de Windows, seulement max. 3 Go de RAM sont reconnus et utilisés.
Pour les systèmes avec 4 Go de RAM ou plus, nous recommandons les versions 64 bits de
Sélection de langue Windows®.
sous Windows 7
Activation de Windows®
Pour conclure l’activation de votre système d’exploitation complètement, vous devez l’activer
chez Microsoft®. Vous serez invité à saisir votre clé produit (« Product Key ») lors de la première
installation de votre ordinateur. La clé produit pour votre système d’exploitation figure sur le
certificat d’authenticité, sur la paroi latérale droite ou à l’arrière du boîtier de votre ordinateur.
Veuillez saisir cette clé produit lors de l’activation.
Si vous avez acheté Windows 8.1 ou Windows 10 avec votre ordinateur, il est possible que il n’y
ait pas de certificat d’authenticité sur la paroi latérale droite ou à l’arrière.
Dans ce cas, il s’agit d’une version de Windows avec activation automatique. La clé du produit
est alors intégrée dans votre système et il n’y a pas de demande d’activation.
L’activation s’effectue directement lors d’une connexion Internet existante ou par téléphone au
service après-ventede Microsoft. Suivez simplement les instructions qui s’affichent sur votre
Sélection de langue écran.
sous Windows 8.1 et
Windows 10
Certificat d’authenticité (« Product Key »)
Veuillez noter que : lors d’un ordinateur sans certificat d’authenticité (avec activation
automatique), il peut avoir des problèmes avec la réactivation de votre système après avoir
modifié la carte-mère (« Mainboard »). Nous vous déconseillons une telle modification.
Dans un tel cas, contactez-nous par e-mail ou téléphonez directement à notre service après-
vente.
36 37DE
FR DE
FR
Restaurer l’état d’origine Windows 8.1
À partir du système d’exploitation en marche :
Windows® 7
Sur le côté droit de l’écran, cliquez sur le « Charms Bar ».
Pour restaurer votre système à ses paramètres d’usine, suivez les étapes suivantes :
Cliquez sur « Paramètres », puis sur « Modifier les paramètres du PC ».
Lors du démarrage de vote ordinateur, maintenez la touche F3 enfoncée jusqu’à ce que Cliquez sur « Mise à jour et récupération », puis sur « Récupération ».
l’écran affiche « Windows charge les fichiers... ».
Confirmez les données dans la première fenêtre.
Dans la deuxième fenêtre, entrez votre nom d’utilisateur et le mot de passe correspondant.
Dans la troisième fenêtre, vous disposez de plusieurs options de récupération. Pour la réins-
tallation de Windows® 7, sélectionnez la dernière option du menu « Réinstaller Windows ».
Le système se réinstalle alors à son état d’usine.
Après l’installation, vous avez la possibilité de transférer votre sauvegarde précédemment créé
sur le système.
Il suffit de suivre les étapes qui s’affichent sur votre écran.
Sélectionnez « Tout supprimer et réinstaller Windows » et suivez les instructions.
38 39DE
FR DE
FR
Windows 10
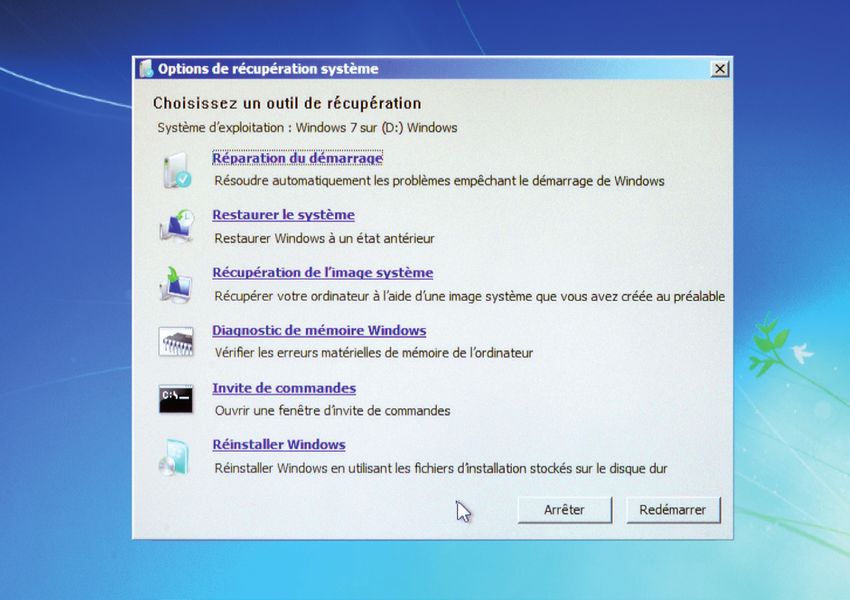
Si un démarrage indépendant de Windows 8.1 n’est plus possible, une réparation du système À partir du système d‘exploitation en marche :
est effectuée automatiquement. Si le démarrage du système échoue à plusieurs reprises, le
menu de récupération s’ouvre : Allez au menu de démarrage et cliquez sur « Paramètres » ou, alternativement, cliquez la
combinaison de touches Windows + i
Sélectionnez « Afficher les options de réparation avancées ».
Sélectionnez « Mise à jour et
Cliquez ci-dessous « Choisir une option » sur « Dépannage ». sécurité » et cliquez ensuite
sur « Récupération ».
Ensuite sélectionnez « Réinitialiser votre PC ». Sous le point de menu
« Réinitialiser ce PC », dé-
marrez avec « Commencer ».
Vous avez ensuite le choix entre deux options :
- « Conserver mes fichiers » écrase tous les paramètres du système et las applications instal-
lées, mais conserve vos données personnelles.
Le système se réinstalle à son état d’usine. Après l’installation, vous avez la possibilité de trans- - « Supprimer tout » écrase aussi bien les paramètres du système et les applications installées
férer votre sauvegarde précédemment créé sur le système. que vos données personnelles et rétablit la configuration d‘origine de l‘ordinateur.
40 41DE
FR DE
FR
Si un démarrage indépendant de Windows 10 n‘est plus possible, une réparation du système
est automatiquement réalisée. si le démarrage du système échoue à plusieurs reprises, les Sécurité, protection Internet et anti-virus
options de démarrage avancées s‘ouvrent :
Une fois que vous êtes connecté à l’Internet, il est d’importance vitale que votre ordinateur soit
Sous « Choisir une option » sélectionnez « Dépannage ». entièrement protégé contre les virus et toutes les autres menaces en ligne.
Si vous choisissez la version d’essai de BullGuard Internet Security, vous serez totalement protégé
pendant 90 jours.
BullGuard Internet Security est construit exclusivement pour l’utilisateur ordinaire, mettant la
priorité sur la sécurité, la simplicité et une conception facile à utiliser. C’est pour cette raison
que 20 millions d’utilisateurs dans le monde entier ont parcouru l’Internet en sécurité avec
BullGuard.
Que recevez-vous ?
L’Internet Security primé complet, pour surfer sur le Web en toute sécurité
Des mises jours constantes du logiciel de sécurité - aucune perte de performance d’ordinateur
Jouer des jeux sans interruptions
Sélectionnez ensuite « Réinitialiser ce PC ». PC Tune-up qui maintient le fonctionnement aisé et efficace de votre ordinateur
Support 24 heures sur 24, 7 jours sur 7
Votre système dispose du BullGuard Internet Security pré installé.
Licence de 3 mois pour maximum 3 ordinateurs comprise.
Comment activer ?
1. Lorsque vous démarrez votre ordinateur, vous serez invité à vous enregistrer afin d’activer
BullGuard.
2. Pour enregistrer votre logiciel, veuillez insérer votre adresse électronique et choisir un mot
de passe pour votre compte BullGuard. Aucune autre information personnelle n’est néces-
saire.
3. Installation de BullGuard sur des ordinateurs supplémentaires. Pour installer BullGuard sur
un maximum de 2 ordinateurs supplémentaires, allez à www.bullguard.com pour télécharger
Vous avez maintenant de nouveau la possibilité de choisir, comme décrit ci-dessus, entre les et installer BullGuard Internet Security.
options « Conserver mes fichiers » et « Supprimer tout ». Une fois l’application installée, cliquez sur le bouton « Log in to BullGuard » (Connexion à
BullGuard) dans le dialogue d’enregistrement, et connectez-vous avec votre compte existant.
Besoin d’aide ?
Chattez en direct avec notre équipe de support, 24 heures sur 24, 7 jours sur 7, à
www.bullguard.com/support, ou envoyez-nous un e-mail support@bullguard.com
42 43DE
FR ES
Mise au rebut
Si vous ne voulez plus vous servir de votre appareil, veuillez l’apporter au centre de col-
lecte de l’organisme agréé d’élimination des déchets de votre commune (p. ex. un centre
de recyclage).
D’après la loi relative aux appareils électriques et électroniques, les propriétaires d’appa-
reils usés sont tenus de remettre tous les appareils électriques et électroniques usagés
à un tri sélectif pour ceux-ci.
L’icône ci-contre signifie que vous ne devez en aucun cas jeter votre appareil dans les
ordures ménagères ! Les matériaux d’emballage doivent être éliminés conformément
aux réglementations locales.
Mise au rebus des batteries
Les batteries ne doivent pas être traitées comme des déchets ménagers. L’utilisateur
final est légalement obligé de remettre de manière conforme toutes les batteries et ac-
cumulateurs usés.
Vous pouvez remettre les batteries usées au point de la vente ou dans le voisinage im-
médiat de celui-ci sans frais (par exemple aux points de collecte dans les magasins ou
points de collecte locaux). Vous pouvez également nous rapporter les batteries usées
gratuitement ou nous les retourner par la poste.
Les batteries usées contenant des contaminants sont dotées de l’un des deux symboles
suivants, composé d’une poubelle barrée et du symbole chimique pour la classification
Instrucciones de instalación
en tant que métal lourd polluant.
Les symboles ont la signification suivante :
Pb = batterie / accumulateur contenant du plomb
Cd = batterie / accumulateur contenant du cadmium
Actualizado: enero 2017
Hg = batterie / accumulateur contenant du mercure
Ces informations figurent également dans les documents accompagnant la livraison.
Directive DEEE: 2012/19/EU
EUN° d’enregistrement DEE: DE 94495668
Par la présente, la société CSL Computer GmbH & Co. déclare que l’appareil est conforme aux exigences essentielles et aux autres
dispositions pertinentes.
Pour obtenir une déclaration de conformité dans son intégralité, contactez: CSL Computer GmbH & Co. KG, Sokelantstr. 33-35,
30165 Hannover.
CSL Computer GmbH & Co. KG • Sokelantstr. 33-35 • D 30165 Hannover
www.csl-computer.com
44 45DE
ES DE
ES
¡Le felicitamos por la adquisición de un PC de CSL! Indicaciones de seguridad
Con este sistema ha adquirido un producto realizado en base a los últimos avances técnicos y Observe las siguientes medidas de seguridad, para garantizar su propia seguridad y la seguri-
con el que disfrutará durante largo tiempo, como es de esperar. dad operativa del PC:
Por favor, lea atentamente las instrucciones de este manual. Cuando no se utilice el ordenador durante largo tiempo, apáguelo.
Indicaciones para el correcto montaje de su PC No utilice el PC durante una tormenta, para evitar el riesgo de daños por sobrecorriente y
descarga eléctrica.
Guarde este manual siempre cerca de su PC. En caso de que venda el PC debe entregarle al
nuevo propietario el manual y los CD con los driver. No introduzca ningún objeto en los orificios de la carcasa.
No permita que líquidos entren en el PC.
Seguridad operativa
En caso de que los cables estuviesen dañados, póngase en contacto con nuestro departamento Limpie el PC solo cuando está apagado, usando un paño suave, humedecido.
de atención al cliente. ¡No opere nunca el PC con un cable defectuoso! Un cable no se puede Utilice únicamente agua para empapar el paño, nunca detergentes líquidos, pues pueden
reparar bajo ninguna circunstancia. contener sustancias inflamables.
No coloque el PC cerca de aparatos calefactores ni fuentes de calor.
Contenido del embalaje Tenga cuidado de que los orificios de ventilación no estén bloqueados.
Si, a pesar de nuestro control de calidad, el producto que le hemos entregado resulte incomple-
to, le rogamos de contactarnos lo antes posible pero antes de los 14 días. No coloque en PC dentro de un armario, una estantería ni similar.
No utilice el PC cuando se han retirado partes de la carcasa.
Cableado del PC
Extienda los cables de forma que nadie tropiece con ellos ni los pise. No coloque ningún objeto La electricidad estática puede dañar componentes sensibles del PC. Para evitarlo tiene
encima de los cables. Por favor, conecte los cables con el PC apagado. que desviar la electricidad estática de su cuerpo antes de tocar los componentes del
Solo hay unos pocos dispositivos que pueden ser conectados cuando están encendidos, por sistema. Para lograrlo toque una superficie metálica no pintada en la carcasa.
ejemplo los dispositivos USB y Firewire (IEEE1394).
Tenga para ello en cuenta los manuales de los equipos periféricos.
En caso de consulta Limpieza del ordenador
Si tiene alguna pregunta sobre la puesta en marcha del ordenador, póngase por favor en con-
El polvo puede acumularse en el interior del ordenador y esto podría causar malfuncio-
tacto con nuestro servicio de atención al cliente, teléfono: +49 511 - 76 900 214, o escríbanos
namientos en este. Le recomendamos limpiar el interior del ordenador mínimo una vez
un correo electrónico a: shop@csl-computer.com
al año.
Para cualquier pregunta póngase en contacto con nuestro servicio de atención al cliente
llamando el número: +49 511 - 76 900 214.
46 47DE
ES ES
(1) y (2) Conexión del teclado y ratón
Si dispone de un teclado o un ratón con una clavija PS/2, introduzca la clavija en la conexión marcada Esquema simbólico de la
parte trasera en la carca-
con (1). Si el teclado o el ratón tuviesen una conexión USB, utilice las conexiones USB marcadas
sa del ordenador
con (2).
(3) USB 3.0
Las conexiones USB azules (3) disponen de la especificación USB 3.0 y son aptas para la transmisión
de datos con SuperSpeed. Le recomendamos utilizar esas conexiones para los periféricos, tales como
p.ej. discos duros o unidades de procesamiento externos. Los dispositivos USB 2.0 y USB 1.1 también
se pueden operar en las conexiones USB 3.0.
(4), (5) y (6) Monitores
El cable del monitor se conecta o bien usando la hembra VGA azul (6), en la salida DVI blanca (5) o
bien (si el monitor y la tarjeta gráfica son compatibles con ella) en la salida HDMI.
Tenga en cuenta que con una tarjeta gráfica especializada (4b/5b/6b), que se ha montado con gráfica
Onboard adicional (4a/5a/6a) solo funcionan esas conexiones (4b/5b/6b).
No olvide que tanto el cable VGA como el cable DVI sólo se pueden introducir en la hembra en un
sentido. Asegúrese, por eso, que no ha girado el cable 180°.
A continuación apriete los tornillos de la clavija.
(7) Conexiones de red y LAN, por ej. DSL
Conecte su cable de red (RJ45) (que proviene del enrutador, del hub o del módem ADSL) en la
hembra (7). Cerciórese de que ha enchufado correctamente.
(8) Altavoces/Auriculares/Micrófono
La conexión verde (8) es la salida de los altavoces o los auriculares. La rosa (8) (normalmente) es la
entrada del micrófono, la azul (8) la entrada de los demás equipos de audio.
La asignación de la hembra rosa o azul se puede modificar a menudo en el driver, p.ej. para permitir
un cableado surround 5.1. Puede consultar información al respecto en el manual de la placa madre.
Esquema simbólico de
(9) Suministro de corriente la parte delantera de la
El enchufe tiene que estar cerca del PC y accesible. Opere el PC sólo en enchufes con toma de tierra carcasa del ordenador
de su corriente doméstica. Si utiliza una extensión cuide que cumpla los requisitos VDE-GS.
Conecte la corriente solo después de haber conectado todos los periféricos (excepto los dispositivos
USB y Firewire, tal como se ha descrito antes).
(10) Interruptor principal
Tras la correcta conexión encienda primero el interruptor principal (10) de la parte trasera, para
realizar la puesta en servicio.
(11) Power
Después encienda el ordenador con el interruptor redondo grande de la parte delantera del PC.
(12) Tecla Reset
Si su ordenador “se quedase colgado” puede reiniciarlo pulsando la tecla reset.
(13) CardReader (lector de tarjetas)
Formatos compatibles: SD, SDHC, MicroSD, xD, CF I/II, MicroDrive, MS, MS Duo, M2, MMC, USB 2.0
(opcional USB 3.0).
48 49Sie können auch lesen