GX200 - BEDIENUNGSANLEITUNG OPERATOR MANUAL MODE D'EMPLOI ISTRUZIONI PER L'USO GEBRUIKSHANDLEIDING
←
→
Transkription von Seiteninhalten
Wenn Ihr Browser die Seite nicht korrekt rendert, bitte, lesen Sie den Inhalt der Seite unten
GX200

BEDIENUNGSANLEITUNG     DE
   OPERATOR MANUAL      GB
      MODE D‘EMPLOI     FR
 ISTRUZIONI PER L’USO   IT
GEBRUIKSHANDLEIDING     NL
                             1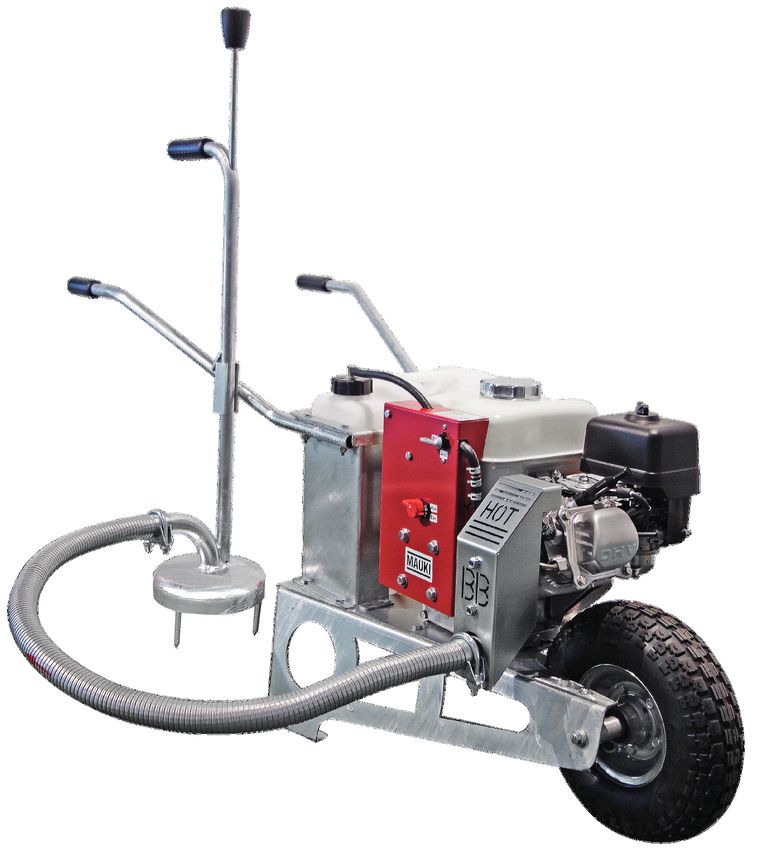
8.
                                             1.                     5.

                                                                    6.

                                             2.
                                                                             7.

                                                                                  8.               9.
             Benzin + 2% Diesel                  3.
           Gasoline + 2% Diesel
           Essence + 2% Diesel
           Benzina + 2% Diesel                   4.
            Benzine + 2% Diesel

         9.

                                                                                                                10.

              Benzin / Gasoline
         Essence / Benzina / Benzine

              Deutsch                  English           Français          Italiano             Nederlands
    1.        Sondierstab              Sounding rod      Tige de sondage Suono asta             Sondeerstang
    2.        Rauchglocke              Smoke bell        Cloche à fumée    Campana fumo         Rook bell
    3.        Rauch Ein/Aus            Smoke on/off    Fumée               Fumo                 Rook aan/uit
                                                       marche/arrêt        acceso/spento
    4.        Motor Ein/Aus            Motor on/off    Moteur              Motore               Motor aan/uit
                                                       marche/arrêt        acceso/spento
    5.        Drehzahl                 Number of revo- Nombre de révo-     Numero di giri       Aantal revoluties
                                       lutions         lutions
    6.        Choke                    Choke           Étouffer            Soffocare            Stikken
    7.        Benzinhahn               Fuel tap engine   Robinet de car-   Rubinetto del car-   Brandstofkraan
              Motor                                      burant moteur     burante motore       motor
    8.        Benzin +                 Gasoline +        Essence +         Benzina +            Benzine +
              2% Diesel                2% Diesel         2% Diesel         2% Diesel            2% Diesel
    9.        Benzin                   Gasoline          Essence           Benzina              Benzine
    10.       1.5 bar                  1.5 bar           1.5 bar           1.5 bar              1.5 bar
2
1.                   2.
     a
         c

                 a

         d       b
     b

3.                   4.
                     3.

             a   c

             b   d

5.                   6.
             c

             d

                          3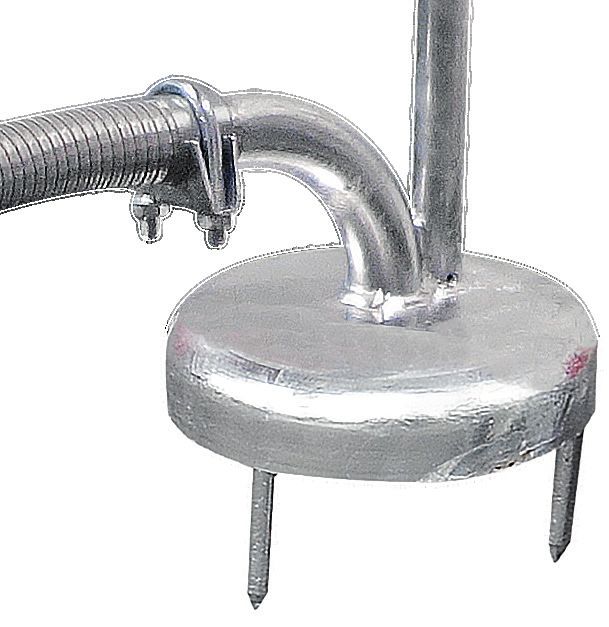
Sprachen/Languages/Langues/Lingue/Talen
    DE������������������������������������������������������������������������������������������������������������������������������������������������������������������ 5
    GB����������������������������������������������������������������������������������������������������������������������������������������������������������������16
    FR ����������������������������������������������������������������������������������������������������������������������������������������������������������������27
    IT������������������������������������������������������������������������������������������������������������������������������������������������������������������38
    NL����������������������������������������������������������������������������������������������������������������������������������������������������������������49

    Wichtig: Diese Anleitung muss sorgfältig durchgelesen werden, bevor Sie den Mäusevernichter zum
    ersten Mal einsetzen. Sie enthält Informationen zu Ihrer eigenen Sicherheit und zur Sicherheit anderer.
    Important: Please read these instructions through carefully before using the Rodent Destroyer for
    the first time. They contain information which is critical for your own safety and the safety of others.
    Important: Ce mode d‘emploi doit être soigneusement lu avant d‘utiliser le destructeur de mulots
    pour la première fois. Il contient des informations pour votre propre sécurité et celle des autres.
    Importante: Preghiamo di leggere attentamente questo libretto di utilizzo, in modo da usare corret-
    tamente il nostro apparecchio e svolgere una giusta manutenzione. Le istruzioni inoltre vi aiuteran-
    no ad evitare danni e pericoli a cose e persone.
    Belangrijk: Voor u deze Muizenverdelger gebruikt, is het van belang dat u deze handleiding goed
    doorleest. Hierin staat informatie voor uw eigen veiligheid, maar ook voor die van anderen.
4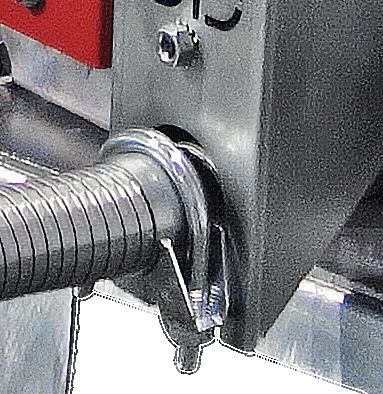
INHALTSVERZEICHNIS
                 MAUKI Mäusevernichter - GX 200
1. Einleitung�������������������������������������������������������������������������������������������������������������������������������������������������� 6
    1.1 Funktionsweise�������������������������������������������������������������������������������������������������������������������������������� 6
    1.2 Konstruktion ������������������������������������������������������������������������������������������������������������������������������������ 6
    1.3 Verwendungsbereich ���������������������������������������������������������������������������������������������������������������������� 6
2. Sicherheit ������������������������������������������������������������������������������������������������������������������������������������������������ 7
    2.1 Abgase���������������������������������������������������������������������������������������������������������������������������������������������� 7
    2.2 Verbrennungsgefahr������������������������������������������������������������������������������������������������������������������������ 7
    2.3 Geräuschemissionen ���������������������������������������������������������������������������������������������������������������������� 7
    2.4 Kraftstoff������������������������������������������������������������������������������������������������������������������������������������������ 7
    2.5 Allgemeines�������������������������������������������������������������������������������������������������������������������������������������� 7
3. Technische Daten������������������������������������������������������������������������������������������������������������������������������������ 8
4. Inbetriebnahme �������������������������������������������������������������������������������������������������������������������������������������� 8
    4.1 Vorbereitung ������������������������������������������������������������������������������������������������������������������������������������ 8
    4.2 Motor starten (siehe auch Bedienungsanleitung Motor)������������������������������������������������������������ 8
    4.3 Motor abstellen�������������������������������������������������������������������������������������������������������������������������������� 9
5. Wartung���������������������������������������������������������������������������������������������������������������������������������������������������� 9
6. Lagerung�������������������������������������������������������������������������������������������������������������������������������������������������� 9
7. Mäusebekämpfung mit MAUKI ����������������������������������������������������������������������������������������������������������10
    7.1 Mäusebau sondieren ��������������������������������������������������������������������������������������������������������������������10
    7.2 Maschinen-Einsatz������������������������������������������������������������������������������������������������������������������������10
    7.3 Kontrolle über die Rauchverteilung����������������������������������������������������������������������������������������������10
    7.4 Vorbereiten des nächsten Mäusebaues��������������������������������������������������������������������������������������10
    7.5 Standortwechsel����������������������������������������������������������������������������������������������������������������������������10
    7.6 Bautenvernichtung ������������������������������������������������������������������������������������������������������������������������10
    7.7 Einteilung und Vorgang ����������������������������������������������������������������������������������������������������������������10
    7.8 Nachkontrolle ��������������������������������������������������������������������������������������������������������������������������������11
    7.9 Zeitpunkt der Bekämpfung�����������������������������������������������������������������������������������������������������������11
    7.10 Hinweis ����������������������������������������������������������������������������������������������������������������������������������������11
8. Betriebsstörungen��������������������������������������������������������������������������������������������������������������������������������11
9. Service - Stelle��������������������������������������������������������������������������������������������������������������������������������������12
10. Garantiebedingungen ������������������������������������������������������������������������������������������������������������������������12
11. EG - Konformitätserklärung��������������������������������������������������������������������������������������������������������������13
12. Ersatzteilliste��������������������������������������������������������������������������������������������������������������������������������������14

Diese Bedienungsanleitung ist urheberrechtlich geschützt. Alle Rechte bleiben vorbehalten, beson-
ders das Recht der Vervielfältigung, Übersetzung und der Verarbeitung mit elektronischen Systemen.
                                                                                                                                           DE                        5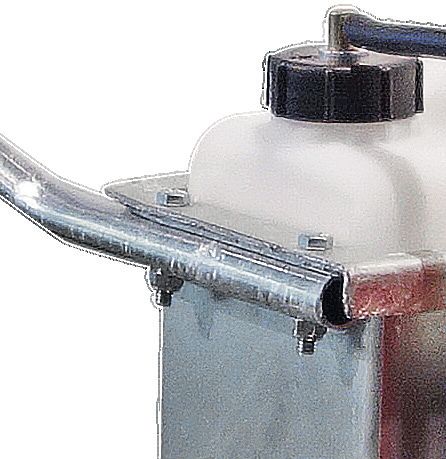
1. Einleitung
Vielen Dank, dass Sie sich für einen MAUKI Mäusevernichter entschieden haben. Wir als Hersteller
möchten, dass Sie mit Ihrem neuen Produkt vollständig zufrieden sind.
WICHTIG: Lesen Sie diese Anleitung sorgfältig durch, damit Sie Ihr Gerät korrekt bedienen und
warten können. Die Anleitung hilft bei der Vermeidung von Verletzungen und Schäden.
1.1 Funktionsweise
Mit einer Benzinpumpe wird ein Benzin-Diesel-Gemisch angesaugt, genau dosiert in den Spezial-
Schalldämpfer eingespritzt und dort verdampft. Dieser Rauch wird über einen flexiblen Metall-
schlauch und einer Glocke in das Gangsystem geleitet. Der hohe Druck des Industriemotors bewirkt
eine schnelle Rauchverteilung und der vorhandene Sauerstoff wird aus dem Gangsystem gepresst.
Die Schädlinge haben keine Chance zu entrinnen. Innert Sekunden werden die Atemwege gelähmt.
Dies führt zu einem raschen und schmerzlosen Tod. Falls die betäubte oder tote Maus von einer
Katze oder einem Greifvogel gefressen wird, besteht keine Gefahr einer Sekundärvergiftung.
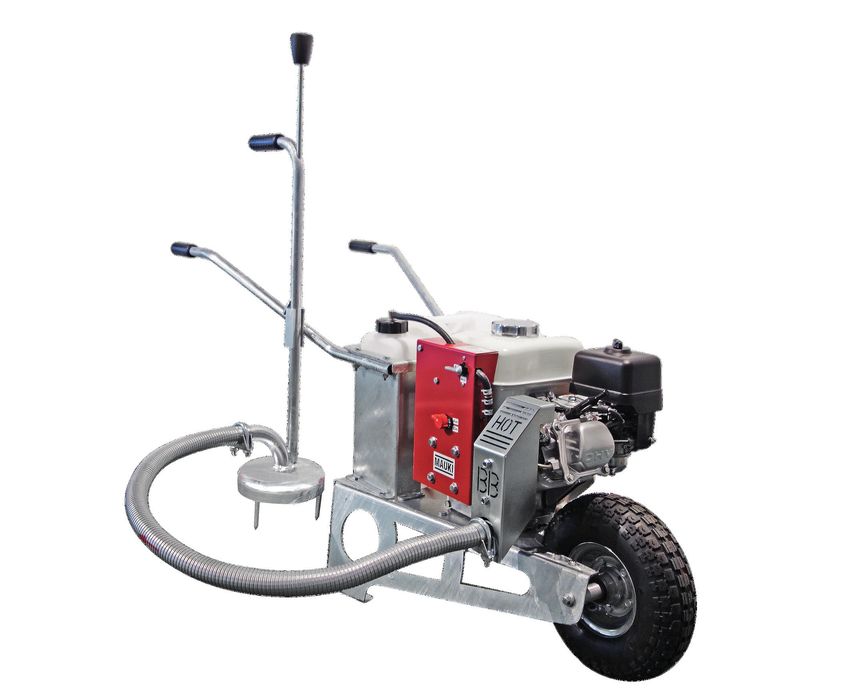
1.2 Konstruktion
Die robuste und handliche Schubkarre ist feuerverzinkt und mit einer Rauchglocke sowie einem
Sondierstab ausgerüstet. Der leistungsstarke 5.5 PS Honda-Motor entspricht der neuesten Techno-
logie, ist langlebig und servicefreundlich. Zur Sicherheit des Bedieners kann beim Standortwechsel
die Rauchentwicklung abgestellt werden.
1.3 Verwendungsbereich
Der MAUKI - Mäusevernichter dient ausschliesslich dem Zweck, Wühlmäuse gezielt in ihren Bauten
zu bekämpfen. Bitte beachten Sie folgende Einsatz-Beschränkungen:
1. Das Gerät darf nur im Freien eingesetzt werden! In geschlossenen Räumen besteht akute Vergif-
tungsgefahr durch Kohlenmonoxid!
2. Der Maulwurf ist geschützt und darf nur mit einer Ausnahmegenehmigung der zuständigen Be-
hörde (Landratsamt) bekämpft werden.
3. Gemäss Tierschutzgesetz ist für die gewerbsmässige Bekämpfung von Wirbeltieren als Schäd-
linge eine Bewilligung notwendig. Die Bekämpfung von Wirbeltieren als Schädlinge durch Privatper-
sonen ist jedoch nicht erlaubnispflichtig.
4. Der Einsatz in Wasserschutzgebieten und Trinkwasserschutzzonen I und II, sowie auf Flächen mit
Trinkwasserleitungen aus Kunststoff im Umkreis von 100m ist nicht erlaubt.
5. Die Verwendung des Gerätes zum Zweck des Pflanzenschutzes in Anbaubereichen (Äcker, Ge-
wächshäuser, Wälder, usw.) ist nicht zulässig.
6. Der Benutzer ist allein verantwortlich für die ordnungsgemässe Verwendung der Ausrüstung und
die Einhaltung der Nutzungsbeschränkungen.
7. Verlangen Sie vor dem Kauf oder dem ersten Einsatz bei Ihrer zuständigen Behörde (Landrats-
amt) nach einer Einsatzbewilligung.
6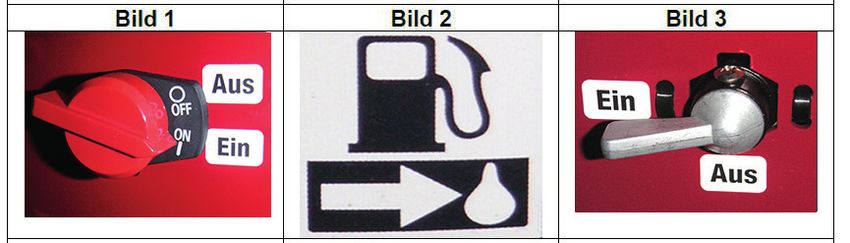
2. Sicherheit
Die gesamte Bedienungsanweisung vor erster Inbetriebnahme
aufmerksam lesen! Nichtbeachten der nachfolgenden Sicher-
heitshinweise kann lebensgefährlich sein!

2.1 Abgase
Das Gerät darf nur im Freien eingesetzt werden! In geschlos-
senen Räumen besteht akute Vergiftungsgefahr durch Kohlen-
monoxid!
Benzinhahn zu Zusatztank erst öffnen, wenn Glocke fest auf die
Erde aufgesetzt ist! Die Bedienungsperson muss immer gegen
den Wind arbeiten, damit die Abgase nicht eingeatmet werden!
Beim Standortwechsel Benzinhahn zu Zusatztank schliessen.

2.2 Verbrennungsgefahr
Genügend Abstand zur Auspuffanlage und flexiblen Metall-
schlauch halten! Dieser wird heiss!

2.3 Geräuschemissionen
Die Bedienungsperson muss einen Gehörschutz tragen und die
örtliche Lärmschutzverordnung beachten! Der Schalldruckpegel
beträgt 87 dB(A).

2.4 Kraftstoff
Vor dem Tanken Motor abstellen! Nicht rauchen! Von offenem
Feuer Abstand halten! Keinen Kraftstoff verschütten! Keinen
Kraftstoff an die Kleider kommen lassen! Sonst Kleider wech-
seln - Lebensgefahr!

2.5 Allgemeines
Sie sind selber für die richtige und sichere Verwendung des Gerätes verantwortlich. Sie sind auch
verantwortlich für die Anweisung der Personen, denen Sie erlauben, den Mäusevernichter zu be-
dienen. Den Mäusevernichter niemals von Kindern oder Personen, die mit den Anweisungen des
Gerätes nicht vertraut sind, bedienen lassen!
Nicht vergessen, dass der Eigentümer für Unfälle bzw. Schäden verantwortlich ist, die andere Perso-
nen oder deren Eigentum betreffen!
Dieses Gerät darf ausschliesslich zu ihrem bestimmten Zweck verwendet werden. (siehe Kap. 1.3
Verwendungsbereich) Bei Zuwiderhandlung erlischt jeglicher Anspruch auf Garantie oder Haftung
gegenüber dem Hersteller. Für Schäden, welche durch Nichtbeachtung der Betriebsanleitung ent-
stehen, wird nicht gehaftet.

                                                                                                      7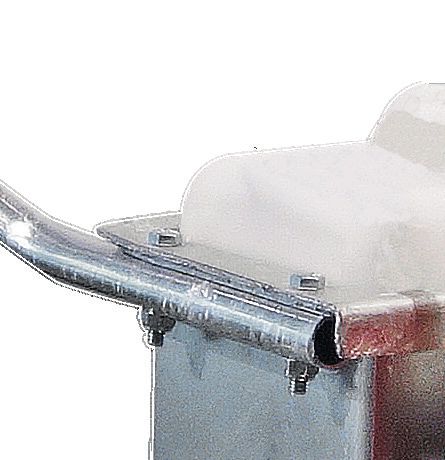
3. Technische Daten
    Hersteller:		   Brühwiler Maschinen AG, Hauptstrasse 1, CH-8362 Balterswil
    			             Tel.: 		       071 973 80 40 (0041 71 973 80 40)
    			             Fax.: 		       071 973 80 49 (0041 71 973 80 49)
    			E-Mail:                     info@bruehwiler.com
    			Web: 		www.mauki.ch
    Bezeichnung:		  MAUKI Mäusevernichter GX 200
    Abmessungen:    Höhe 64 cm, Breite 59 cm, Länge 126 cm
    Gewicht:		      ca. 37 kg (ohne Betriebsstoff)
    Motor:			       Honda GX 200T
    			Hubraum 196 cm3
    			             Netto Leistung 4.1 kW / 5.5 PS
    Schallpegel:		  3400 U/min: 87dB(A)
    			2200 U/min: 78dB(A)
    Betriebsstoff:  Motor: Bleifreibenzin (kein Oel)
    			             Zusatztank: Bleifreibenzin mit 2% Diesel (2dl Diesel pro 10l Benzin)
    Fahrgestell:		  feuerverzinkte Schubkarre mit Pneuräder
    Zusatzbehälter: 10 Liter für Benzin-Dieselgemisch (2dl Diesel pro 10l Benzin)
    Zubehör:		      inkl. Sondierstab, Betriebsanleitung
    Garantie:		     2 Jahre

    4. Inbetriebnahme
    4.1 Vorbereitung
    Auftanken. Achtung! Benzin ist leicht entflammbar und hochexplosiv! Feuer und Explosionen kön-
    nen Verbrennungen oder Sachschäden verursachen. Kraftstoff nur in Behältern aufbewahren, die
    speziell für diesen Zweck konstruiert wurden. Für Kinder unzugänglich aufbewahren. Das Gerät nur
    im Freien auftanken und beim Tanken nicht rauchen. Zum Auffüllen einen Trichter verwenden. Vor
    dem Motorstart Kraftstoff nachfüllen. Niemals den Tankdeckel entfernen oder Benzin einfüllen,
    während der Motor läuft oder wenn der Motor heiss ist. Den Kraftstofftank nicht ganz auffüllen. Nur
    soviel Benzin in den Tank füllen, bis der Flüssigkeitsstand 10 mm unter der Unterseite des Einfüll-
    stutzens liegt. Dieser Freiraum im Tank ermöglicht dem Kraftstoff, sich auszudehnen. Wenn Benzin
    verschüttet wurde, nicht versuchen, den Motor zu starten, sondern das Gerät vom verschütteten
    Kraftstoff wegschieben und offene Flammen vermeiden, bis die Kraftstoffdämpfe verdunstet sind.
    Betriebsstoff: Motor			     Bleifreibenzin (kein Oel)
    			            Zusatztank		 max. 10 Liter Benzin - Dieselgemisch
    						Mischverhältnis: 2% Diesel
    						(2dl Diesel pro 10l Benzin)
    			Hinweis		 Der Diesel hat keinen Einfluss auf die Wirkung des
    						                      Gerätes, es dient nur zur Markierung der Abgase

    4.2 Motor starten (siehe auch Bedienungsanleitung Motor)
    Achtung! Den Motor nicht in begrenzten Räumen laufen lassen, wo sich gefährliche Kohlenmono-
    xiddämpfe ansammeln können.

8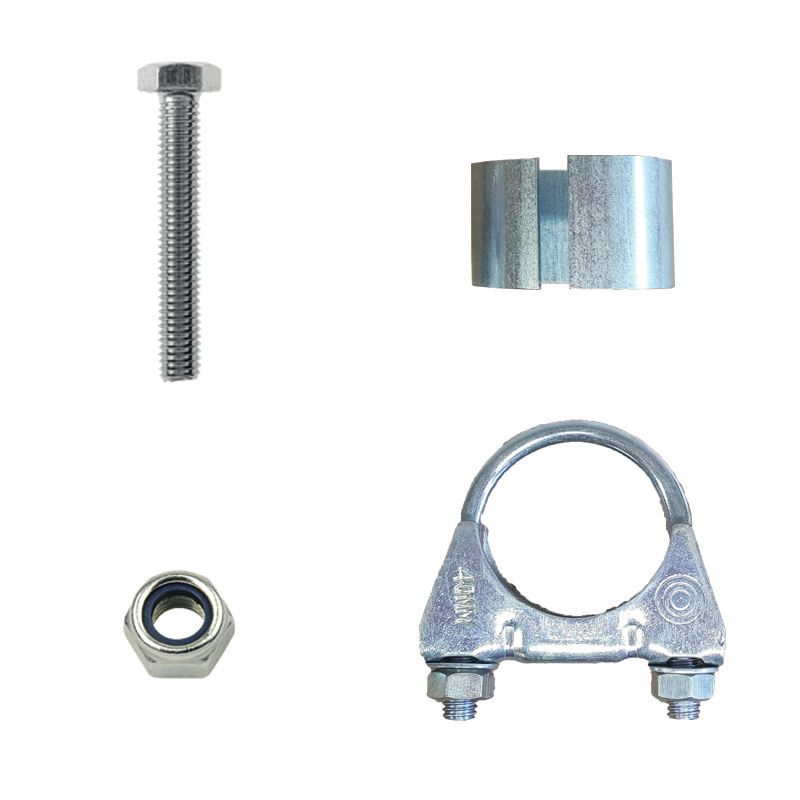
Ein-/Ausschalter auf                                             Sobald der Motor anspringt, den
Position Ein “ I “ stellen                                       Choke öffnen und den Motor ca.
                                                                 3 Minuten warmlaufen lassen.
Kraftstoffhahn öffnen                                            Während dieser Zeit sollte der
Chokeklappe schliessen                                           Benzinhahn zu Zusatzbehälter
                                                                 geschlossen sein, damit die Gas-
Gashebel auf Position Start “Hase“ stellen                       entwicklung unterbrochen ist.
Motor mit Rücklaufstarter starten

Für die Rauchentwicklung Benzinhahn zu Zusatztank öffnen.             Ein

Wichtig: Beim Betrieb im Standgas muss der Hahn für die Rauch-        Aus
entwicklung auf AUS gestellt werden.

Zur Sicherheit der Bedienungsperson muss beim Standortwech-           Aus
sel der Benzinhahn zu Zusatztank geschlossen werden. Dadurch
wird die Gasentwicklung unterbrochen.

Achtung! Motorabgase enthalten Kohlenmonoxid, ein geruchloses, tödliches Gift. Motor nicht
in geschlossenen Räumen oder abgeschlossenen Bereichen laufen lassen. Während des Verga-
sungsvorganges sind Kinder und Haustiere fernzuhalten, auch ist auf die Windrichtung zu achten.

4.3 Motor abstellen
Benzinhahn zu Zusatztank schliessen, 1 Minute warten                  Aus
Gashebel auf Position Standgas stellen
Ein-/Ausschalter auf Position Aus “O“ stellen
Kraftstoffhahn schliessen

5. Wartung
Motorenoel alle 5 Stunden kontrollieren!
Erster Oelwechsel nach 20 Std., nachher alle 100 Std. (0.6 l, SAE-15W40)
Luftfilter und Vorfilter bei Verschmutzung ersetzen (Honda 17210-ZE1-822)
Zündkerze bei Verschmutzung ersetzen (NGK BPR6ES)
Alle 50 Stunden Benzinfilter zu Zusatztank ersetzen (MU20028)
Für weitere Arbeiten am Motor siehe Betriebsanleitung von Honda
Reifendruck max. 1,5 bar
Gerät nie mit Druckwasser reinigen
Alle Muttern und Schrauben müssen festsitzen, dass das Gerät in sicherem Betriebszustand bleibt

6. Lagerung
Den Mäusevernichter niemals mit Benzin im Tank innerhalb eines Gebäudes aufbewahren, wo
Dämpfe eine offene Flamme oder Funken erreichen können. Den Motor abkühlen lassen, bevor er
in Gebäuden aufbewahrt wird. Wenn der Kraftstofftank entleert werden muss, sollte das im Freien
geschehen.

                                                                                                    9
7. Mäusebekämpfung mit MAUKI
 10 entscheidende Grundregeln bilden das Geheimnis des Erfolges.

 7.1 Mäusebau sondieren
 Mit dem Sondierstab den Mäusegang suchen und ein Loch von ca. 5 cm Durchmesser öffnen.
 ACHTUNG! Das Gerät darf nur im Freien eingesetzt werden! In geschlossenen Räumen besteht
 akute Vergiftungsgefahr durch Kohlenmonoxid!

 7.2 Maschinen-Einsatz
 Glocke aufsetzen und gut andrücken. Motor ca. 5 Minuten auf Vollgas drehen lassen.
 ACHTUNG! Benzinhan zu Zusatztank erst öffnen, wenn Glocke fest auf die Erde gedrückt ist!

 7.3 Kontrolle über die Rauchverteilung
 Genau kontrollieren, ob bei einem zusammenhängenden Bau alle Gänge mit Rauch gefüllt sind.
 (siehe aufsteigender Rauch, ev. mit Sondierstab kontrollieren) Das System verlangt zur Markierung
 des Rauches den Zusatz von 2 % Diesel. Der Zusatz von Diesel oder Oel hat keinen Einfluss auf die
 Wirkung des Gerätes! Dieses dient nur zur Markierung der Mäusegänge.
 ACHTUNG! Die Bedienungsperson muss immer gegen den Wind zur Glocke stehen! Es dürfen sich
 keine weiteren Personen, insbesondere Kinder oder Haustiere, in der Nähe aufhalten!

 7.4 Vorbereiten des nächsten Mäusebaues
 Während den 5 Minuten Laufzeit können Sie den nächsten Bau suchen und vorbereiten. Loch mit
 Sondierstab markieren. Bei sehr grossen Bauten (oft bis 50 Meter lang) empfehlen wir, die Glocke
 an 2 - 3 Orten anzusetzen.

 7.5 Standortwechsel
 Zur Sicherheit der Bedienungsperson muss beim Standortwechsel der Benzinhahn zu Zusatztank
 geschlossen werden. Dadurch wird die Rauchentwicklung unterbrochen. Die Glocke abheben, diese
 an die Maschine hängen und sofort das Loch mit dem Fuss zudrücken, damit der Rauch nicht ent-
 weichen kann. Die Maschine an den neuen Standort verschieben und Glocke auf das vorher vorbe-
 reitete Loch ansetzen und Zusatzhahn öffnen.

 7.6 Bautenvernichtung
 Gehen Sie an den vorgängig ausgeräucherten Bau zurück und treten Sie alle Mäusehaufen und Gän-
 ge zu. Damit verhindern Sie, dass zuwandernde Mäuse keine offenen Gänge finden und diese be-
 nützen können. Wenn sich eine Maus trotzdem einnistet, muss diese die Gänge frisch aufstossen.
 Diese sind dann gut erkennbar und bei einem 2. Durchgang neu auszuräuchern.

 7.7 Einteilung und Vorgang
 Immer grossflächig ausräuchern. Wenn möglich Ihren Nachbarn zum Mitmachen motivieren. Bei
 Hanglagen immer oben mit dem Ausräuchern beginnen. (Gase sind schwerer als Luft) Falls Wald-
 ränder oder Bachborde angrenzen, müssen Sie dort beginnen und Richtung offene Wiese arbeiten,
 denn die Mäuse halten dort oft einen Fluchtweg offen.

10
7.8 Nachkontrolle
Nach jedem Grasschnitt oder jeder Ernte auf Wiesen und Felder auf neue Mäusebauten achten. Be-
sonders Obst-, Reb- und Gemüse-Anlagen sind wegen Wurzelverbiss gefährdet.

7.9 Zeitpunkt der Bekämpfung
Grundsätzlich muss das ganze Jahr über bekämpft werden. Im Winterhalbjahr, soweit es die Schnee-
decke zulässt, haben Sie den besten Erfolg. Die Tiere sind dann geschwächt und Ihre Vermehrungs-
rate geringer. Damit man nicht plötzlich von einer hohen Mäusepopulation überrascht wird, ist eine
dauernde Überwachung der Wiesen, Felder, Obst- und Rebanlagen nötig. Achtung: Die Zuwande-
rung der Mäuse im Sommerhalbjahr ist gross.

7.10 Hinweis
Diese Mäusebekämpfung ist eine einfache und sichere Bekämpfungsmethode. Sie ist gefahrlos für
Pflanzen, Greifvögel, Katzen, Hunde, Füchse und andere Nützlinge. Durch den Sauerstoffmangel hö-
ren die Schädlinge auf zu atmen. Es ergibt sich dadurch keine Sekundärvergiftung. Trotz wirksamer
Bekämpfung mit MAUKI ist es ratsam, auch die natürlichen Feinde der Mäuse zu schützen. Ver-
zichten Sie auf den Einsatz von Gift! Die Natur und die Vogelwelt sind Ihnen dankbar. Wir wünschen
Ihnen viel Erfolg und würden uns freuen, wenn sie unseren MAUKI weiterempfehlen würden.

8. Betriebsstörungen
Störung			Mögliche Ursachen			Beseitigung		                             Bild
Motor läuft nicht		 Stoppschalter auf AUS		     Stoppschalter auf EIN		  1
				                Kein oder zu wenig Benzin		 Benzin auffüllen
				                Benzinhahn geschlossen		    Benzinhahn Motor öffnen  2
				Zu wenig Motoren-Oel		Motoren-Oel auffüllen

Raucht nicht			 Gemisch-Hahn auf AUS		 Gemisch-Hahn auf EIN		   3
				Gemisch-Kanister leer		Benzingemisch auffüllen              4
				            Düse verstopft			      Düse aus Schlauch ziehen 5
									und Düse ausblasen 		 6

Weitere Probleme		        Unbekannte Ursache		              Fachwerkstatt fragen

                                                                                                 11
9. Service - Stelle Für die Wartung, Ersatzteile oder andere Informationen wenden Sie sich bitte an Ihren MAUKI-Fach- händler oder an den Hersteller. Wenn Sie sich an Ihre Servicestelle oder ans Werk wenden, sollten Sie immer das Modell, die Serie-Nummer des Gerätes und die Motoren-Serie-Nummer angeben. Diese Nummern helfen dem Händler oder dem Herstellerwerk die entsprechenden Informationen für Ihr Produkt zu beschaffen. MAUKI Mäusevernichter, Modell GX200 Serie-Nr: ____________________________________ Kaufdatum:_____________________________________ Servicestelle: Hersteller: Brühwiler Maschinen AG, Hauptstrasse 1, CH-8362 Balterswil Tel.: 071 973 80 40 (0041 71 973 80 40) Fax.: 071 973 80 49 (0041 71 973 80 49) E-Mail: info@bruehwiler.com Web: www.mauki.ch 10. Garantiebedingungen Die Garantie ist unter Ausschluss aller weiteren Ansprüche auf kostenlosen Ersatz der Teile be- schränkt, welche innerhalb der Garantiezeit von 24 Monaten nachweislich infolge eines Material- und Bearbeitungsfehlers unbrauchbar geworden sind. Die Lieferung der Ersatzteile erfolgt so rasch wie möglich. Eine Verzögerung der Lieferung dieser Teile begründet weder Schadenersatzforderun- gen des Käufers noch eine Verlängerung der Garantiezeit. Die Montage- und Frachtkosten werden nicht vergütet. Von der Garantie ausgenommen sind Teile, die infolge unsachgemässer Reparatur- arbeiten oder natürlicher Abnutzung unbrauchbar geworden sind. Die Garantie erlischt, wenn das Gerät ausserhalb einer autorisierten Werkstätte repariert wird, keine Original-Ersatzteile verwendet werden oder die ausgehändigte Bedienungsanleitung nicht beachtet wurde. Im Übrigen gelten die Verkaufs- und Lieferbedingungen der Verkaufsstelle. 12
11.
EGEG  - Konformitätserklärung
    - Konformitätserklärung
(2006/42/EG, 2004/108/EG)

Der Hersteller:    Brühwiler Maschinen AG
                   Hauptstrasse 1
                   CH-8362 Balterswil

erklärt, dass die nachfolgende Maschine:

                   Bauart:      Mäusevernichter
                   Marke:       MAUKI
                   Modell:      GX200

mit den Bestimmungen der Maschinenrichtlinie 2006/42/EG, inklusiv deren
Änderungen, übereinstimmen. Das Erzeugnis ist in Übereinstimmung mit den
folgenden Normen entwickelt und gefertigt worden:

EN ISO 12100:2011-03            Sicherheit von Maschinen - Grundbegriffe,
                                allgemeine Gestaltungsleitsätze - Teil 1:
                                Grundsätzliche Terminologie, Methodologie (ISO
                                12100-1:2003); Deutsche Fassung EN ISO 12100-
                                1:2003

DIN EN ISO 13732-1:2008         Ergonomie der thermischen Umgebung -
                                Bewertungsverfahren für menschliche Reaktionen
                                bei Kontakt mit Oberflächen - Teil 1: Heiße
                                Oberflächen (ISO 13732-1:2006); Deutsche
                                Fassung EN ISO 13732-1:2008

DIN EN ISO 14982:2009           Land- und forstwirtschaftliche Maschinen –
                                Elektromagnetische Verträglichkeit - Prüfverfahren
                                und Bewertungskriterien

Bevollmächtigt die technischen Unterlagen zusammenzustellen ist:
Herr Beat Brühwiler, Anschrift siehe Hersteller

Ausgefertigt in:   Balterswil
Am:                01.03.2021
Unterzeichner:     Beat Brühwiler, Bereichsleiter

Unterschrift:

                                                                                     13
14
12. ErsatzteillisteMU23002. . . . . . . . . Flexibler Metallschlauch 1.10 m
MU23003. . . . . . . . . Schlauchbriede verzinkt
MU20009*. . . . . . . . Motor Honda GX200, leer, ohne Schalldämpfer
MU20009K*. . . . . . . Motor Honda GX200, kpl. mit Schalldämpfer u. Pumpe
MU23015. . . . . . . . . Betriebsstundenzähler
MU23017. . . . . . . . . Sondierstab verzinkt, inkl. Knopf
MU20118. . . . . . . . . Rad zu Schubkarre GX200
MU20218*. . . . . . . . Schlauch zu Schubkarrenrad GX200
MU23126. . . . . . . . . Benzinhahn Metall
MU20028. . . . . . . . . Benzinfilter
MU20029. . . . . . . . . Benzinschlauch, Ø 9mm / 330 mm (Schlauch im Tank)
MU20030. . . . . . . . . Benzinschlauch Ø 11.5mm / 1 Meter (Tankdeckel bis Motor)
MU23132. . . . . . . . . Benzindüse Messing
MU23033. . . . . . . . . Benzinpumpe
MU23035. . . . . . . . . Klemmbriede zu Benzinschlauch Metall Ø11mm
MU23045. . . . . . . . . Briede zu Benzinhahn 20x45mm verzinkt
MU20053. . . . . . . . . Dichtung zu Schalldämpfer Honda GX200
MU20055. . . . . . . . . Schalldämpfer zu Mod. GX 200 (nur im Austausch)
MU20056. . . . . . . . . Schalldämpferschutz GX200
MU20062. . . . . . . . . Stoppschalter zu Honda-Motor
MU20163. . . . . . . . . Benzinkanister 10 Liter GX200, ohne Deckel Ø 43mm
MU20065. . . . . . . . . Auspuffglocke GX200
MU20169. . . . . . . . . Kanisterdeckel Ø 43mm zu Benzinkanister 20163 inkl. Krümmer
MU20170. . . . . . . . . Tankschlauchset (inkl. Filter 20028, Schlauch 20029, Deckel 20169)
MU20071. . . . . . . . . Klemmring verzinkt, zu Schalldämpfer
MU20417. . . . . . . . . Handrohr rechts mit Gummigriff
MU20418. . . . . . . . . Handrohr links mit Gummigriff
Serviceteile:
MU20001. . . . . . . . . Luftfilter Honda 17210-ZE1-505
MU20002. . . . . . . . . Zündkerze NGK BPR6ES
SAE15W40*. . . . . . . Motorenoel
*Ist auf dem Ersatzteilbild nicht abgebildet
15INDEX OF CONTENTS
MAUKI Rodent Destroyer - GX 200
1. Introduction��������������������������������������������������������������������������������������������������������������������������������������������17
1.1 Operation����������������������������������������������������������������������������������������������������������������������������������������17
1.2 Construction ����������������������������������������������������������������������������������������������������������������������������������17
1.3 Field of Application������������������������������������������������������������������������������������������������������������������������17
2. Safety������������������������������������������������������������������������������������������������������������������������������������������������������18
2.1 Exhaust Gases��������������������������������������������������������������������������������������������������������������������������������18
2.2 Burns Hazard����������������������������������������������������������������������������������������������������������������������������������18
2.3 Noise Emissions����������������������������������������������������������������������������������������������������������������������������18
2.4 Fuel��������������������������������������������������������������������������������������������������������������������������������������������������18
2.5 General��������������������������������������������������������������������������������������������������������������������������������������������18
3. Technical Data ��������������������������������������������������������������������������������������������������������������������������������������19
4. Starting Up ��������������������������������������������������������������������������������������������������������������������������������������������19
4.1 Preparation ������������������������������������������������������������������������������������������������������������������������������������19
4.2 Starting the engine (see also operator manual engine)������������������������������������������������������������19
4.3 Switching off engine����������������������������������������������������������������������������������������������������������������������20
5. Maintenance������������������������������������������������������������������������������������������������������������������������������������������20
6. Storage ��������������������������������������������������������������������������������������������������������������������������������������������������20
7. Rodent Control with MAUKI ����������������������������������������������������������������������������������������������������������������21
7.1 Searching Out the Rodent Run������������������������������������������������������������������������������������������������������21
7.2 Using the Machine ������������������������������������������������������������������������������������������������������������������������21
7.3 Monitoring Gas Distribution����������������������������������������������������������������������������������������������������������21
7.4 Preparing the next Rodent Run����������������������������������������������������������������������������������������������������21
7.5 Change of Location������������������������������������������������������������������������������������������������������������������������21
7.6 Destroying the Runs����������������������������������������������������������������������������������������������������������������������21
7.7 Classification and Procedure��������������������������������������������������������������������������������������������������������21
7.8 Follow-Up Checks��������������������������������������������������������������������������������������������������������������������������22
7.9 Time to Apply Controls������������������������������������������������������������������������������������������������������������������22
7.10 Note ����������������������������������������������������������������������������������������������������������������������������������������������22
8. Troubleshooting������������������������������������������������������������������������������������������������������������������������������������22
9. Service Point������������������������������������������������������������������������������������������������������������������������������������������23
10. Warranty Conditions ��������������������������������������������������������������������������������������������������������������������������23
11. Spare parts������������������������������������������������������������������������������������������������������������������������������������������24
12. EC - Declaration of Conformity ��������������������������������������������������������������������������������������������������������26
GB
16
This manual is protected by copyright. All rights are reserved, especially the right of reproduction,
translation and processing with electronic systems.1. Introduction
Thank you for choosing a MAUKI Rodent Destroyer. As product manufacturers, we hope that you are
completely satisfied with your new unit.
IMPORTANT: To enable you to operate and maintain your equipment correctly, you are advised to
read this Instruction Manual through carefully. The Manual will help you to prevent injuries and
damage.
1.1 Operation
Using a fuel pump, a mixture of petrol and diesel is suctioned off, injected into the special muffler
in precisely metered quantities and allowed to vaporize. The resulting fumes are channelled into a
system of ducts via a flexible metal pipe and dome-shaped cover. The high pressure of the industrial
engine brings about a rapid distribution of the fumes and the existing oxygen is squeezed out of the
duct system. The pests have no chance to escape. Within seconds their airways are paralyzed. This
leads to a rapid and painless death. If a stunned or dead rodent is eaten by a cat or a bird of prey,
there is no risk of secondary poisoning.
1.2 Construction
The robust and easy-to-handle barrow is galvanized and fitted with a dome-shaped fume cover as
well as a probing rod. The heavy duty 5.5 hp Honda engine is in line with the latest technology, has
a long service life and is easy to maintain. For operator safety, it is possible for the fumigator unit to
be switched off during relocation to another site.
1.3 Field of Application
The purpose of the MAUKI Rodent Destroyer is solely and specifically to combat rodents (arvicoli-
nae) in their burrows. Please note the following restrictions as regards the use of this equipment:
1. The device may only be used out of doors. Usage in enclosed spaces incorporates an acute risk
of poisoning due to carbon monoxide.
2. Moles are protected and infestations may only be controlled if an exception permit is obtained
from the responsible local authority (District Office).
3. Under Animal Welfare Legislation a permit is necessary for the commercial control of vertebrates
as pests. However, the control of vertebrates as pests by private individuals is not subject to permit.
4. Usage in water conservation areas and drinking water protection zones I and II as well as areas
featuring potable water pipes made from plastic within a range of 100m is not permitted.
5. The use of the device for purposes of plant protection in areas under cultivation (fields, greenhou-
ses, woodland etc.) is not permitted.
6. Sole responsibility for the proper use of the equipment and compliance with the restrictions on
use lies with the user.
7. Before buying or using it for the first time, ask your responsible authority (district office) for a
permit.
172. Safety Read the entire Instruction Manual carefully before starting up the machine for the first time. Failure to observe the following safety instructions may have fatal consequences. 2.1 Exhaust Gases The device may only be used out of doors. Usage in enclosed spaces incorporates an acute risk of carbon monoxide poiso- ning. Only open the fuel tap to the auxiliary tank once the dome-sha- ped cover is firmly positioned on the ground. The operator must always work against the wind in order to avoid inhaling any fu- mes. Close the fuel tap to the auxiliary tank when relocating. 2.2 Burns Hazard Maintain an adequate distance from the exhaust system and flexible metal pipe. This gets hot! 2.3 Noise Emissions The operator must wear hearing protection and observe the lo- cal noise regulations. The sound pressure level is 87 dB(A). 2.4 Fuel Switch off the before refuelling. No smoking. Keep away from naked flames. Avoid fuel spillage. Do not allow any fuel to come into contact with clothing. If this happens, change your clothes – danger to life! 2.5 General You yourself are responsible for the correct and safe usage of the device. It is also your responsibili- ty to ensure that any persons you allow to operate the Rodent Destroyer are given proper instruction. Never allow the Rodent Destroyer to be operated by children or people who are not familiar with the instructions for the use of the equipment. Remember that the owner is responsible for all accidents and/or damage that may affect other per- sons or their property. This device may only be used for its designated purpose (see. Section 1.3 Area of Application). Failure to comply will render any warranty claim or liability on the part of the manufacturer null and void. No liability will be accepted for damage which is caused by failure to observe the provisions of this Manual. 18
3. Technical Data
Manufacturer:   Brühwiler Maschinen AG, Hauptstrasse 1, CH-8362 Balterswil
			             Tel.: 		       071 973 80 40 (0041 71 973 80 40)
			             Fax.: 		       071 973 80 49 (0041 71 973 80 49)
			E-Mail:                     info@bruehwiler.com
			Web: 		www.mauki.ch
Designation:		  MAUKI Rodent Destroyer GX 200
Dimensions:		   Height 64 cm, Width 59 cm, Length 126 cm
Weight:		       approx. 37 kg (without fuel)
Engine:		       Honda GX 200T
			             Cubic capacity 196 cm3
			             Output net 4.1 kW / 5.5 PS
Sound level:		  3400 U/min: 87dB(A)
			2200 U/min: 78dB(A)
Fuel:			        Engine: Unleaded petrol (no oil)
			             Auxiliary tank: Unleaded petrol with 2% diesel (2dl diesel for every 10l of petrol)
Chassis:		      Hot-dip galvanized barrow with rubber wheel
Auxiliary tank: 10 litre for petrol/diesel mixture (2dl diesel for every 10l of petrol)
Accessories:		  Inclusive of probe rod and Operating Instructions
Warranty:		     2 years

4. Starting Up
4.1 Preparation
Re-fuelling. Note: Petrol is highly flammable and highly explosive. Fire and explosions can cause
burns and/or damage to property. Fuel must only be stored in containers that have been specifically
designed for this purpose. Keep out of the reach of children. Only re-fuel the equipment out of doors
and do not smoke while re-fuelling. Use a funnel to top up. Top up fuel levels prior to starting the
engine. Never remove the filler cap or top up with petrol while the engine is running or if the engine
is hot. Do not fill the fuel tank to the brim. Only top up the tank with the amount of petrol required to
keep the fluid level 10mm below the bottom of the filler neck. Leaving sufficient space in the tank
will allow the fuel to expand. In the event of a petrol spillage do not attempt to start the engine, in-
stead push the device clear of the spilled fuel and avoid any open flames until the fumes from the
fuel have vaporized.
Fuel:			 Engine		         Unleaded petrol (no oil)
			      Auxiliary tank		 Max. 10 litres petrol – diesel mix
						                    Mixing ratio: 2% diesel
						                    (2 dl diesel to every 10l petrol)
			Information		          The diesel will not affect the operation of the
						                    equipment; it serves only as a marker to indicate
						the presence of fumes.

4.2 Starting the engine (see also operator manual engine)
Do not allow the engine to run in confined spaces where there is a risk of hazardous carbon mon-
oxide fumes accumulating.

                                                                                                        19
Set On/Off switch As soon as the engine starts to
to On position “ I “ turn over, open the choke and
give the engine approx. 3 minu-
Open fuel tap tes to warm up. During this time
Close choke the fuel tap to the auxiliary tank
should be closed so as to inhibit
Set throttle control to Start position the development of the gas.
(„Hare“) Start engine using recoil starter
To enable the fumes to develop, open petrol tap to auxiliary tank. Ein
Important: When operating in idling mixture, the tap for the Aus
fumes development function must be set to OFF.
To ensure operator safety, the petrol tap to the auxiliary Aus
tank must be closed if the unit is moved to another location.
This will ensure that the development of the gas is inhibited.
Note: Engine exhaust fumes contain carbon monoxide, an odour-free, lethal poison. Do not allow
engine to run in confined spaces or enclosed areas. During the gassing process, keep children and
pets away; note wind direction.
4.3 Switching off engine
Close fuel tap to auxiliary tank, wait 1 minute Aus
Set throttle control to idling mixture
Set On/Off switch to Off position “O“
Close fuel tap
5. Maintenance
Check engine oil every 5 hours
First oil change after 20 hrs, after that every 100 hrs (0.6 l, SAE-15W40)
Replace air filter and prefilter if dirty (Honda 17210-ZE1-822)
Replace spark plug if dirty (NGK BPR6ES)
Replace petrol filter to auxiliary tank every 50 hours (MU20028)
For further works on the engine see Honda Operator Manual
Tyre pressure max. 1.5 bar
Never use water under pressure to clean the device
All nuts and bolts must be firmly seated to ensure that the device is maintained in a
safe operating condition
6. Storage
Never store the Rodent Destroyer with petrol in the tank inside a building where fumes may come
into contact with a naked flame or sparks. Allow the engine to cool before storage inside buildings.
If the fuel tank has to be drained, this operation should be carried out in the open air.
207. Rodent Control with MAUKI
There are 10 key principles that constitute the secret to success.
7.1 Searching Out the Rodent Run
Search out the rodent run with the probe and open up a hole approx. 5cm in diameter. NOTE: The
device may only be used in the open air. Using it in enclosed spaces incorporates an acute risk of
carbon monoxide poisoning.
7.2 Using the Machine
Attach the dome-shaped cover and press down securely. Allow the engine to run at full throttle for
approx. 5 minutes. NOTE: Only open the petrol tap once the dome-shaped cover is firmly pressed
down on to the ground.
7.3 Monitoring Gas Distribution
If there is an adjacent run, carry out a precise check on whether all the passageways are filled with
fumes (check for rising fumes, it may be necessary to check with the probe). For purposes of iden-
tifying exactly where the fumes are, the system requires the addition of 2% diesel. The addition of
diesel or oil has no effect on the action of the device. This serves only to mark out the rodent runs.
NOTE: The operator must always stand upwind of the dome-shaped cover. There must be no other
persons – especially children or pets – in the vicinity.
7.4 Preparing the next Rodent Run
During the 5 minute running time you can search out the next run and make the necessary preparations.
Use the probe rod to mark the hole. If very large runs are involved (often up to 50 metres in length) we
recommend placing the dome-shaped cover at 2 – 3 locations.
7.5 Change of Location
In the interests of operator safety, it is essential that, in the event of a change of location,that the
petrol tap to the auxiliary tank is closed. This will ensure that fume development is impeded. Lift the
dome-shaped cover, hang it on the machine and close the hole immediately with the foot so that the
fumes cannot escape. Move the machine to the new location and place the dome-shaped cover over
the previously prepared hole and open auxiliary tap.
7.6 Destroying the Runs
Go back to the previously fumigated run and tread on all mounds and passageways constructed by
the rodents to close. By so doing you will ensure that any migrating rodents are unable to find any
open passageways that they can use. If a rodent happens to become entrenched despite this, it will
need to push up fresh earth to create new passageways. In the event, these will be readily identifia-
ble and a second attempt made at refumigation.
7.7 Classification and Procedure
Always fumigate over a wide area. If possible, encourage your neighbours to join in. On hillside loca-
tions always commence fumigation from the top (gases are heavier than air). Where there are stret-
ches of woodland or banks of streams adjacent, then you should start here and work in the direction
of open meadow land because this is where the rodents will often keep an escape route open.
217.8 Follow-Up Checks
Be alert to the possibility of new runs being constructed on meadow-land and fields after each grass
cutting operation or harvest. Orchards, vineyards and vegetable plots are particularly at risk from
browsing or nibbling at the roots.
7.9 Time to Apply Controls
As a matter of principle, controls should be applied all year round. It is in the winter months, snow
covering permitting, that you will find you obtain the best results. The animals are then weakened
and their rate of reproduction is lower. In order to avoid being suddenly swamped by a high rodent
population, it is essential to ensure that the meadows, fields, orchards and vineyards are constantly
monitored. Note: Remember that large numbers of rodents tend to migrate during the summer
months.
7.10 Note
Rodent control is a straightforward and reliable method of control. It is safe for plants, birds of prey,
cats, dogs, foxes and other beneficial organisms. The pests cease breathing due to the lack of oxy-
gen. No secondary poisoning can occur. Even though you may be operating effective controls with
MAUKI it is advisable to take care at the same time to protect the natural enemies of the rodents.
Not using poisons will earn you the gratitude of the birds as well as the birds. We wish you every
success and would appreciate your recommending MAUKI to your friends.
8. Troubleshooting
Faults Possible Reasons Elimination Fig.
Engine not running Stop switch set to OFF Set stop switch to ON 1
No fuel / too little fuel Top up fuel
Fuel tap closed Open the engine fuel tap 2
Too little engine oil Top up with engine oil
No fume production Mixer tap set to OFF Set mixer tap to ON 3
Mix canister empty Top up with fuel mixture 4
Nozzle clogged Pull nozzle out of pipe and 5
blow out nozzle to clear 6
Other problems Cause unknown Bring in to specialist workshop
Fig. 1 Fig. 2 Fig. 3
Fig. 4 Fig. 5 Fig. 6
229. Service Point
For maintenance and service, spares or other information please contact your specialist MAUKI
dealer or the manufacturer. If you contact your service point or the factory itself, you should always
quote the model, the serial number of the item of equipment and the engine serial number. These
numbers will help the dealer or the manufacturer to obtain the corresponding information for your
product.
MAUKI Rodent Destroyer, Modell GX200
Serial No: ________________________________ Purchase date:____________________________________
Service Point:
Manufacturer: Brühwiler Maschinen AG, Hauptstrasse 1, CH-8362 Balterswil
Tel.: 071 973 80 40 (0041 71 973 80 40)
Fax.: 071 973 80 49 (0041 71 973 80 49)
E-Mail: info@bruehwiler.com
Web: www.mauki.ch
10. Warranty Conditions
The warranty is limited, to the exclusion of all other claims, to free-of-charge replacement of any
parts which have become unusable within the warranty period of 24 months as a result of a mate-
rial and/or machining fault. The spare parts will be supplied as quickly as possible. Any delay in the
delivery of these parts shall not entitle the purchaser to any compensation for damages or to any ex-
tension of the warranty period. Installation and freight costs will not be reimbursed. Excluded from
the warranty are any parts which have become unserviceable as a result of incorrect repair works or
natural wear and tear. The warranty shall be void if the device is repaired outside an authorised work-
shop, in the event of failure to use original spares or to comply with the Instruction Manual issued.
In all other respects the Sales and Delivery Conditions of the retail outlet shall apply.
2324
11. Spare partsMU23002. . . . . . . . . Flexible metal hose 1.10 m
MU23003. . . . . . . . . Hose clamp, galvanized
MU20009*. . . . . . . . Engine Honda GX200, basic unit, excl. muffler
MU20009K*. . . . . . . Engine Honda GX200, complete with muffler and pump
MU23015. . . . . . . . . Operating hours meter
MU23017. . . . . . . . . Probe rod, galvanized, incl. knob
MU20118. . . . . . . . . Wheel for barrow GX200
MU20218*. . . . . . . . Hose for barrow GX200
MU23126. . . . . . . . . Fuel tap, metal
MU20028. . . . . . . . . Fuel filter
MU20029. . . . . . . . . Fuel pipe, dia. 9mm / 330 mm (pipe in tank)
MU20030. . . . . . . . . Fuel pipe, dia.11.5mm / 1 metre (tank cover as far as engine)
MU23132. . . . . . . . . Fuel nozzle, brass
MU23033. . . . . . . . . Fuel pump
MU23035. . . . . . . . . Clamp for gasoline hose metal Ø11mm
MU23045. . . . . . . . . Clamp for fuel tap 20x45mm galvanized
MU20053. . . . . . . . . Seal for muffler Honda GX200
MU20055. . . . . . . . . Muffler for model GX 200 (replacement only)
MU20056. . . . . . . . . Muffler cover GX200
MU20062. . . . . . . . . Stop switch to Honda engine
MU20163. . . . . . . . . Petrol can 10 litre GX200, excl. lid dia. 43mm
MU20065. . . . . . . . . Dome-shaped fumigator cover GX200
MU20169. . . . . . . . . Can lid, dia. 43mm, for petrol can 20163 incl. elbow
MU20170. . . . . . . . . Set of hoses for tank (incl. filter 20028, hose 20029, lid 20169)
MU20071. . . . . . . . . Clamping ring, galvanized, to muffler
MU20417. . . . . . . . . Right hand tube with rubber grip
MU20418. . . . . . . . . Left hand tube with rubber grip
Service parts:
MU20001. . . . . . . . . Air filter Honda 17210-ZE1-505
MU20002. . . . . . . . . Spark plug NGK BPR6ES
SAE15W40*. . . . . . . Engine oil
*not shown on spare parts picture
2512.
ECEC - Declarationof
Declaration of Conformity
Conformity
(2006/42/EC, 2004/108/EC)
The Manufacturer: Brühwiler Maschinen AG
Hauptstrasse 1
CH-8362 Balterswil
hereby declares that the following machine
Design: Rodent Destroyer
Brand name: MAUKI
Model: GX200
complies with the provisions of the Machinery Directive 2006/42/EC, including any
amendments thereto. The product has been developed and manufactured in
compliance with the following standards:
EN ISO 12100:2011 Safety of Machinery – Basic Concepts, General
Principles for Design: Basic Terminology,
Methodology (ISO 12100-1:2003); German version
EN ISO 12100-1:2003
DIN EN ISO 13732-1:2008 Ergonomics of the Thermal Environment – Methods
for the assessment of human responses to contact
with surfaces - Part 1: Hot surfaces (ISO 13732-
1:2006); German version EN ISO 13732-1:2008
DIN EN ISO 14982:2009 Agricultural and Forestry Machinery –
Electromagnetic compatibility – Test methods and
assessment criteria
Person authorized to compile the technical documentation:
Mr. Beat Brühwiler, for address see manufacturer
Issued in: Balterswil
on: 01.03.2021
Signatory: Beat Brühwiler, Divisional Director
signed:
26TABLE DES MATIÈRES
MAUKI Destructeur de mulots - GX 200
1. Introduction��������������������������������������������������������������������������������������������������������������������������������������������28
1.1 Mode de fonctionnement��������������������������������������������������������������������������������������������������������������28
1.2 Conception constructive ��������������������������������������������������������������������������������������������������������������28
1.3 Utilisation de la gamme����������������������������������������������������������������������������������������������������������������28
2. Sécurité��������������������������������������������������������������������������������������������������������������������������������������������������29
2.1 Gaz d‘échappement ����������������������������������������������������������������������������������������������������������������������29
2.2 Risque de brûles����������������������������������������������������������������������������������������������������������������������������29
2.3 Emissions de bruit ������������������������������������������������������������������������������������������������������������������������29
2.4 Carburant����������������������������������������������������������������������������������������������������������������������������������������29
2.5 Généralités��������������������������������������������������������������������������������������������������������������������������������������29
3. Caractéristiques techniques����������������������������������������������������������������������������������������������������������������30
4. Mise en service��������������������������������������������������������������������������������������������������������������������������������������30
4.1 Préparation ������������������������������������������������������������������������������������������������������������������������������������30
4.2 Démarrage du moteur (Voir également mode d‘emploi du moteur)����������������������������������������30
4.3 Arrêt du moteur������������������������������������������������������������������������������������������������������������������������������31
5. Entretien ������������������������������������������������������������������������������������������������������������������������������������������������31
6. Entreposage ������������������������������������������������������������������������������������������������������������������������������������������31
7. Lutte contre les mulots avec MAUKI��������������������������������������������������������������������������������������������������32
7.1 Sonder les galeries des mulots����������������������������������������������������������������������������������������������������32
7.2 Utilisation de la machine��������������������������������������������������������������������������������������������������������������32
7.3 Contrôle par la distribution de fumée������������������������������������������������������������������������������������������32
7.4 Préparation de la prochaine galerie de mulots��������������������������������������������������������������������������32
7.5 Changement de lieu ����������������������������������������������������������������������������������������������������������������������32
7.6 Destruction des galeries���������������������������������������������������������������������������������������������������������������32
7.7 Classification et procédure ����������������������������������������������������������������������������������������������������������32
7.8 Contrôle ultérieur����������������������������������������������������������������������������������������������������������������������������33
7.9 Moment de la lutte ������������������������������������������������������������������������������������������������������������������������33
7.10 Avis������������������������������������������������������������������������������������������������������������������������������������������������33
8. Dysfonctionnement������������������������������������������������������������������������������������������������������������������������������33
9. Pièces de rechange������������������������������������������������������������������������������������������������������������������������������34
10. Conditions de garantie ����������������������������������������������������������������������������������������������������������������������34
11. EG - Déclaration de conformité��������������������������������������������������������������������������������������������������������35
12. Liste des pièces rechanger����������������������������������������������������������������������������������������������������������������36
La présente mode d‘emploi est protégée par des droits d‘auteur. Tous droits réservés, en particulier
tout droit de copie, de traduction et de traitement avec des systèmes électroniques quelconques.
FR 27Sie können auch lesen